
.jpg.953a04d9d17d856054582e9d4981343a.jpg)

SeniorSpaz87
-
Posts
1,786 -
Joined
-
Last visited
-
Days Won
20 -
Feedback
0%
Content Type
Profiles
Forums
Buy a Patch
Classifieds
Posts posted by SeniorSpaz87
-
-
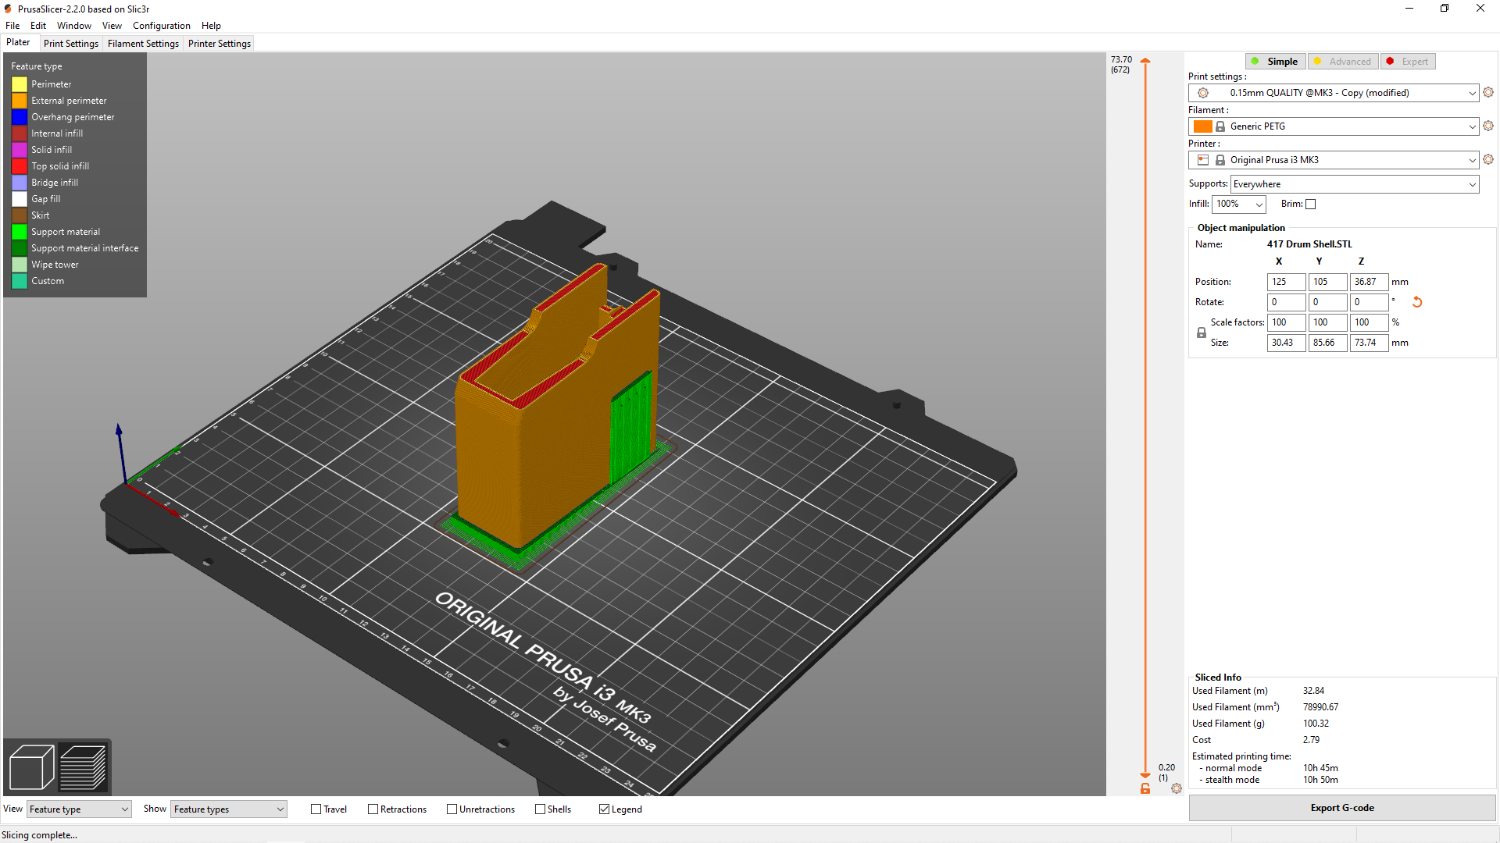
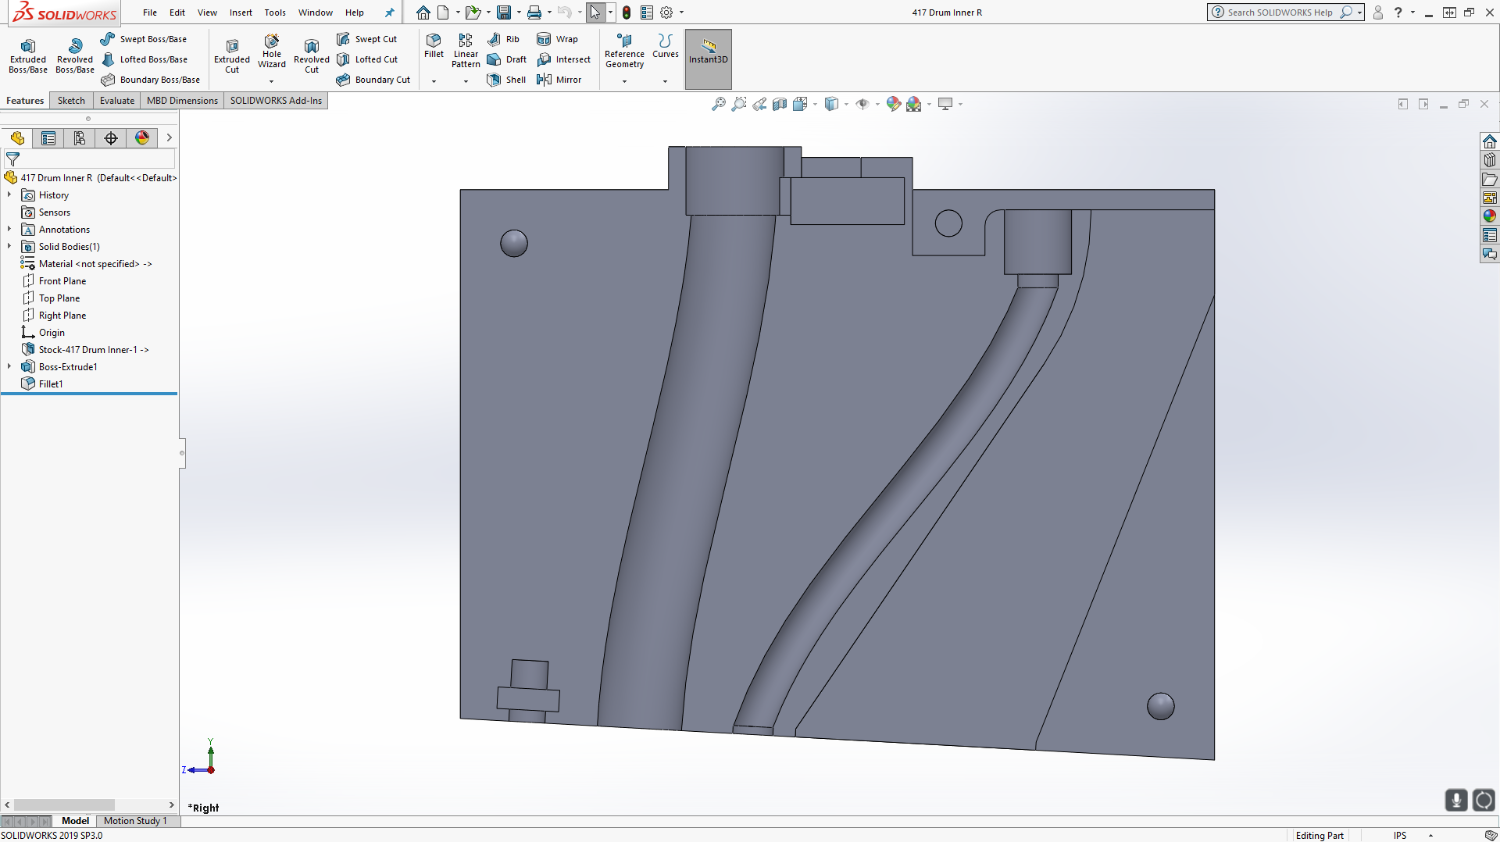
Several test prints later, and a few changes were made. The screw hole has been enlarged for the bolt to pass clean through the base, and halfway into the shell. This makes it flush inside the assembly and actually serves as a pin between all 4 parts. I have also decreased the outer sides of the Inner parts by .02" all around (.5mm), as it would require a pneumatic press to actually get the two inner halves into the shell. Just the cm or so I shoved them together to test the fitment took a hammer to remove. So far I have 2 of the latest bases done, a possible "production" print of the shell done (I have three options to print it:
First, I can do it with the top horizontal, and support material as a wedge. This is what I did for the shell I have printed. It worked, but did have some errors along the base and had to be sanded flat. Testing with the inner parts after theyre done will determine if this is a problem. Its also the longest print - at 80% speed it takes a whopping 14 hours:

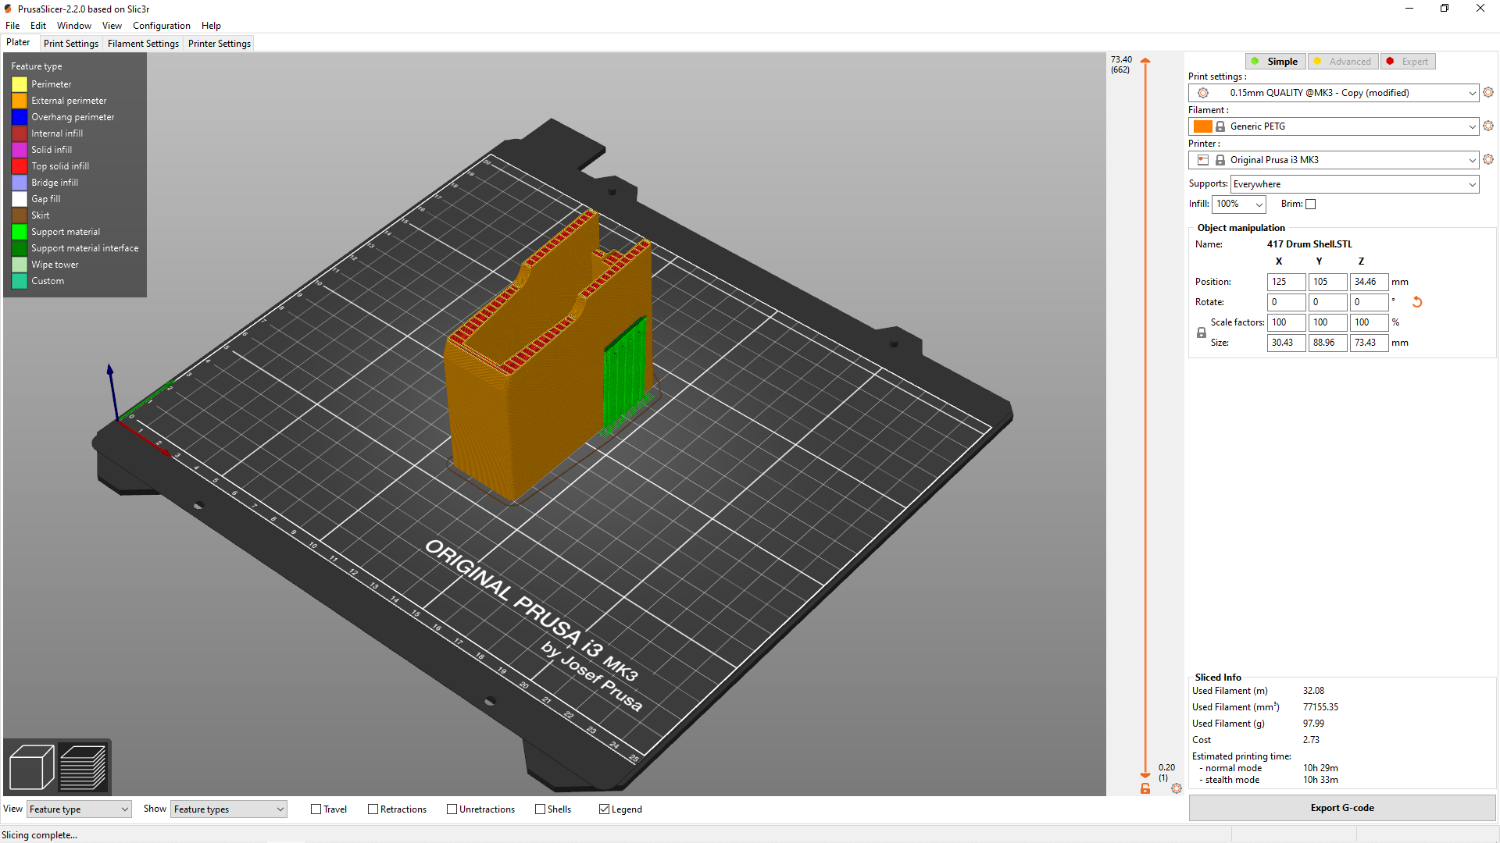
Second is to print it with no supports at the bottom, leaving the top as a slant. This has the plus of ensuring a flat base, but gives a layered top:
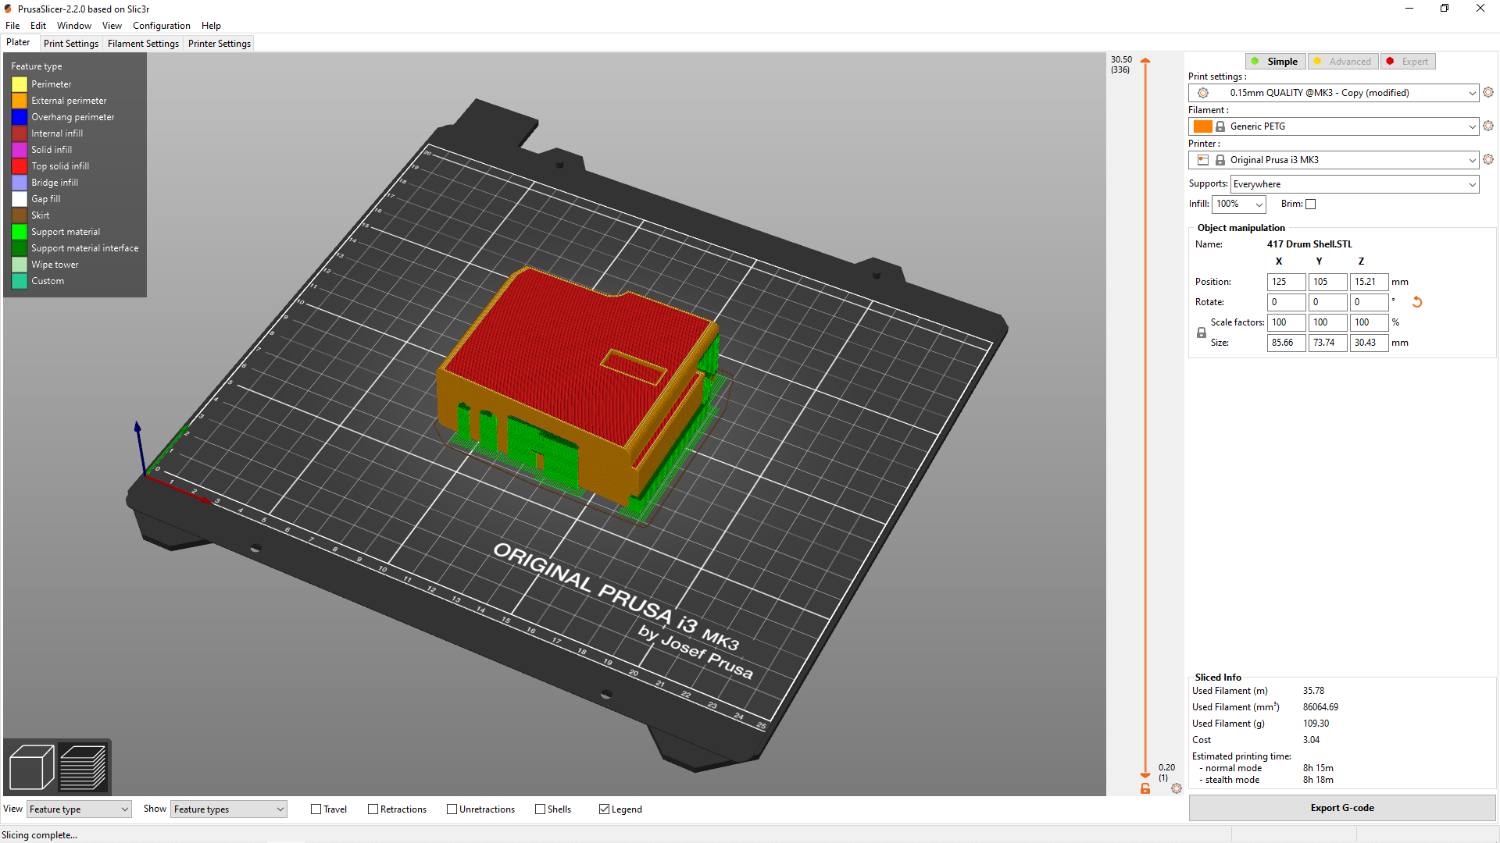
Third is to print on its side. This is the fastest method at only 8 hours and change at 100% (approx 12 hours at 80%), but does use the most material and cost the most. To be fair its about 3 Euros per shell vs the 2.70 Euros or so if printed in either vertical orientation, so not exactly an important difference. Cleaning all that support material out is gonna be a PITA though, and itll leave the face-down side a different texture due to my textured print bed.
), and I am working on printing the two inner halves now. Heres what it looks like mostly assembled, still missing the two inner halves:
-
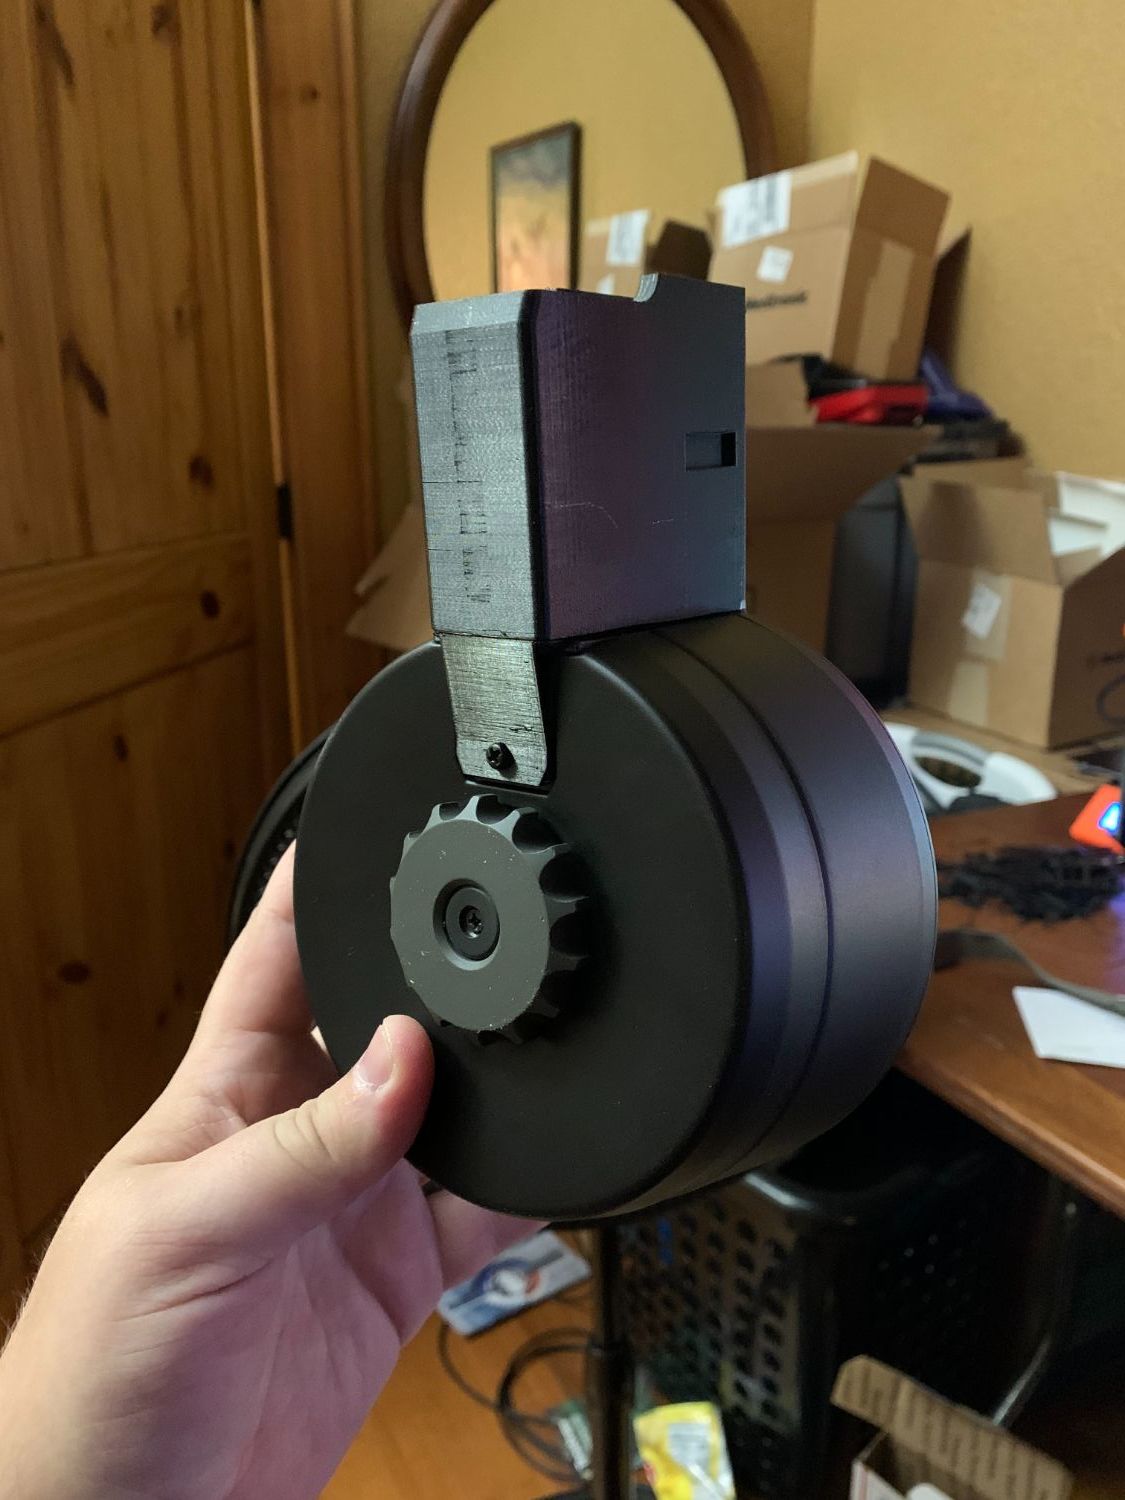
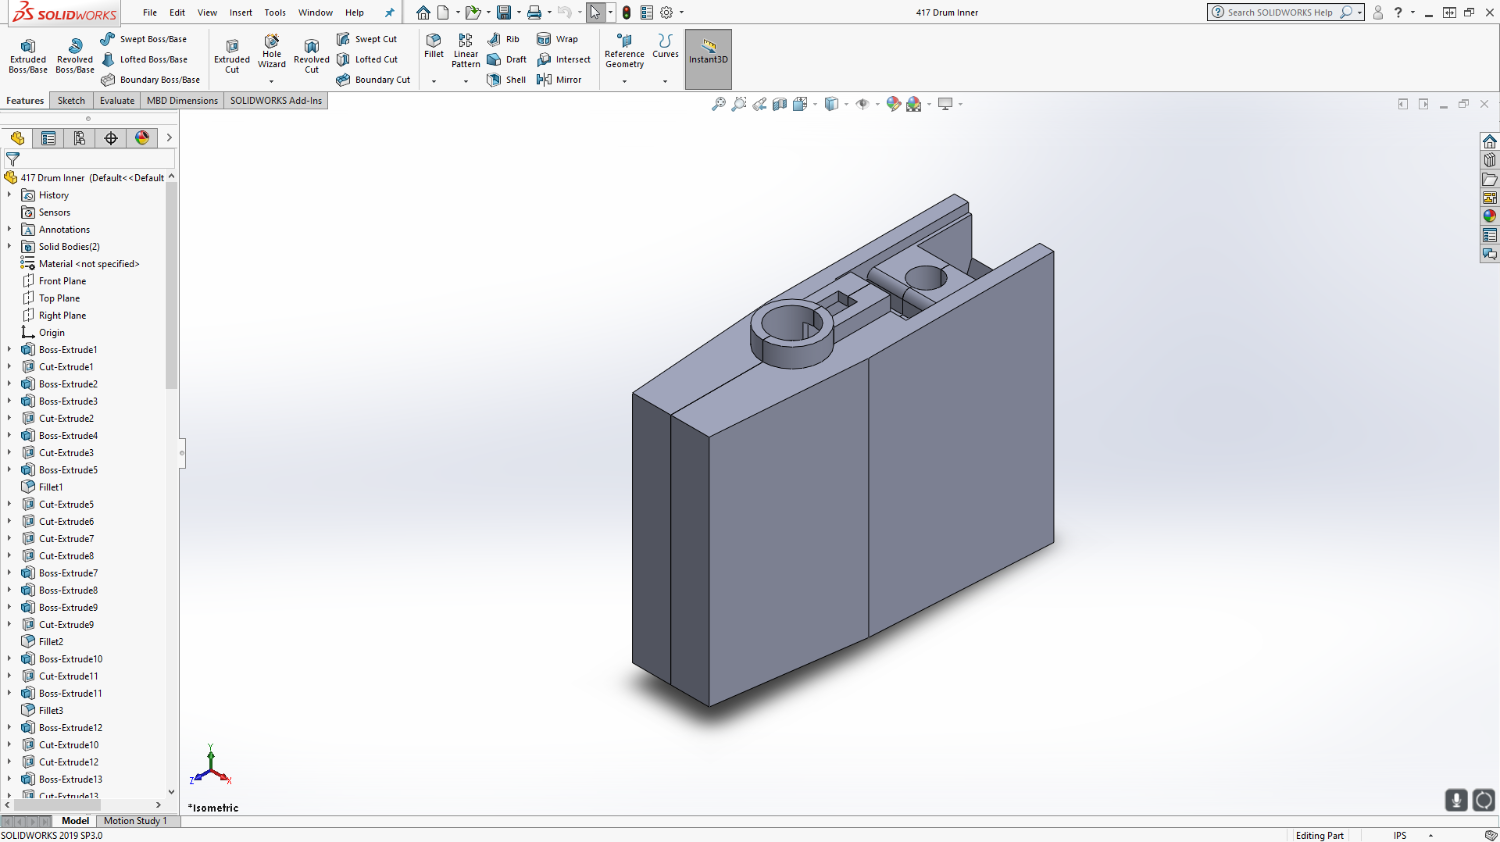
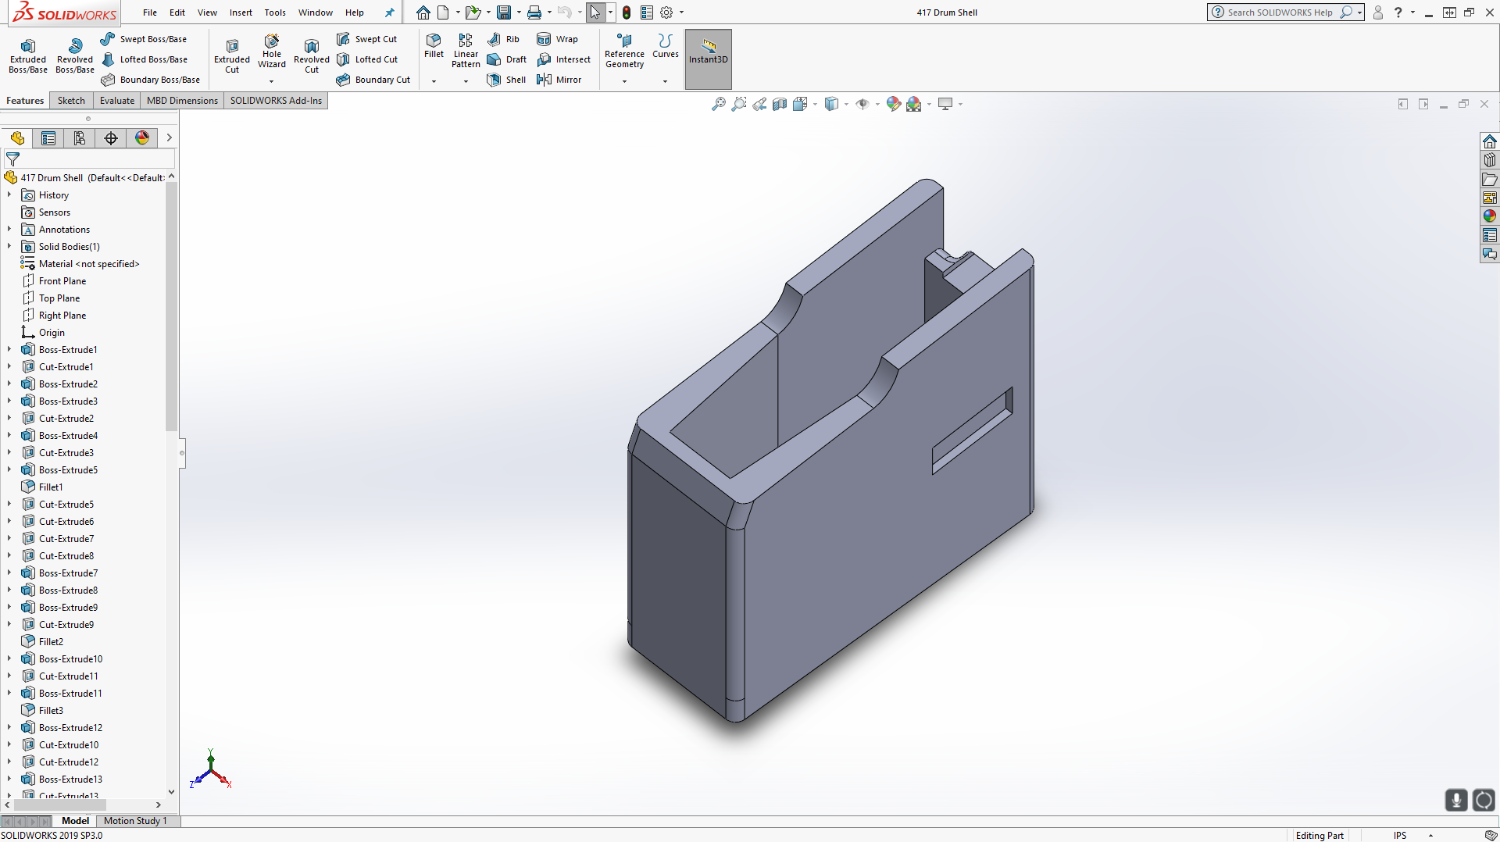
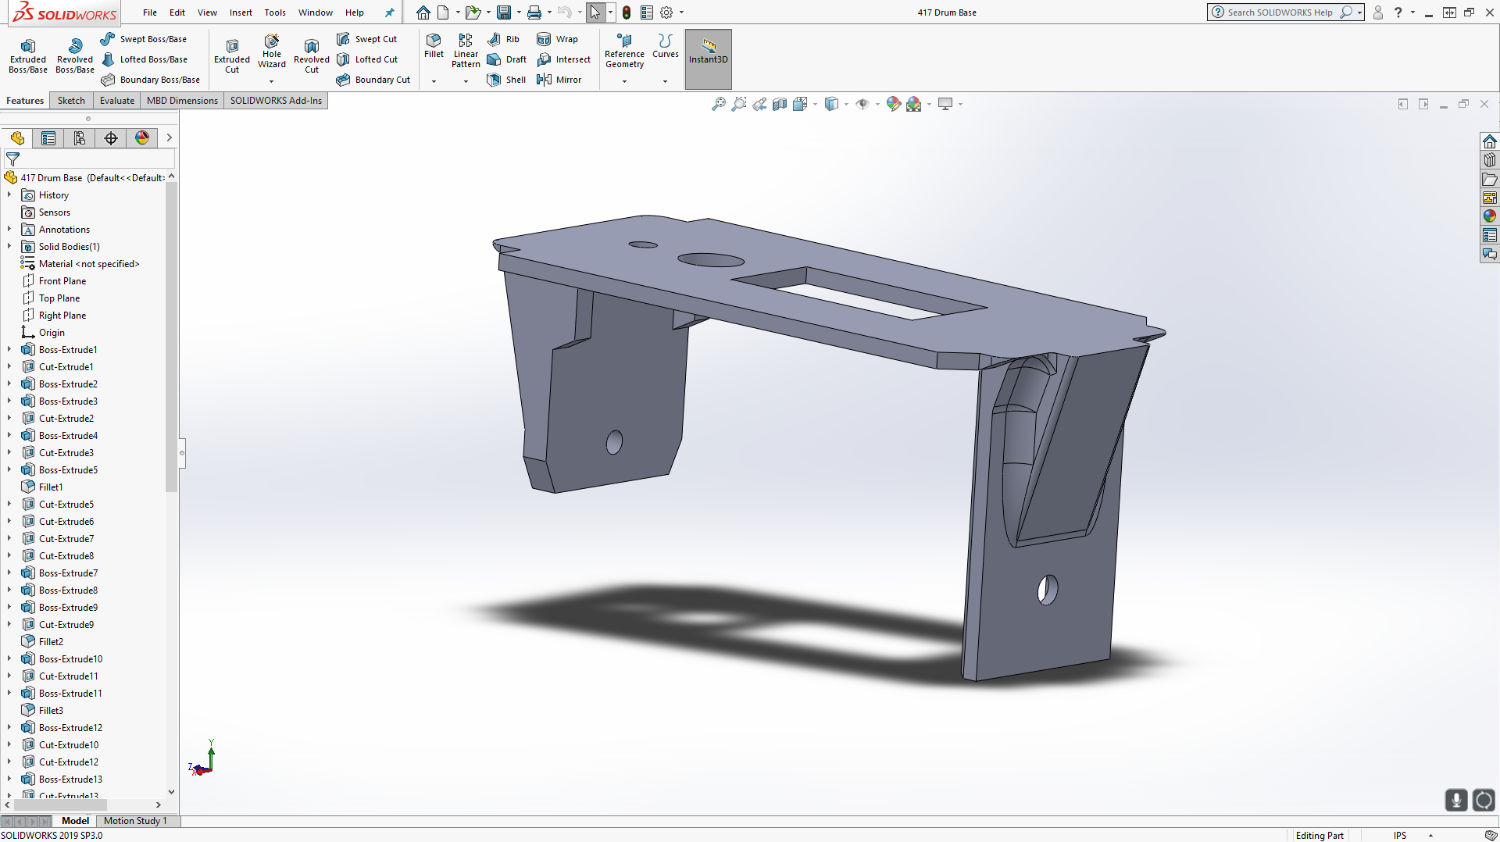
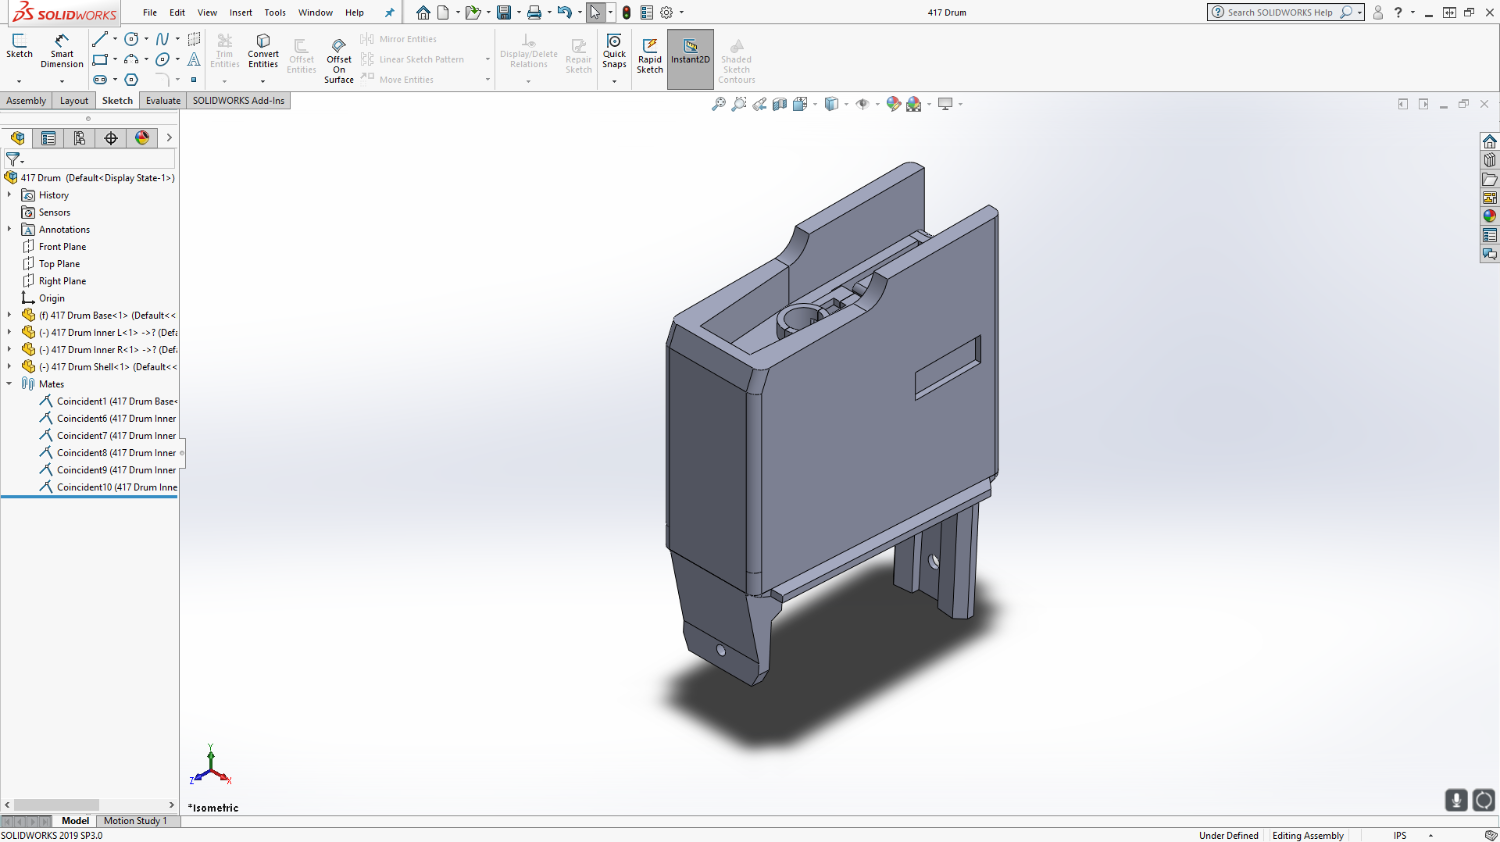
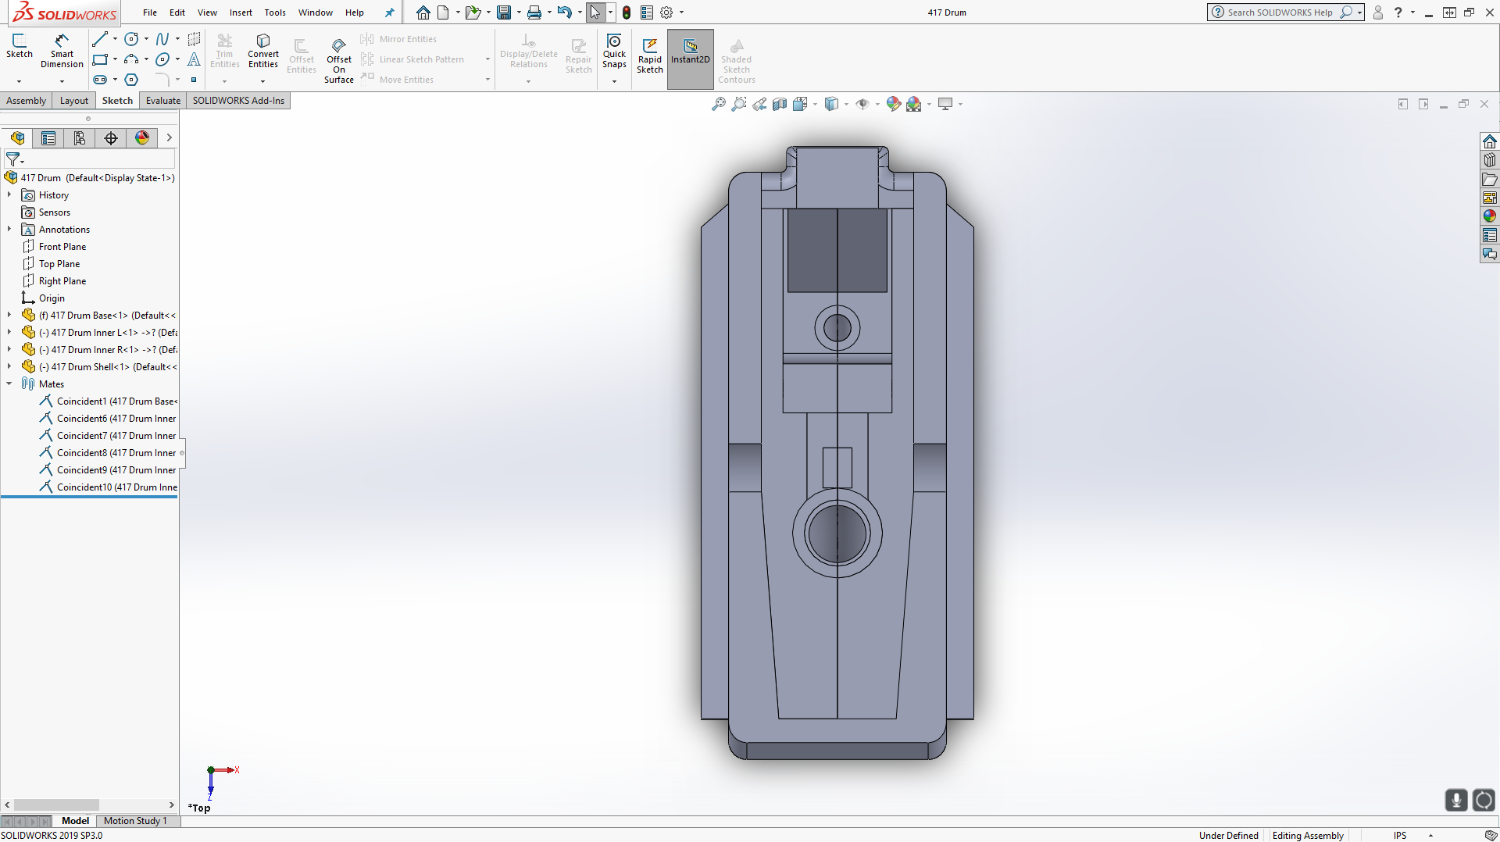
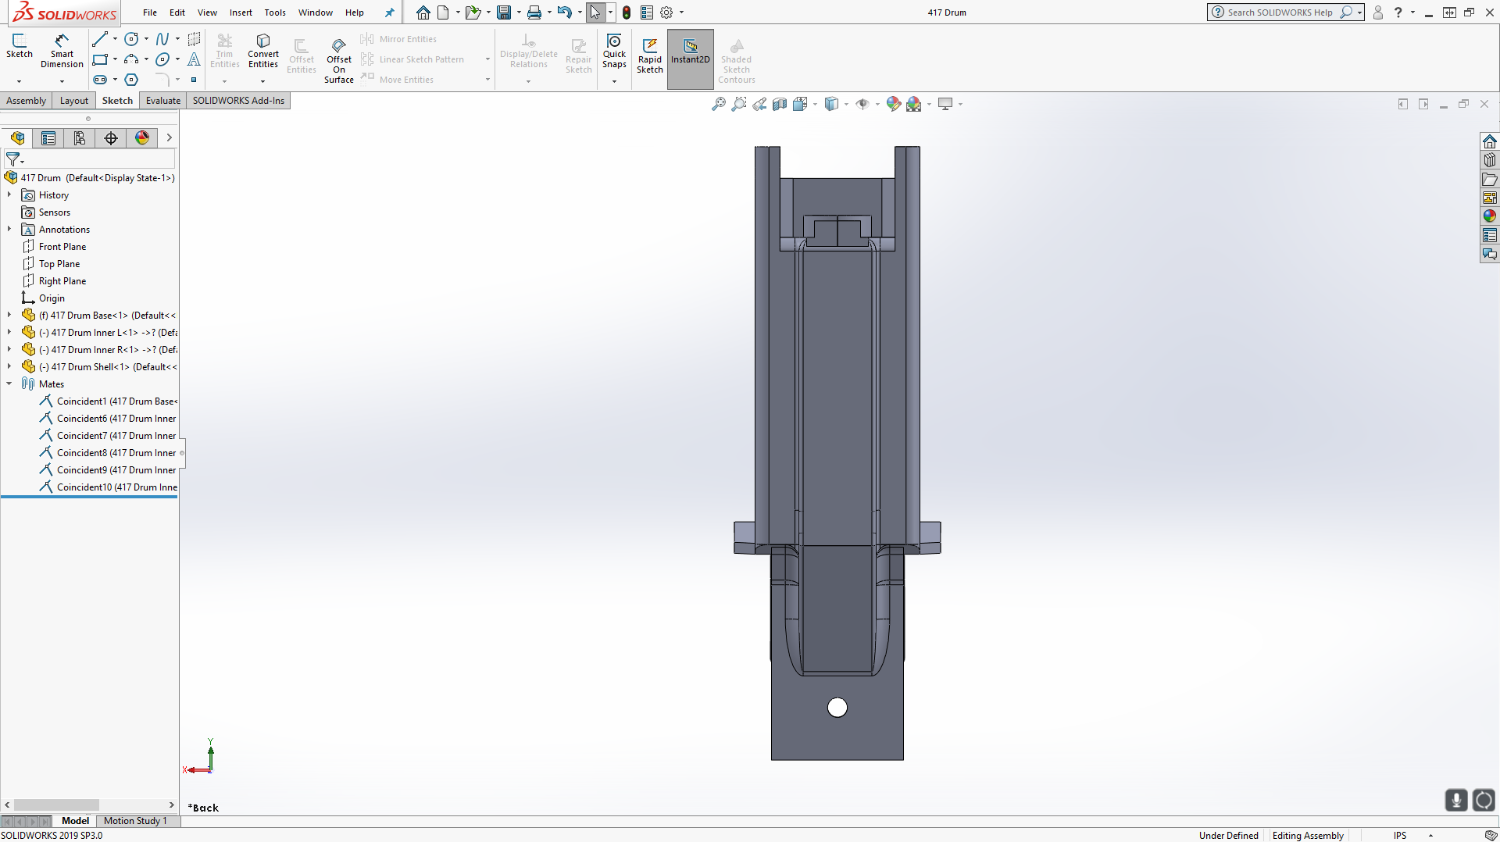
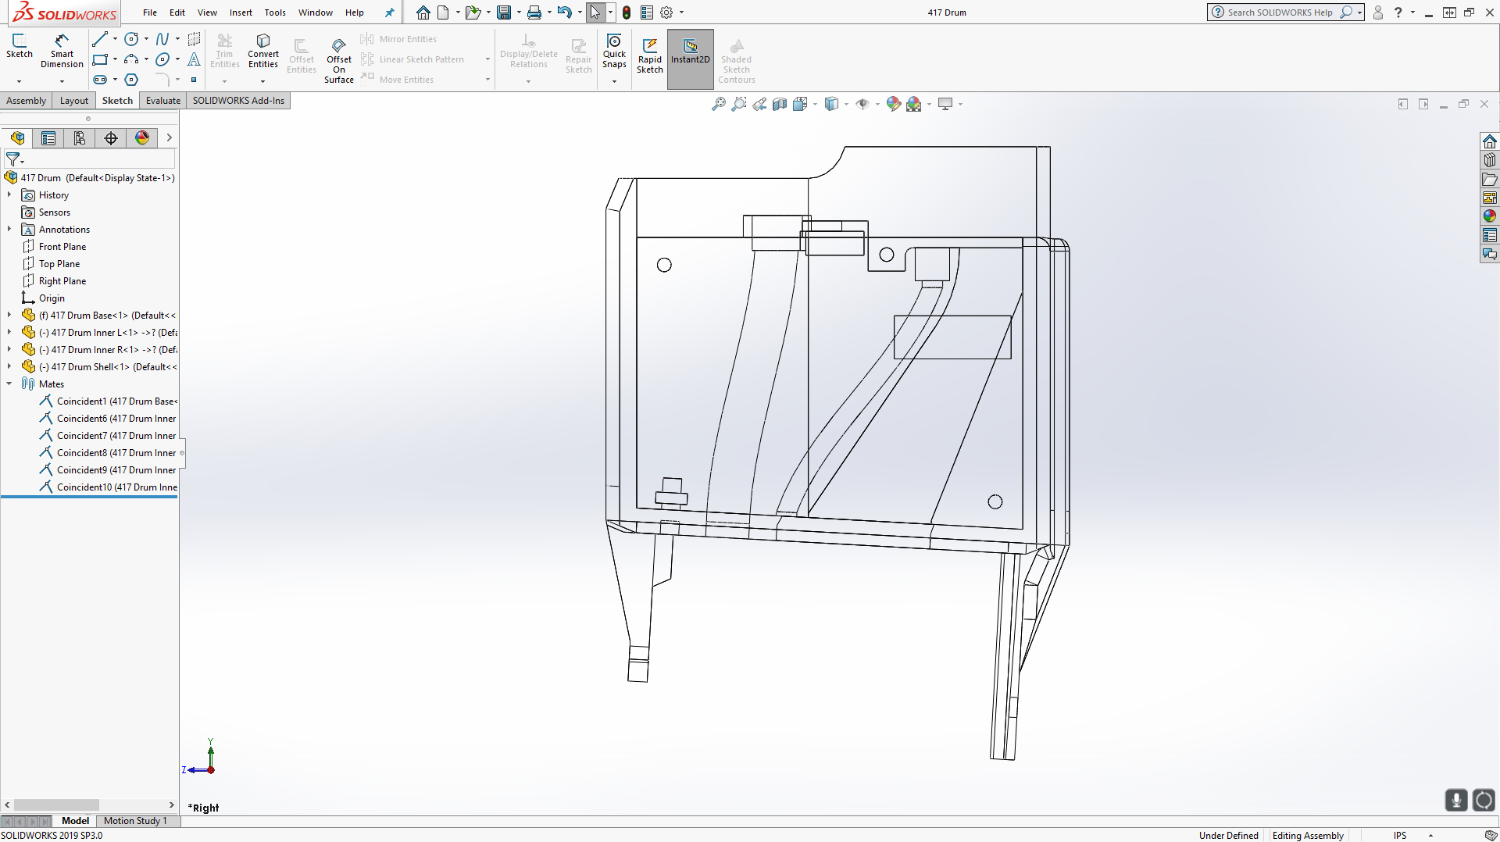
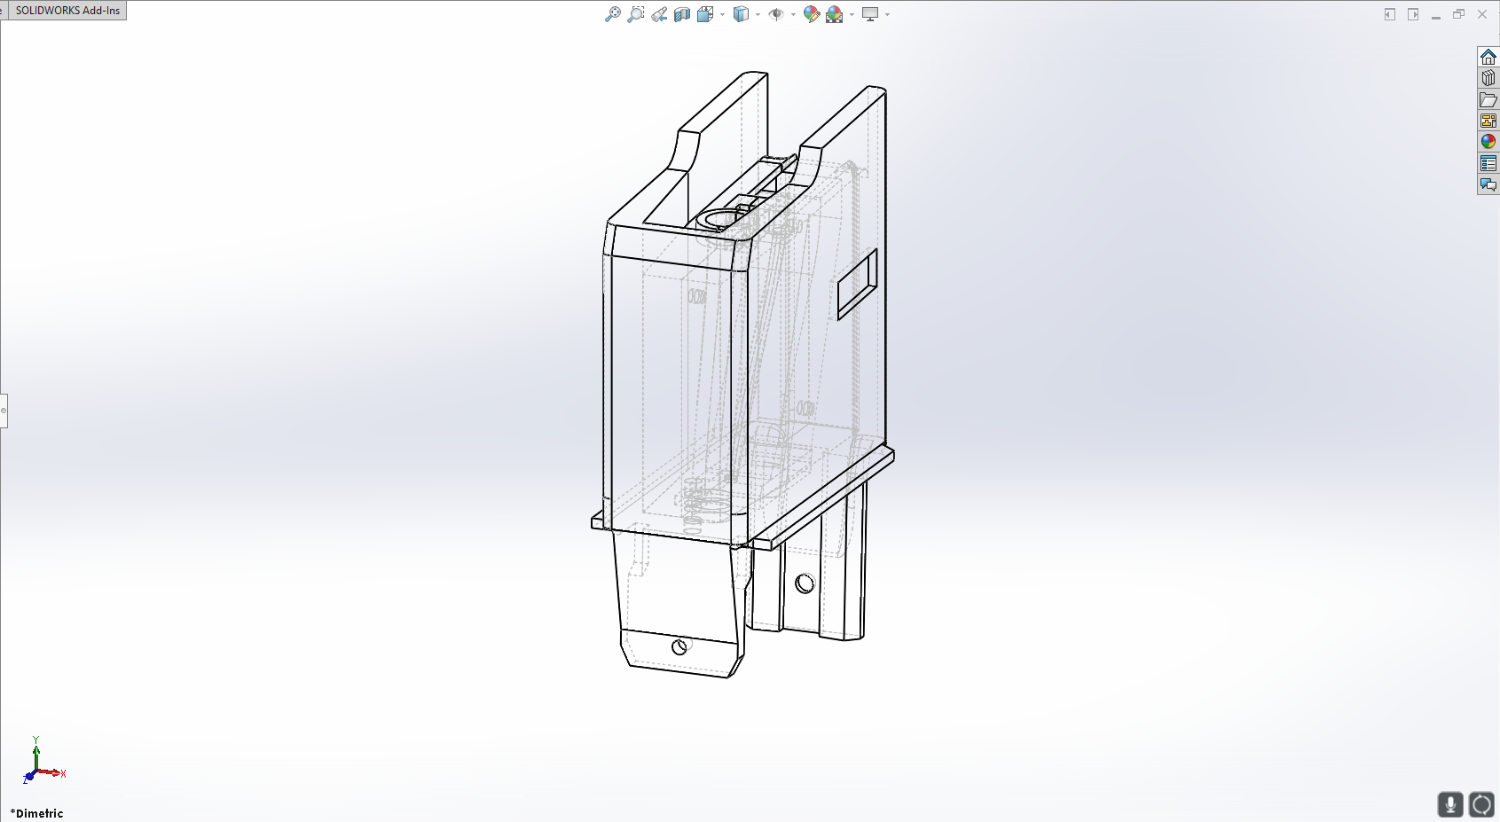
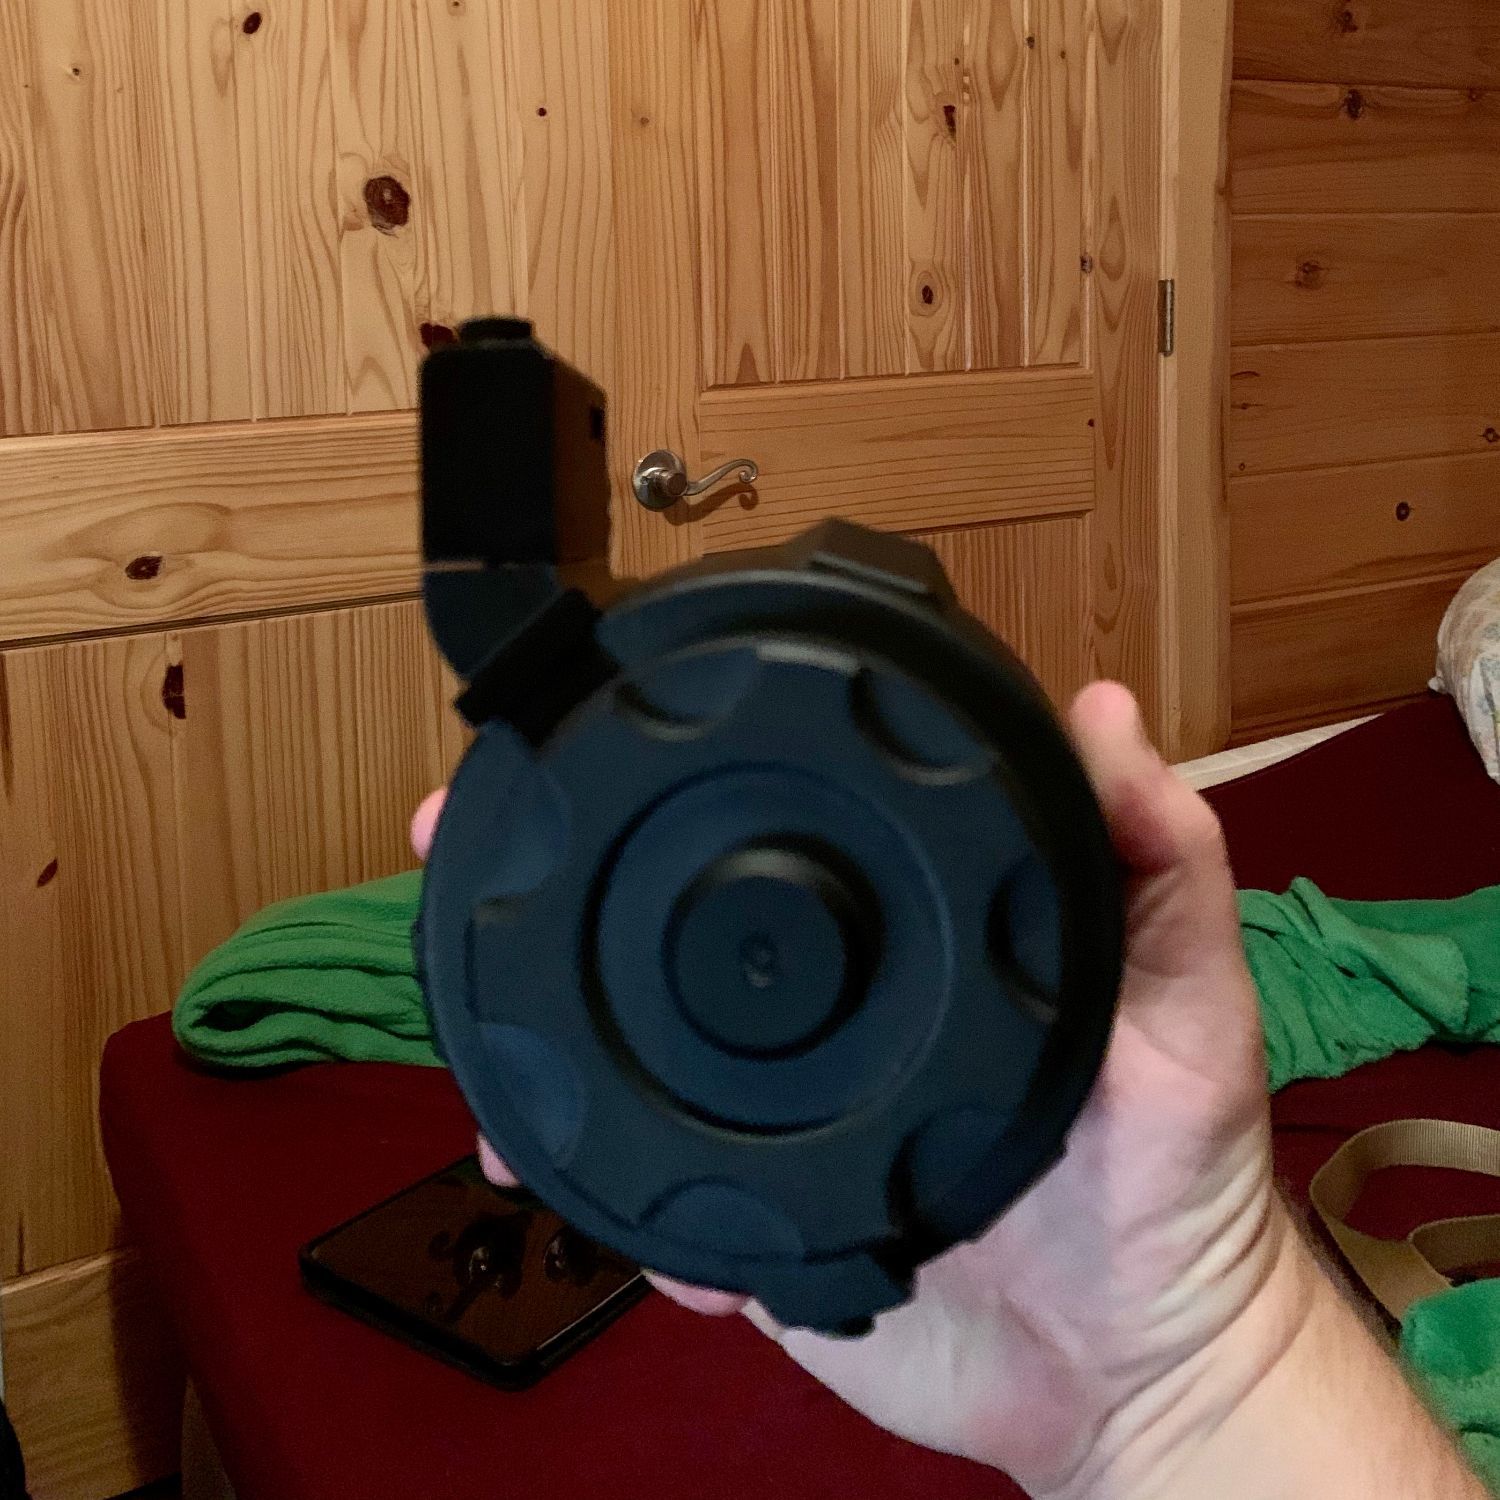
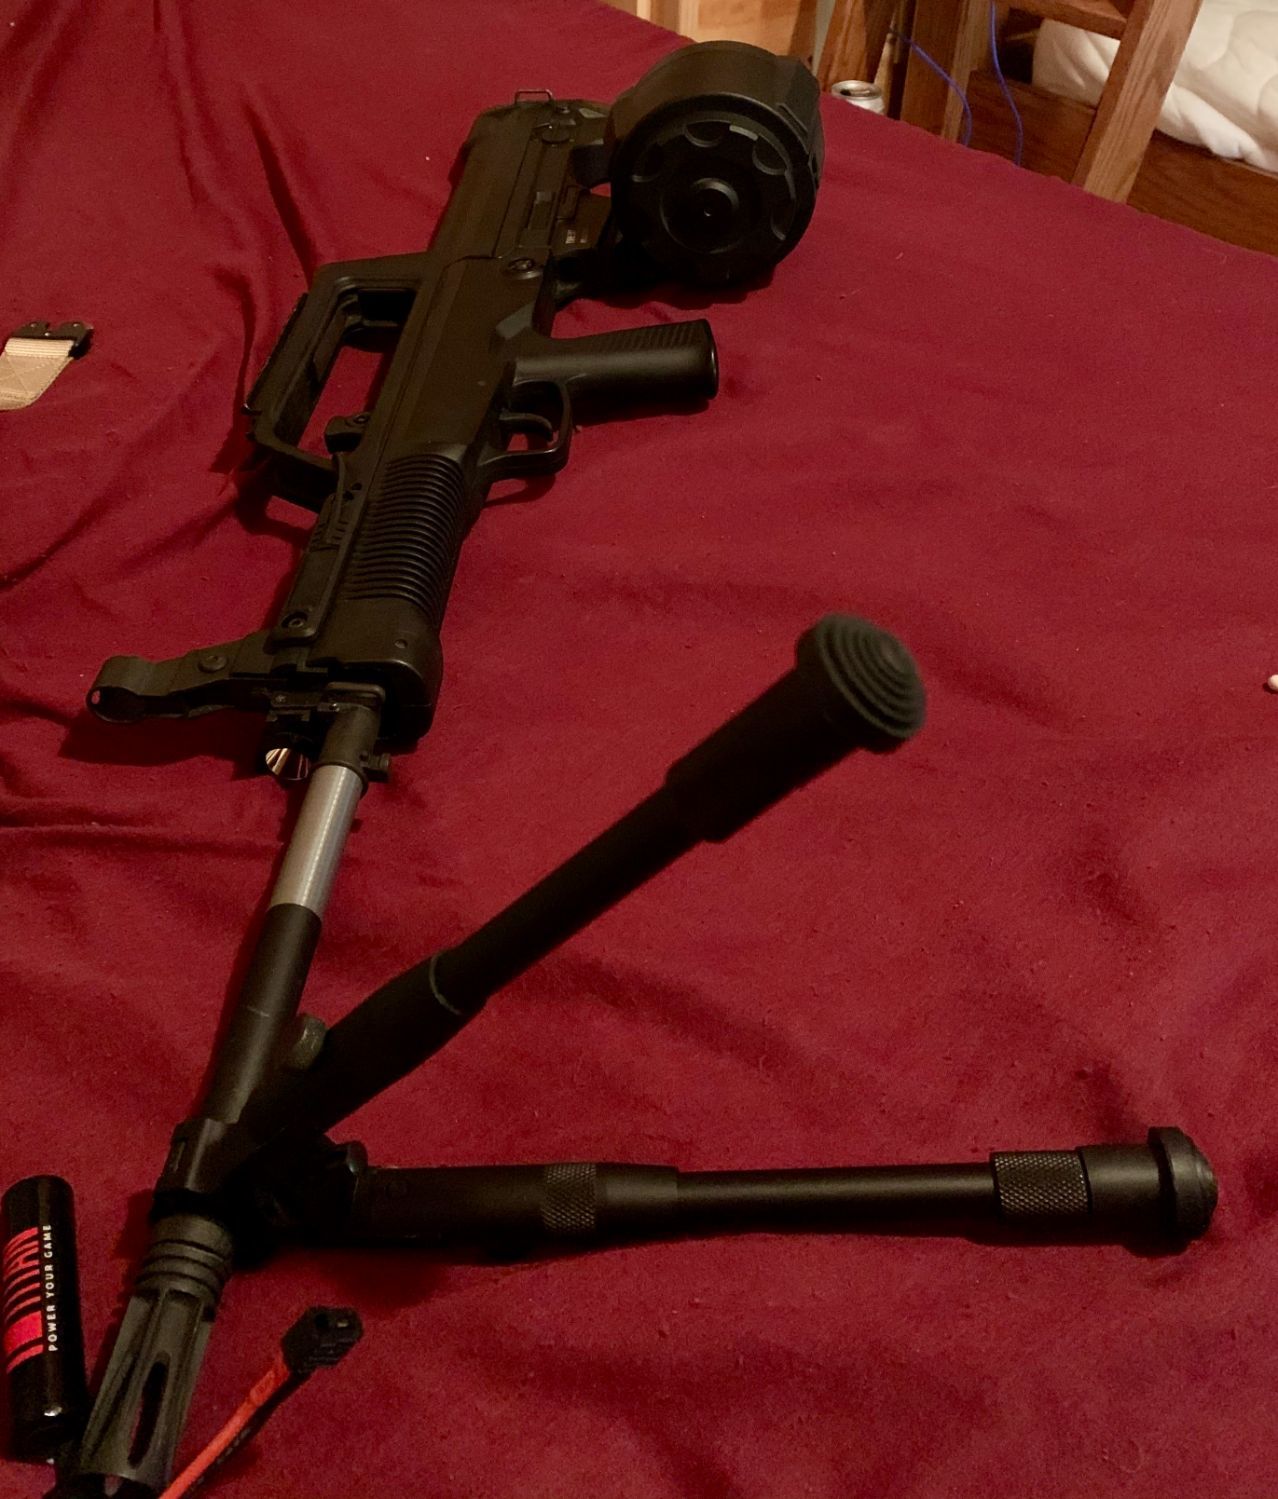
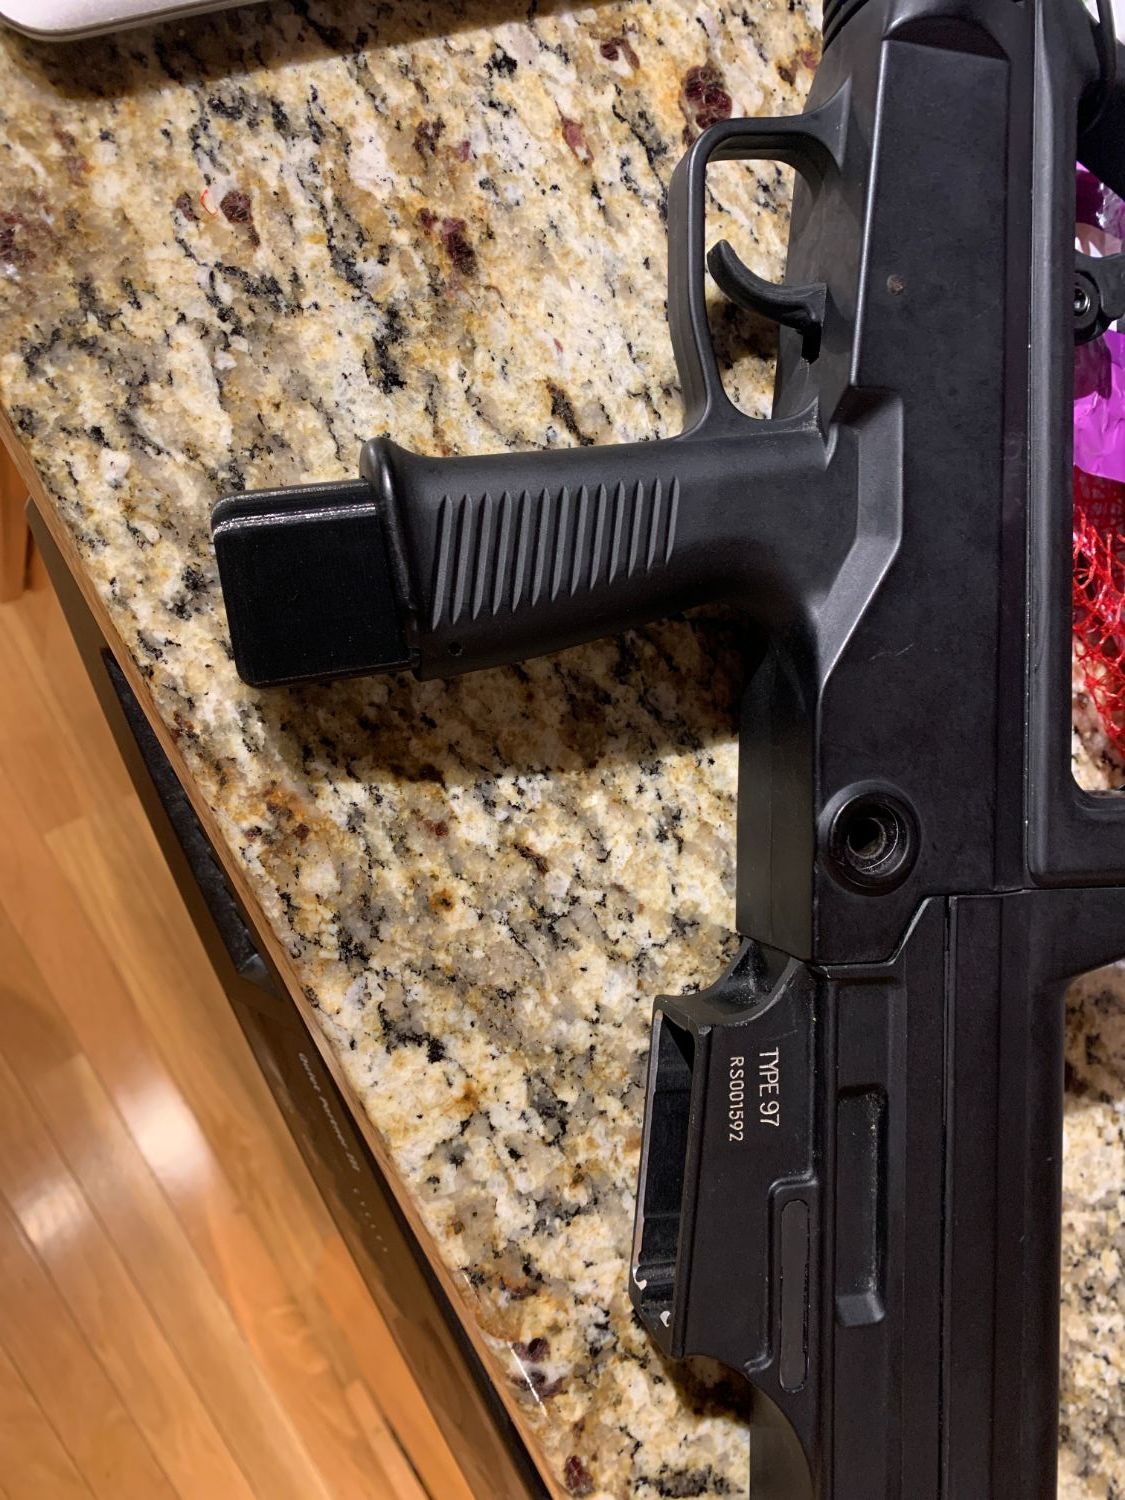
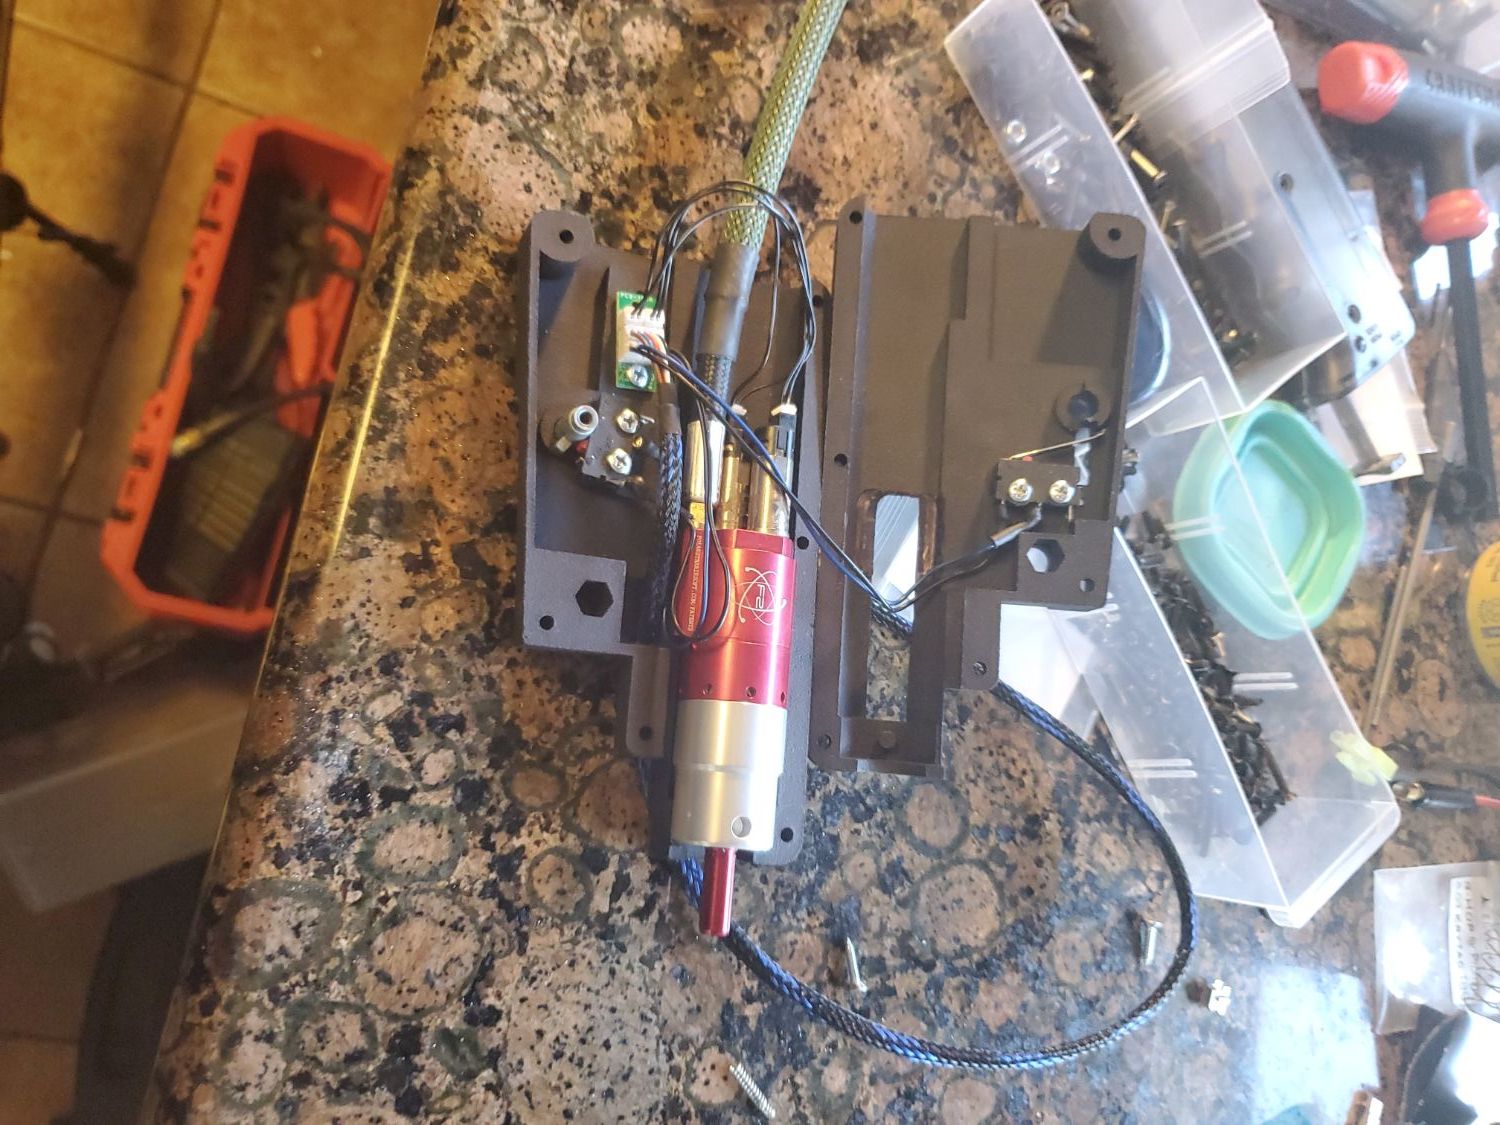
A few more pics of my 417 Drum adapter. It is designed for the A&K SR-25 drums as they are plentiful this side of the pond, dont break the bank, are sized for 308 (the main reason I chose a SR-25 drum over something smaller like the Angel Custom drums, which are sized for 5.56), and have some nice features including a sound-based auto-wind, button-wind, and switch-wind. As it seems all my drum adapter designs end up being, it is split into 4 parts for printing - left and right inner halves, an outer shell, and the base.
Inner Right showing the internal passageways for loading BBs, the feed tube, and the sound sensor slot and wiring tube:
Right and left inner halves put together:
The outer shell:
The base - printed inverse to this, of course:
The four parts assembled (Isometric):
The four parts assembled (top):
The four parts assembled (back):
The cut-away internal shot of all four parts assembled:
- PopRocket123 and strykerles
-
 2
2
-
3 hours ago, PopRocket123 said:
Looks similar to a drum mag adapter I've seen a friend working on
Am I right in thinking that looks like a hk417 mag?
It is indeed.
-
Oh what ever could I be working on now?
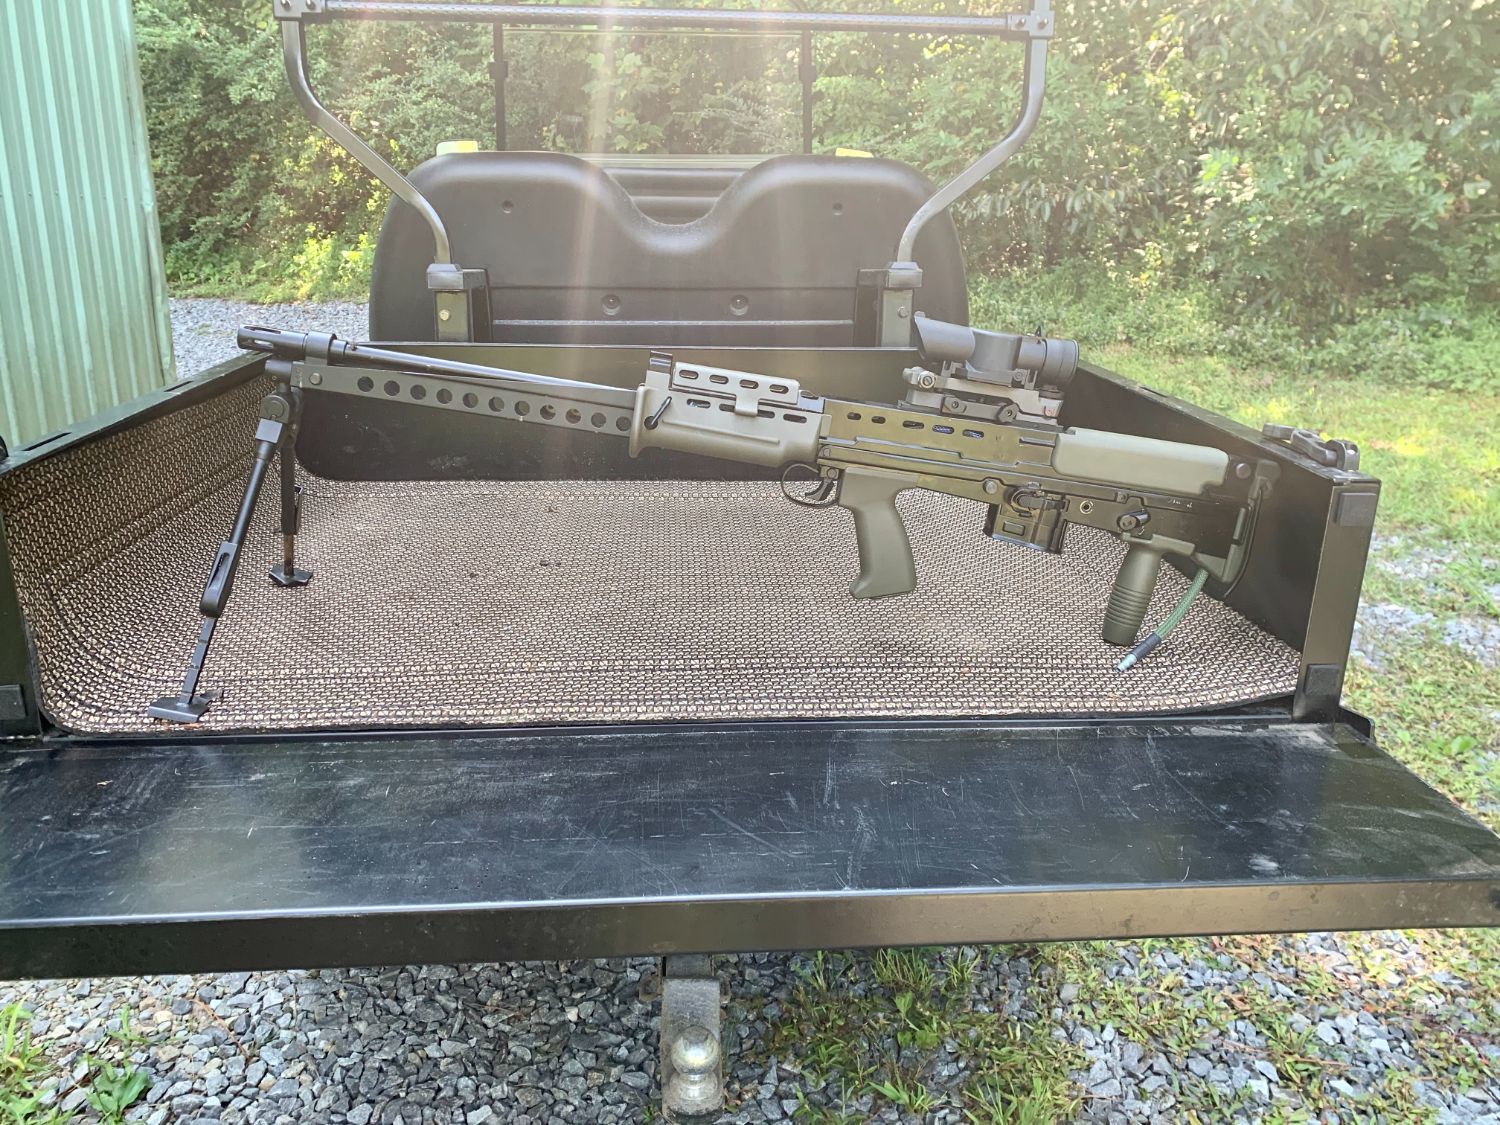
In other news, my three latest projects - that being my AUG HBAR, L86, and QJB-95 are done. Look for them in the Gun Pictures Thread.
- Brophy and PopRocket123
-
2
-
1 hour ago, Speedbird_666 said:
After having an epoxy joint fail on one my prints (admittedly it was cheap unbranded stuff), and some unreliable self-tapping holes, I've just ordered a bunch of M3 heat-set nuts to test out for future projects from Aliexpress. There's someone on eBay (UK) who happens to make a setting tool for these that fit my particular soldering Iron.
Yea Im hoping my high strength stuff and a rough surface will hold. Ill probably just use standard nuts as bolts as space is limited enough as-is. Trying to sink those in will be difficult.
-
15 hours ago, Speedbird_666 said:
Very nice mate. Will you be SLS printing the Mag adapter at some point?
Im... Unsure. I have several parts made in SLS so far, and its certainly the superior material, but it does get pricey. Once this hurricane moves on I will fill the drum with ammo and go stress test it. If the epoxy fails Ill need to redesign it to use bolts, and if the PETG fails then I will need to get it done in SLS. But for now itll stay as PETG.
-
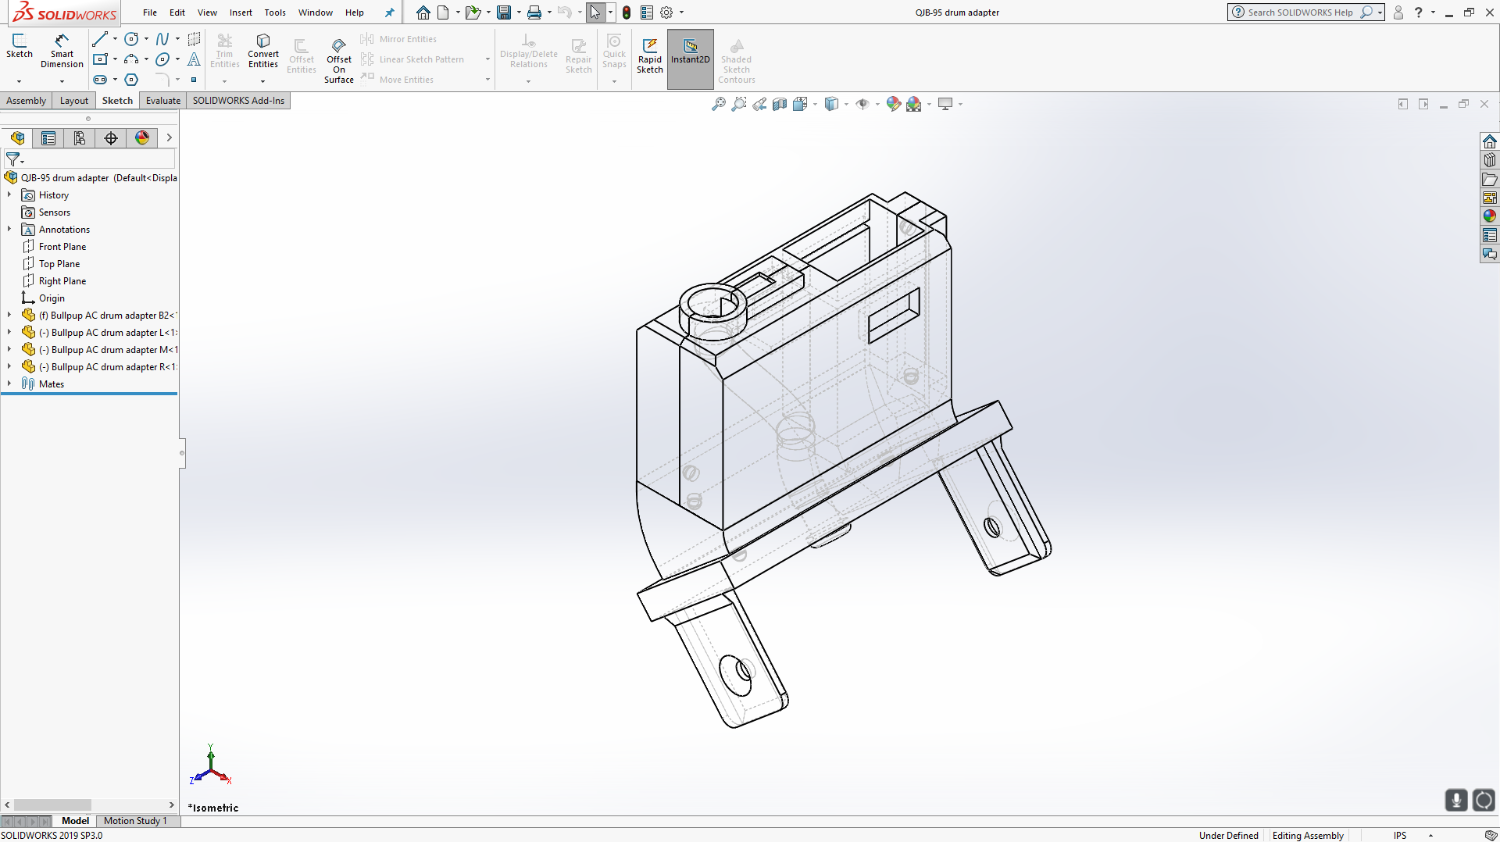
Looks like my custom parts for my QBJ-95 build are done. 4 part AC drum adapter, barrel cover, and battery extension all done. I am looking into getting a real RPK bipod to complete the look, and if that occurs I may redesign the cover, but for now its done. Assembly is tomorrow.
-
Sounds like you need one of the newer AUBLs. Depending on whether you run a torch or use a very oddly-shaped gun the GLS is going to be your best bet too.
Lozart, I unfortunately forgot my non-duty belt platform at the house before leaving on my current work trip so I cant provide pics currently, but I found an better (IMO) way to mount the strap. I took a soldering iron and a leg strap and soldered a hole through it (could also drill and melt the edges like fusing a rope), and drilled a hole through the lowest portion of one of my AUBLs, then bolted it together using a short Safariland bolt and a weld nut. It sits like a UBL, doesnt bunch up in the crotch, and holds to the leg like a leg drop. Maybe give it a try if the knock-off UBL is capable.
-
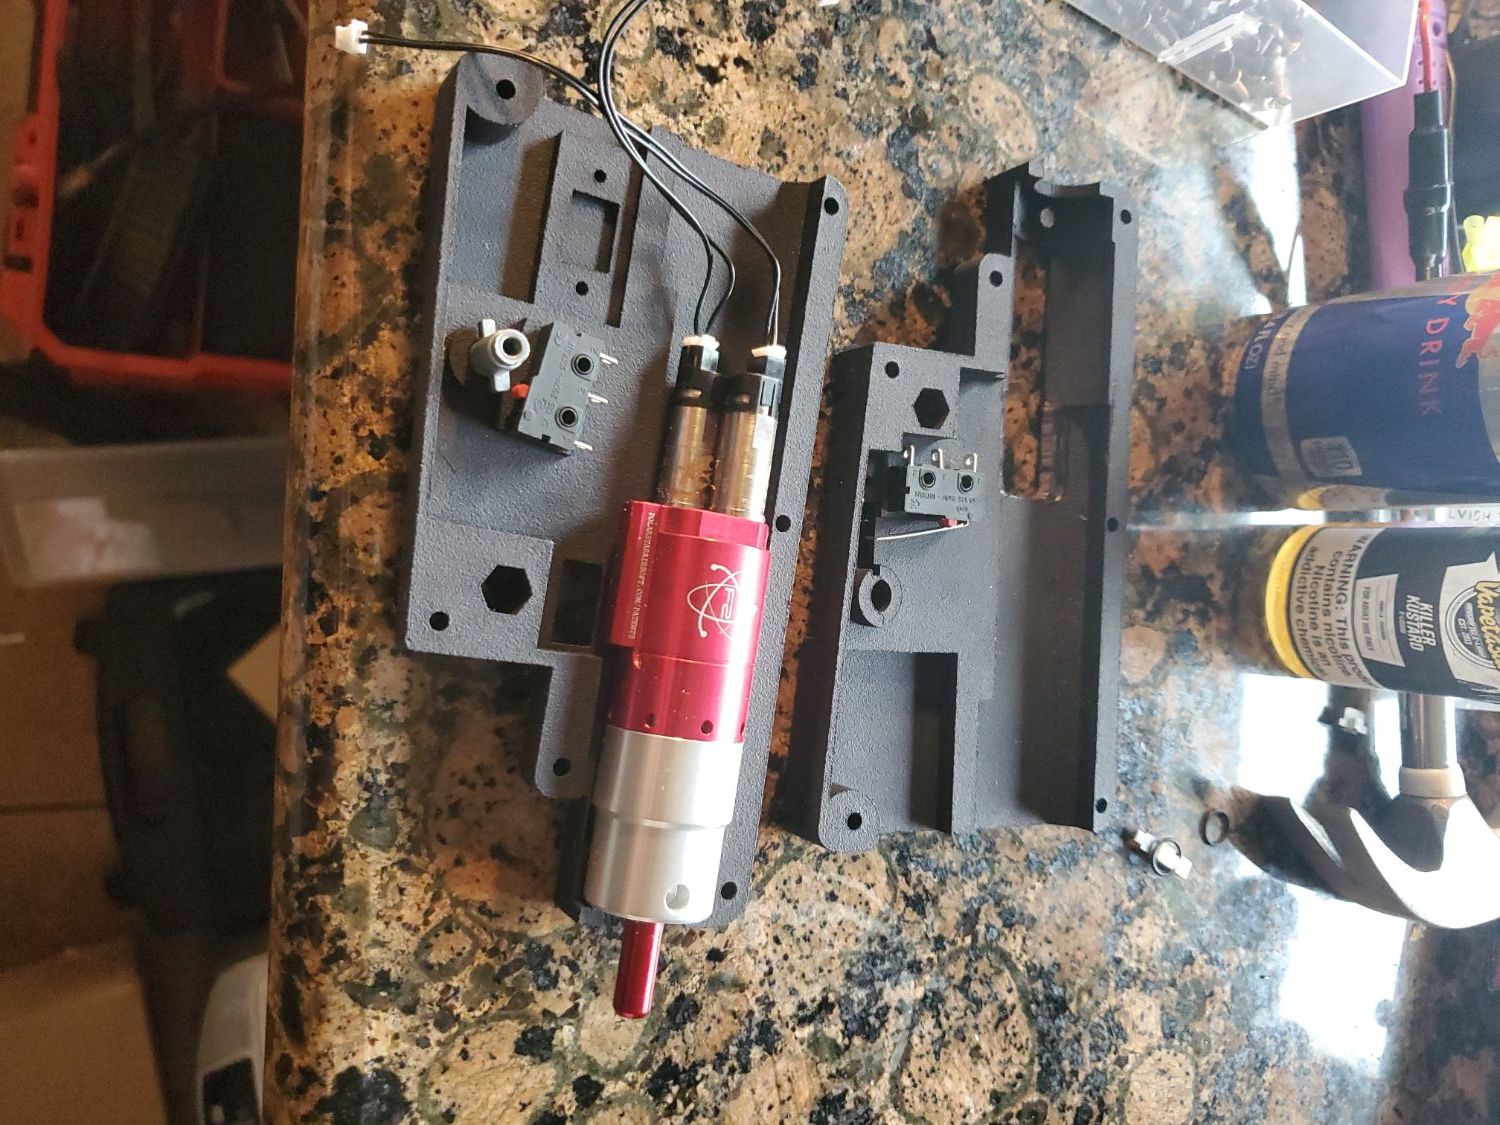
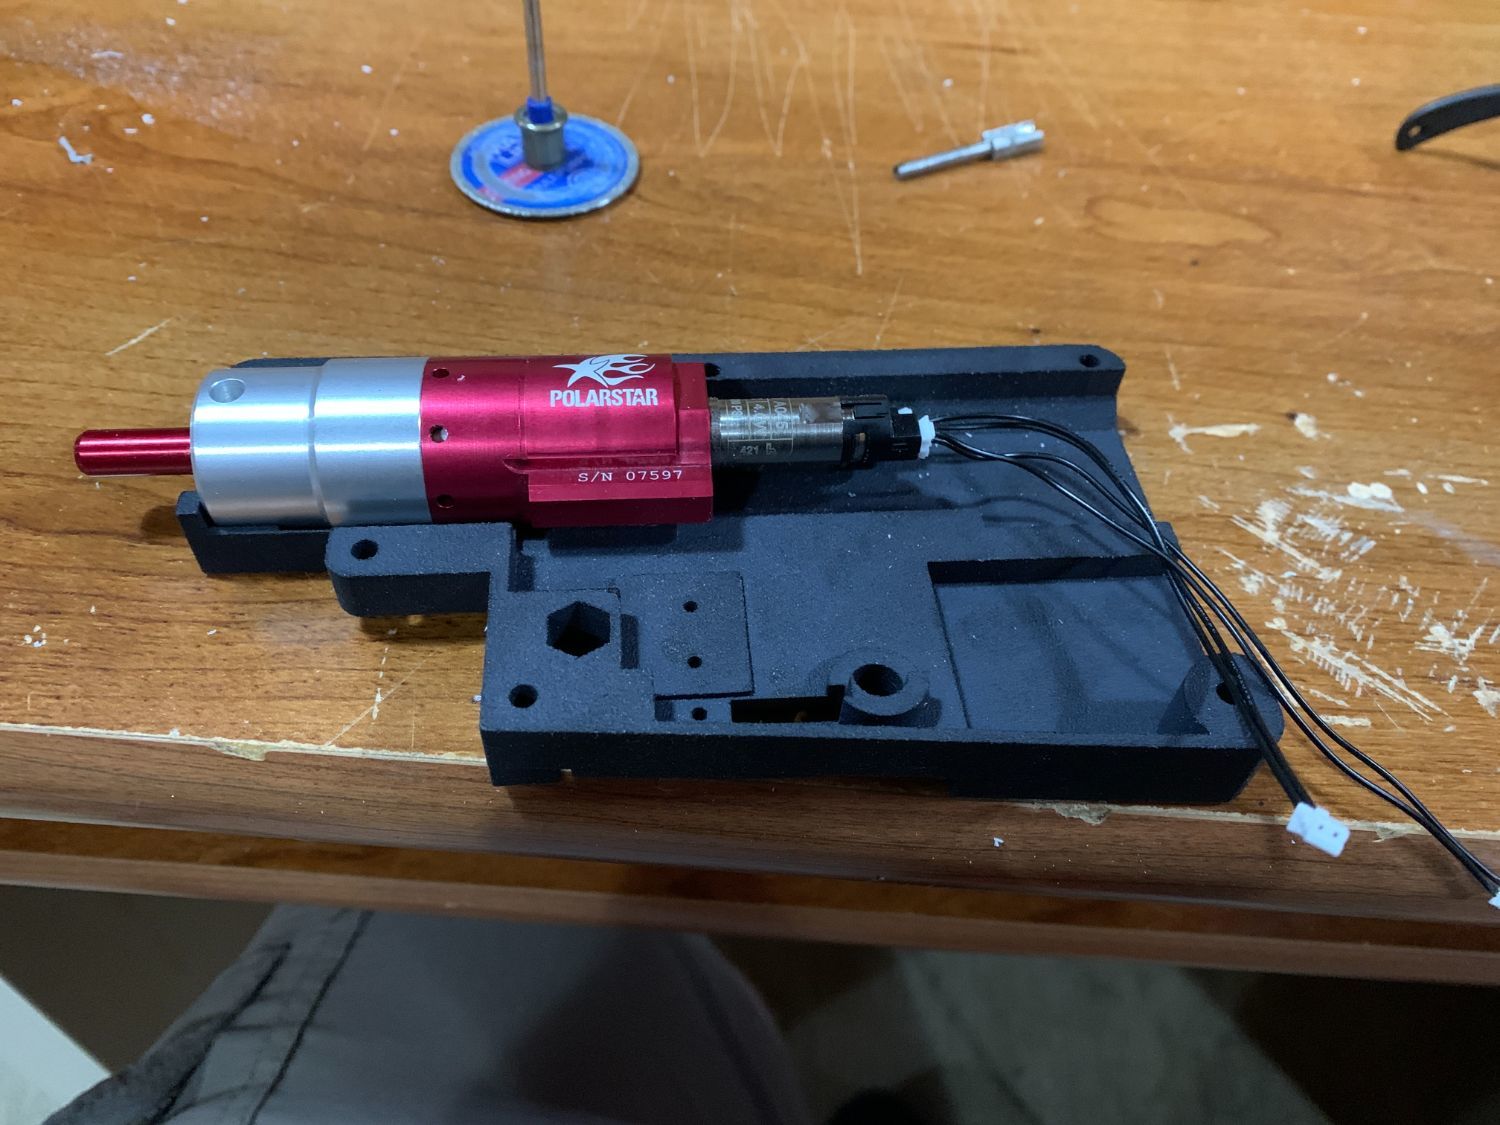
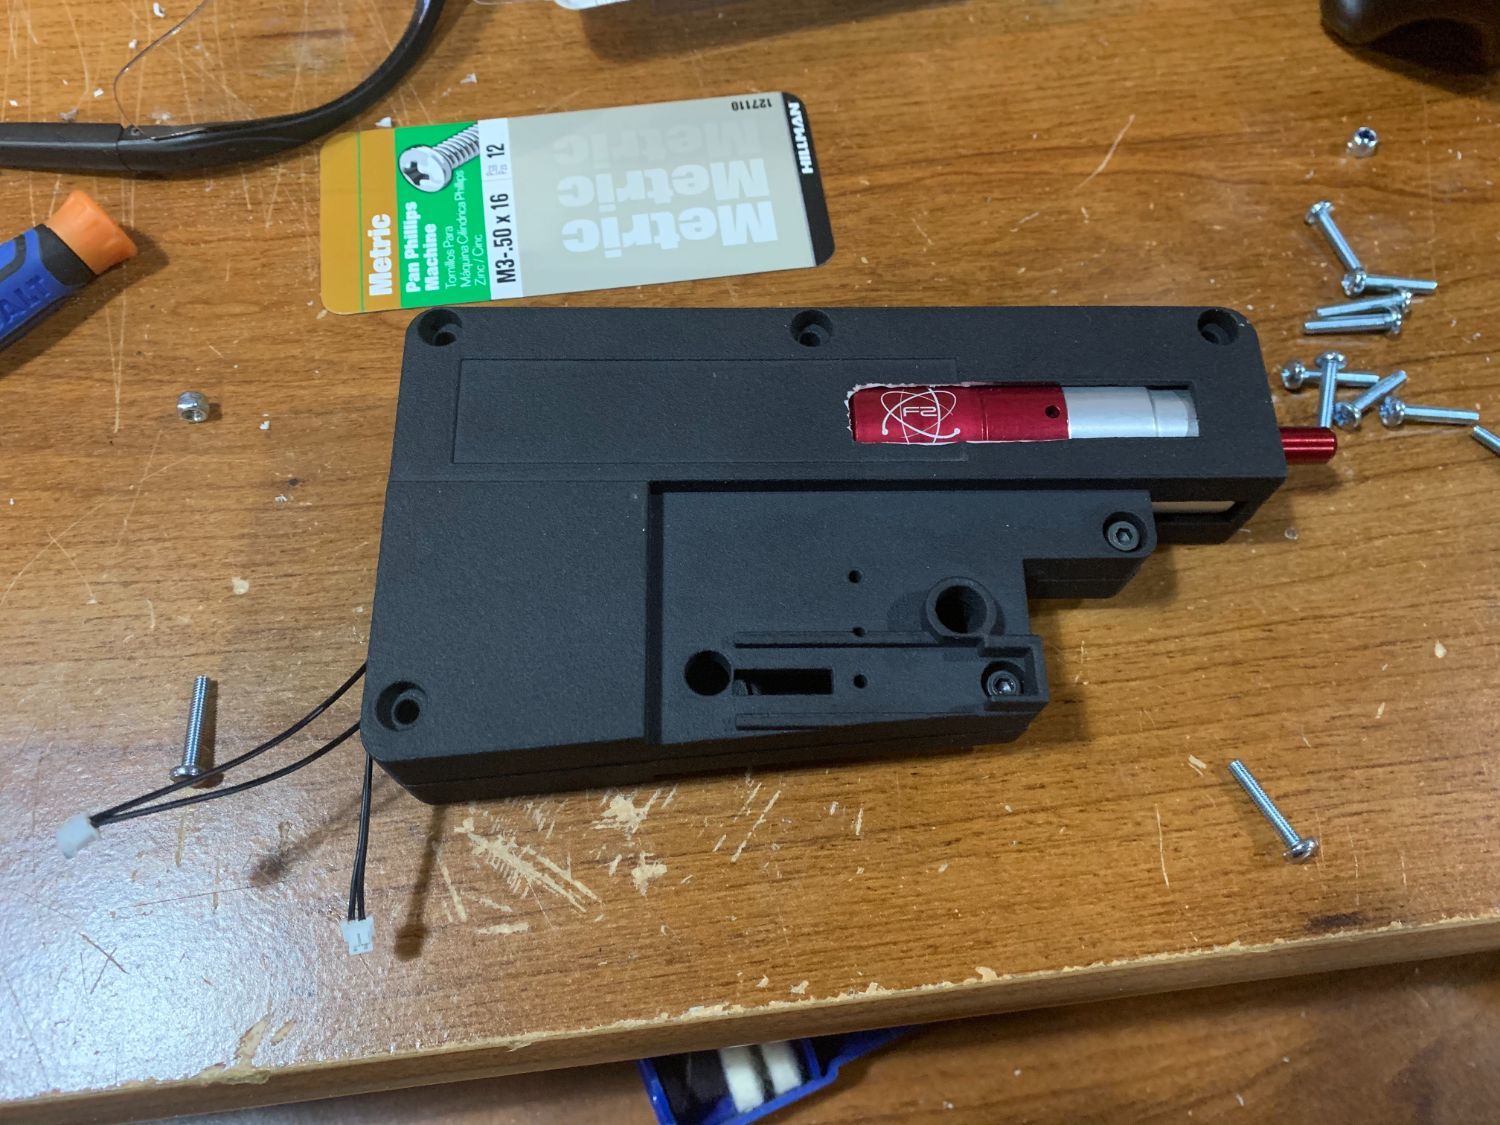
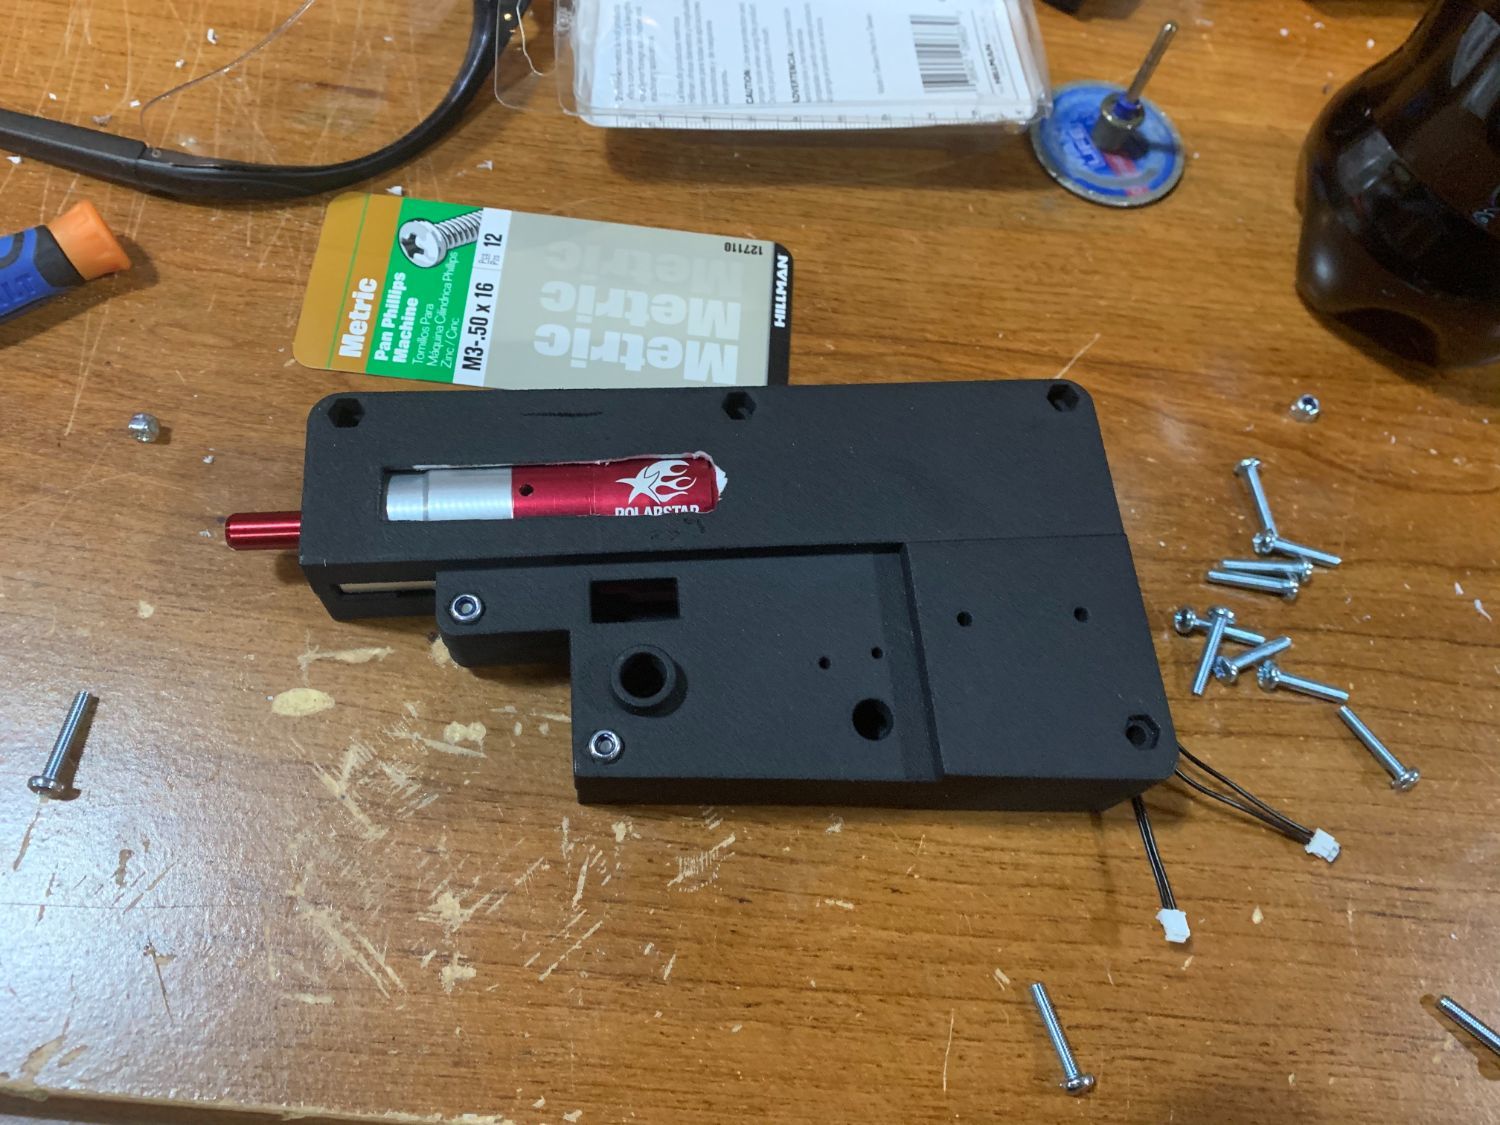
More pics of the custom 3D printed STAR HPA gearbox being assembled and installed. Damn these L86s have a bunch of parts...
- PopRocket123 and Speedbird_666
-
1
-
 1
1
-
- Popular Post
- Popular Post
Well, a lot of work later and shes finished. HPA'd STAR L86. R-hopped 550mm IB, Polarstar F2 engine inside a custom designed and 3D printed gearbox, custom wiring and microswitches, modifications done to fit the IGL, and more. Max range about 85m (not accurate range for you haters). Im happy. Still need to sort out the two side pins behind the magwell, look into adding a grip of some sort if needed, and toss a light on it.
- loctez, EvilMonkee, PopRocket123 and 3 others
-
6
-
Sure does. Im just imaging actually setting the hop

-
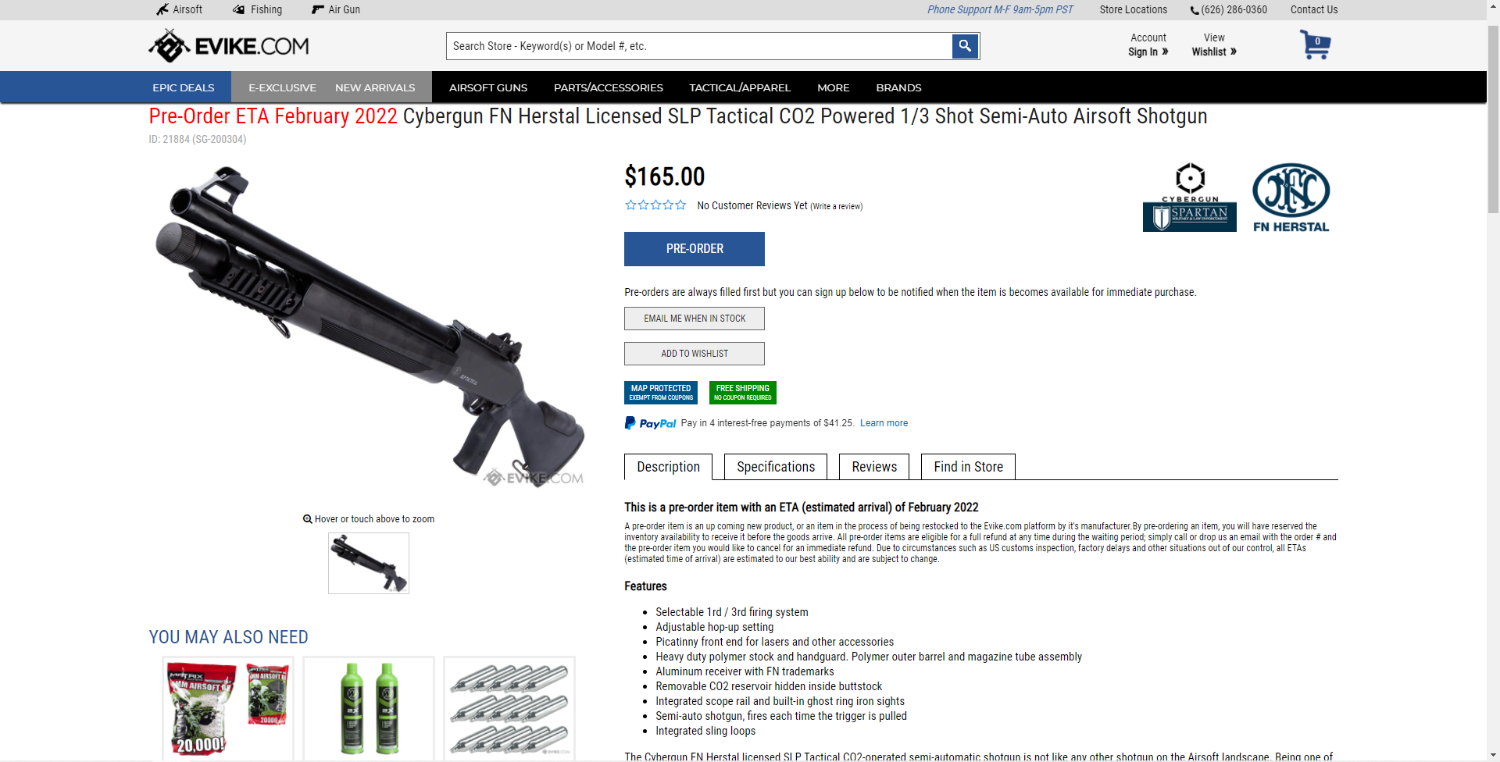
Looks like Cyberguns got a C02 FN SLP on the way. Looks like a M1014 and works the same way, but is made by FN. Single/3 shot, uses Marui shells, 3 shell capacity. FPS is a bit of a kicker - claims are 290 on trishot and a whopping 460 on single. Shotty sniper anyone? ETA to the US is Feb 2022. Its apparently been around since late last year, but I can find very little on it.
-
Sling point should be fine. Its well made. I have the FDE/bronze/RAL version myself. In terms of the sight placement, you are correct to place it further back. Ideally youll have it as far back as possible. Im a military/LEO firearms instructor stateside for background. Having the sight further back allows your eyes to focus though it, as opposed to on it. Similar to how your mind ignores your nose, despite the average schnozz being within view. Moving it forward makes it harder for your mind to ignore the physical sight and focus on your target - superimposing the dot (or circle plex in this case) over it. Furthermore, the G33 and G43 magnifiers tend to have relatively poor focal points, meaning they usually work poorly if not very close to the eye. Its better on the real ones, but not by much. Thats why most people skip magnifiers and instead of or systems like short dots or ELCANs which can be adjusted from 1x to whatever is desired (or 4x for the ELCAN). Ive mostly moved to ELCANs myself on both my airsoft replicas and my RS if Im not just using a dedicated 1x like an Eotech, Aimpoint, or Sig sight. Youll generally see sights put that far forward cause it looks cool in the movies, or I know some comp guys prefer it claiming they can acquire the sights faster - which is pointless if you have the built in muscle memory you should have from practicing with your gun.
-
6 hours ago, Speedbird_666 said:
That really does look like a very cool project - how did you go about printing the shell? It looks almost like SLS?
Good eye - it is indeed SLS. I cant print in it, but I do prototyping myself, and when Im happy with a final product I send it off to be made in better materials - whether that be SLS, metal, etc. Currently I only really use PLA and PETG in my printer.
-
The STAR L86 revitalization project continues. Shell is printed, engine is acquired and installed, both microswitches have been installed, donor parts have been transferred, and all thats left is to wait for Polarstar to hurry up and send over the wiring and boards I need.
- PopRocket123, Druid799 and Speedbird_666
-
2
-
1
-
54 minutes ago, GeorgePlaysAirsoft said:
This is something I kinda put together. I wanted to combine what I like about plate carriers (elastic cummberbunds instead of straps, and after market support) with what i like about chest rigs (they don't need to have plates in them). In the photo I have it set up for use with my LMG so I have two box mags in the front. If I want to switch to the M4, then I clip in the other bit to the side there. Its still a WIP but I think the proof of concept is there.
Bullgear hydro bag
Viper elastic cummberbund
Panda tac GMR-style 40mm bandolier
Viper mini chest rig with FMA kydex insert and viper elastic inserts + cellargear dangler for timed bfgs
MCx custom gear GMR-style minimap + hw holsters timed bfg holsters
Some velcro back pads I got off ali (forget the name)
Cool idea. Id be careful with those BFG holders - Ive had them break before and cost me a BFG.
-
5 hours ago, Tackle said:
@SeniorSpaz87 out of interest mate, given that your in the US, how popular out there are SA80 platform guns, given that over here nearly every man & his dog are running AR platform guns ?.
Very rare. You can buy them all but Ive seen maybe a handful myself. And I go to a lot of multi-hundred player MilSims and the like all over the country.
-
-
I commonly use Gen3 NVGs (PVS-7 and PVS-14) and have used several gens of digital NVGs (ATN X-Sight and others), as well as several thermals (FLIR handheld monocles with 3D printed mounts for head mounting, as well as a Tory Pines T10 micro thermal) at both national-level MilSim events and on the range (Im one of the weird people whos on this site despite being in the US). As people have stated digital NVGs are useful when you have a technological advantage over the opposing force. If noone on the other team has NVGs then youre golden. If youre a WPO looking for poachers youre good. If youre tired of the coyotes killing your chickens are are set up watching for them, youre good. If youre trying to use them to navigate, fight an equal or superiorly-equipped enemy, or move at any pace with them on youre in trouble. Your idea is something that would be awesome to see in 30 years when the tech catches up, but for now I dont see it being of much use in a force-on-force scenario.
-
I have a pair of revolvers that I use from time to time for S&G. I am in the US so the rules are a bit more lax, but having been at the receiving end of one of these (TTT game, kid hit me in the back from less than 2 feet away with the first shot from a fresh C02 cartridge. Slipped around my PC and struck skin - still have a scar to this day. Ref spot chrono'd him after that and the second shot was 523FPS) I dont like using the stock shells as they can seriously hurt someone, especially when you can easily be pushing out 500FPS+ with your first few shots. So I designed and printed some shotshells. Range is crap compared to my other pistols (especially my TMs) but I only have to hit within my 75ft MED with my lever action and now I have low FPS (250-280) shotshells.
-
- Popular Post
- Popular Post
Worked on my buddies KWA SR-16 yesterday. Its an old gun, so it needed work internally and externally. Internally it got a Gate Titan, a new M100, and while I am yet to test its range I have both Prommy purples and Maple Leaf Macrons for it should it need a bucking. Gears, shimming, piston, cylinder, and barrel were done by me a few years back and look fine. Externally he wanted to go two tone, so new G&P rail covers (I prefer the dimpled ones but the blocked were half off so he wanted those), new PTS EPG, new sling mount, and I loaned him one of my good EOTECH replicas, real MBUS irons, PTS EPM1-S, and my two tone Rogers Super Stock for the photo.
Before:
After:
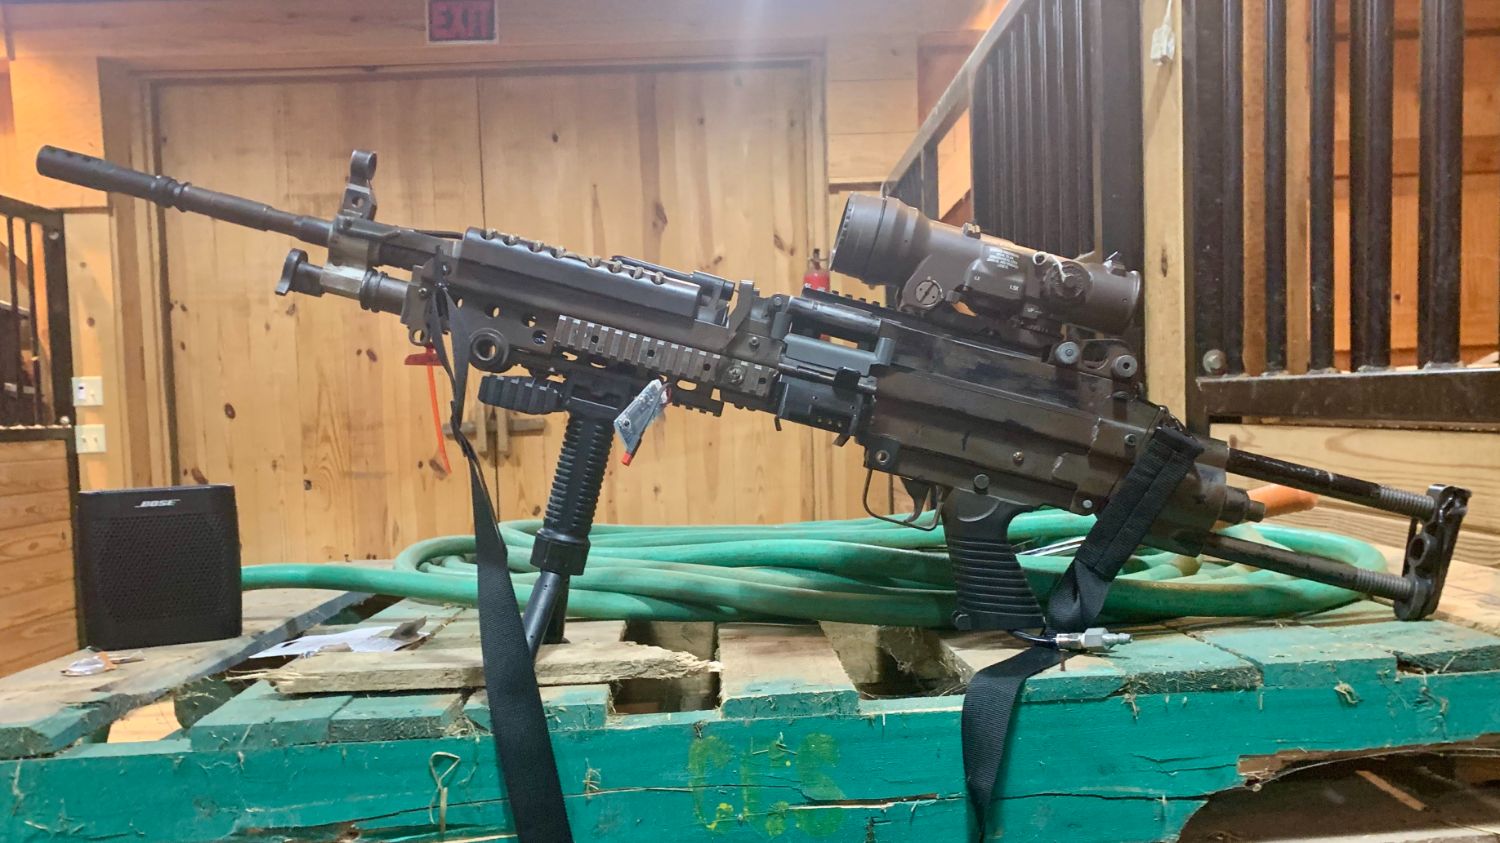
Also my Bingo m249 “Sunfish” is externally complete with the new optic. A fully trademarked 1.5x-6x ELCAN SpecterDR in bronze, with a RS ELCAN 1.5x-6x killflash cause this thing was pricey and the last thing I want is to have it shot out. For those of you who dont know Sunfish was my first HPA gun, and is the first m249 Bingo Airsoft Designs did. For those of you who watch AirsoftAlfonse, his HPA 249 is also a Bingo though newer than mine. We run them together sometimes. I bought it non-working and fixed it up over time, having no idea what I was doing. She has the oldest Polarstar LMG Fusion Engine in the US and possibly the world according to Polarstar themselves. They dont even make the solenoids for it anymore - I have to write up Polarstar and get them to make me custom ones whenever one fails. She recently got upgraded to Gen 3 electronics, and I custom wired in Bullgear equipment to use Bullgear m249 mags, so no more weak feeding box mags. I need to give her another once over inside in preparation for the Fall MilSim season - she seems to be using too much air and the spread is less than ideal. Hopefully its just a bucking change, but who knows.
-
8 hours ago, Kls77 said:
Sr25 recent build
Absolute nail driver . Chucking .43s out
I like those EPMs. Which ones are they?
-
Im unable to view the discord. Any thoughts?
-
This March a mate took a Taginn round right down main street, bounced off him, nailed me in the crotch, fell between us and went off, shrapnling both areas on us. Unpleasant in the moment but not terrible. Same game I took a clearly hot round right below the naval that bled for forever and is still a nice bruise-look two months later. In September had a grenade of some sort - likely Taginn or EG - land inches in front of me while kneeling - bloodied the inside of both thighs and my right arm (sounds worse than it was - tiny bits of shrapnel and the like. Closed up by the time I got back to my hotel. A bit of peroxide to prevent any infections and I was fine). Besides those Ive been pretty good.


Gun picture thread
in Guns, Gear & Loadouts
Posted
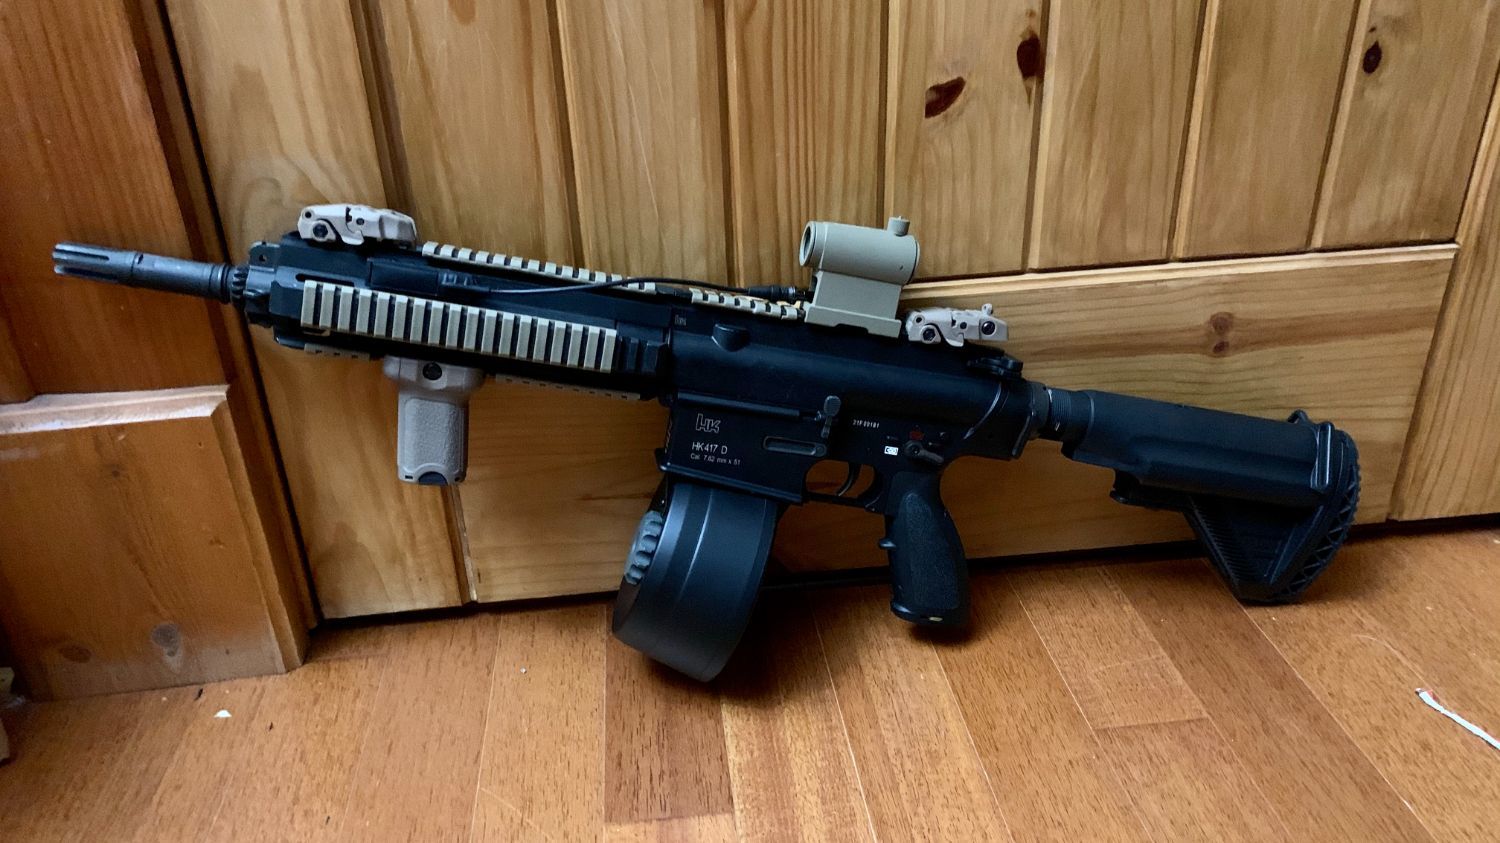
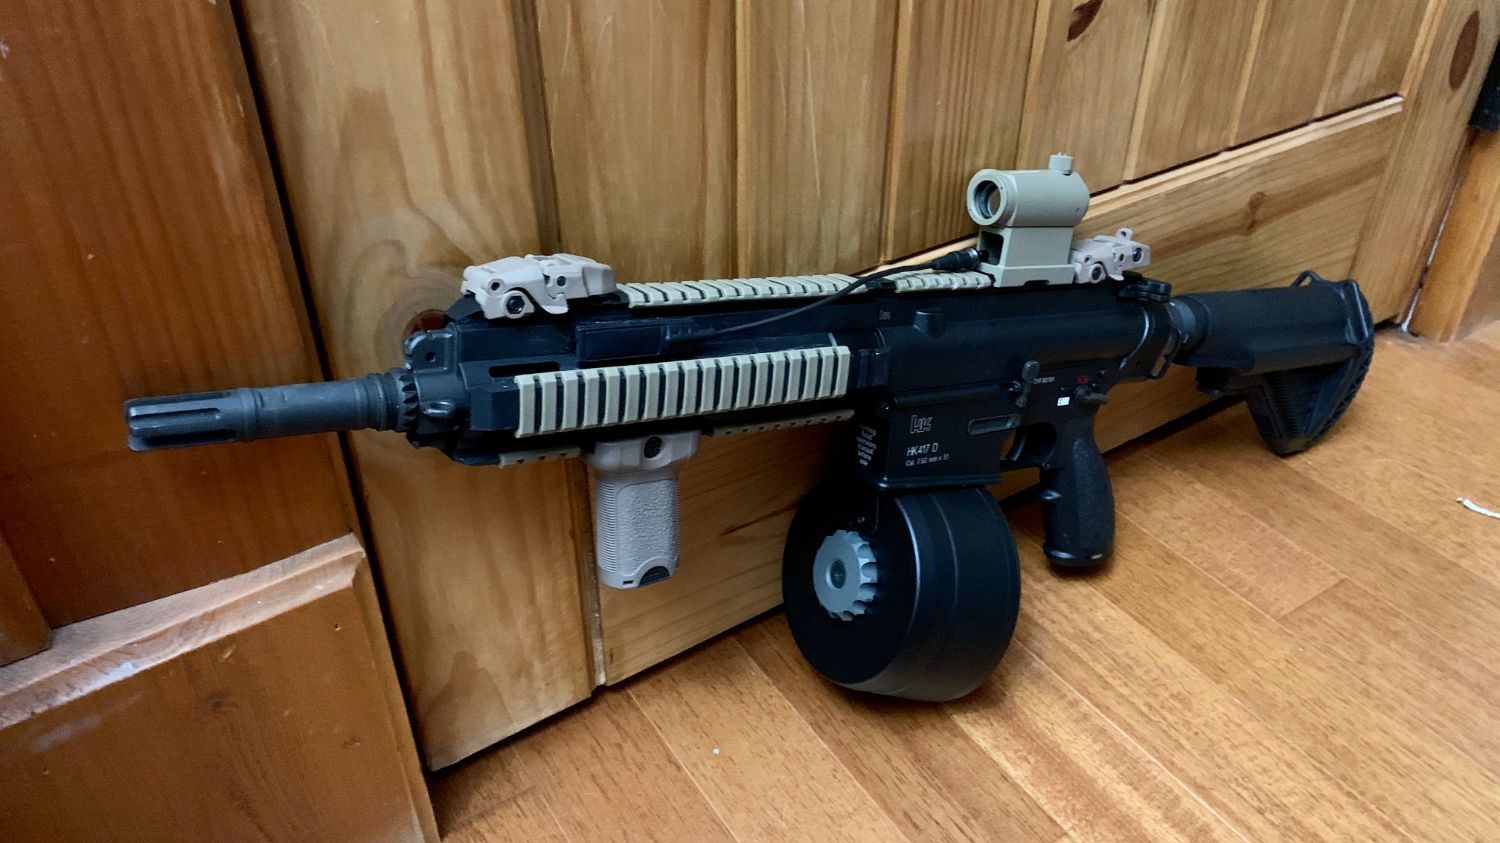
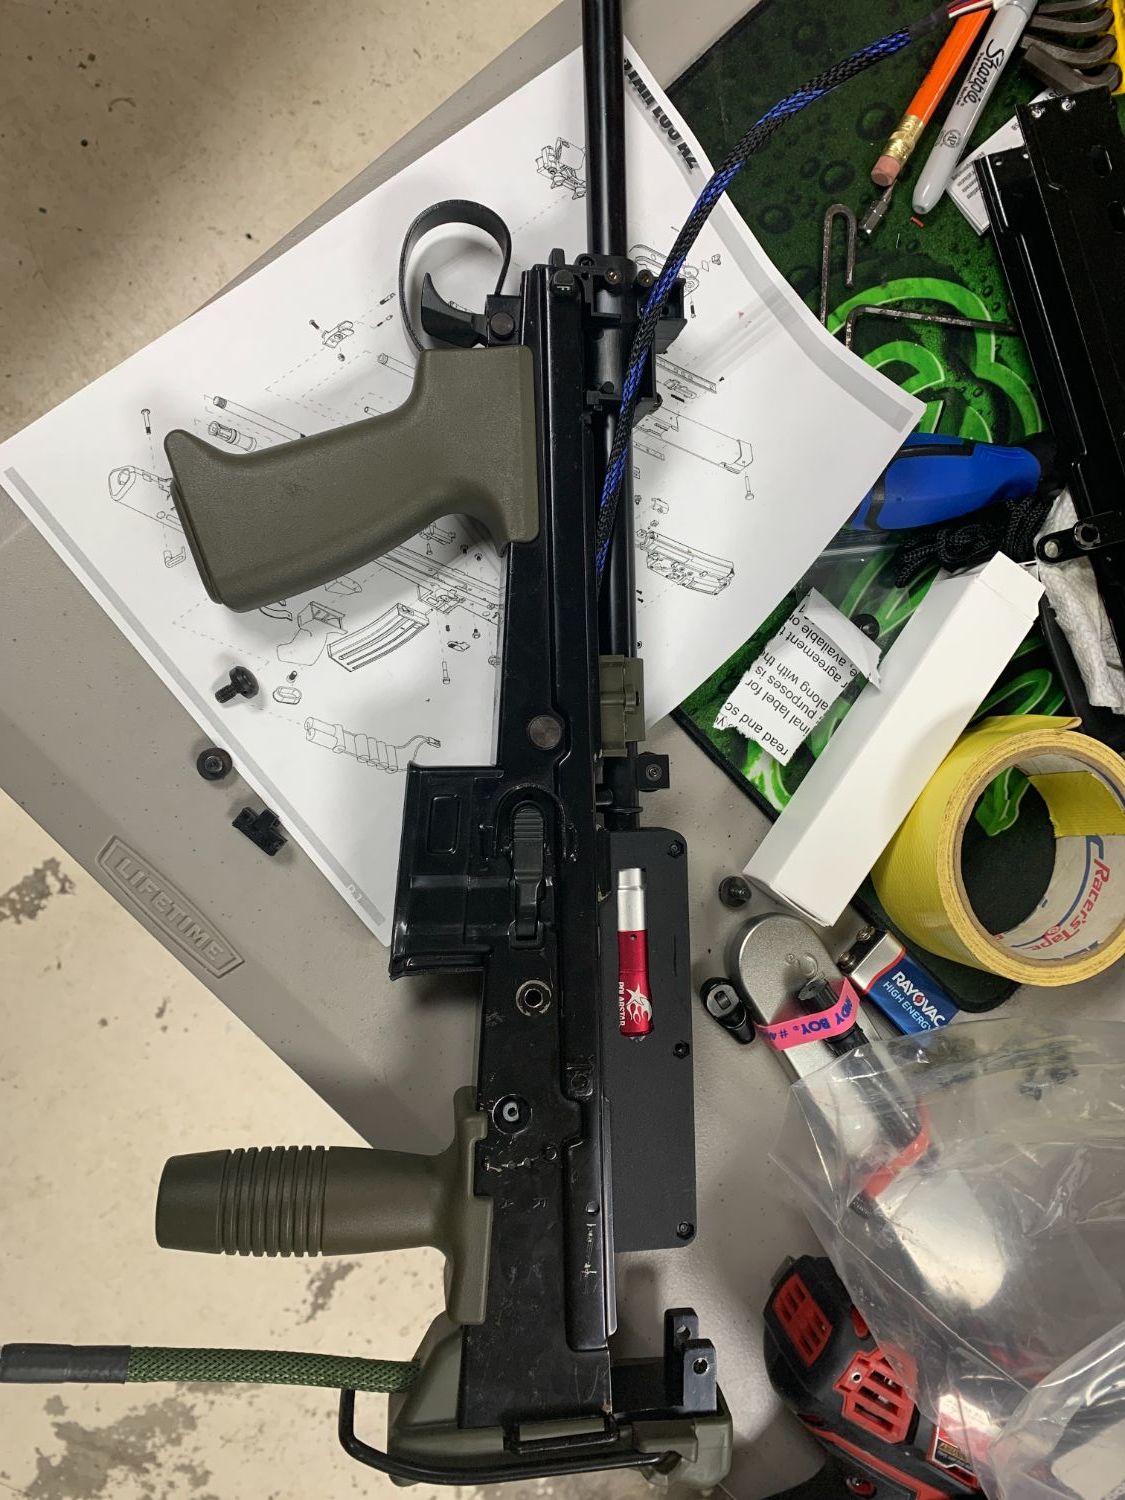
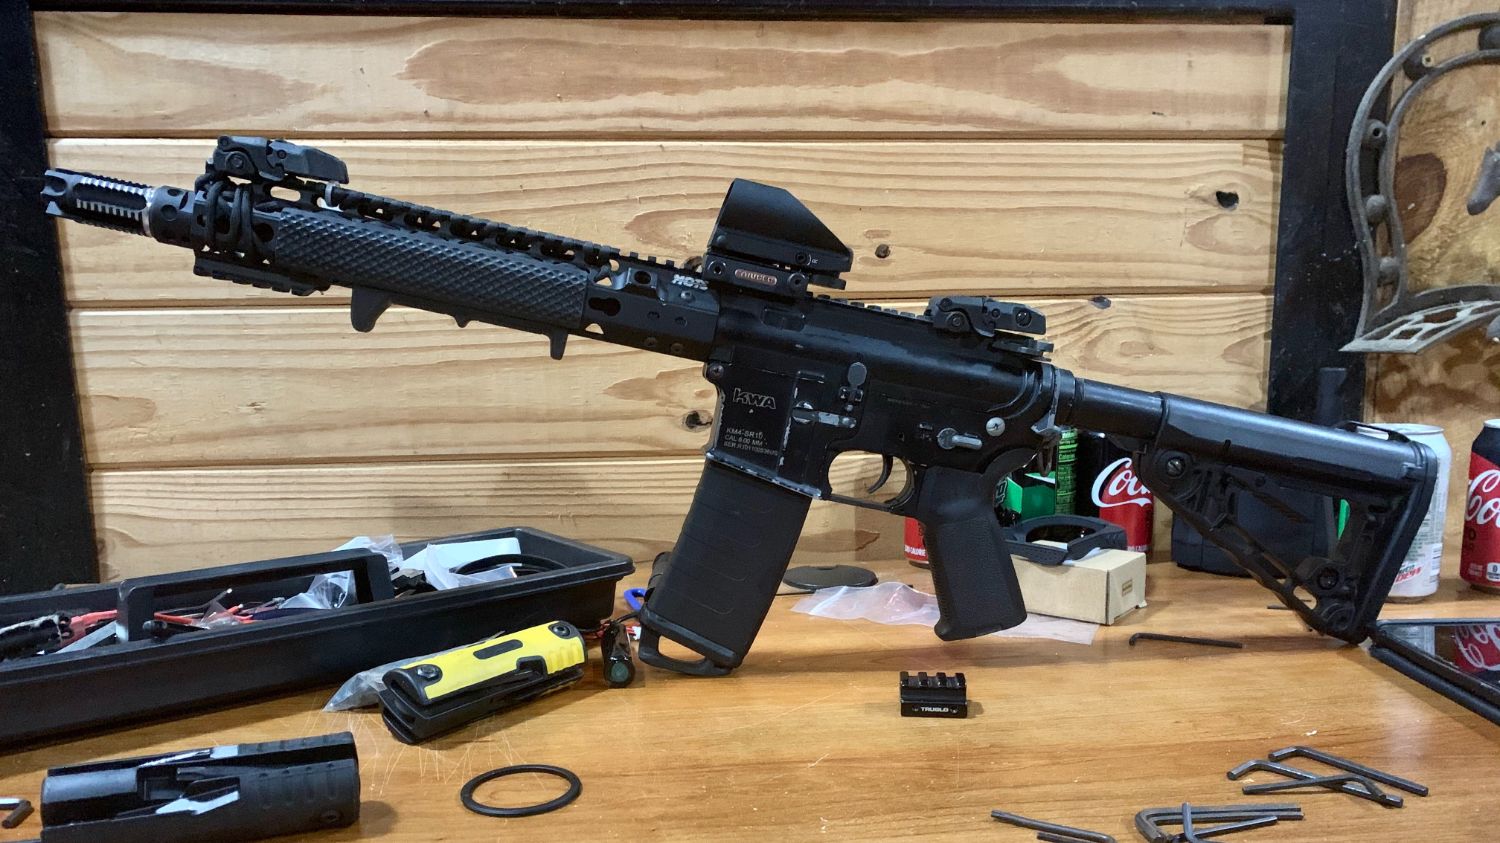
One of my 417s, featuring my WIP HK417 drum design. I could use some suggestions on how to two-tone it up more, as its good up front but id like to add some FDE towards the rear. The G28 grip wont work, already tried (different design for some reason).