Speedbird_666
-
Posts
1719 -
Joined
-
Last visited
-
Days Won
30 -
Feedback
100%
Content Type
Profiles
Forums
Buy a Patch
Classifieds
Everything posted by Speedbird_666
-

Taiwangun Shipping Disruption (Brexit Related Content)
Speedbird_666 replied to Speedbird_666's topic in General Discussion
That's fair enough. But it seems the days of cheap guns from Poland have gone. I've been buying guns in the various sales over the last year from UK stores, there were many bargains to be had. Not TaiwanGun cheap, but still significantly better than normal UK retail. May I ask, how much was your order total? I'm trying to wrap my head around the 'Government Charges' bit and see if roughly correlates with Import Duty and VAT. -
Taiwangun Shipping Disruption (Brexit Related Content)
Speedbird_666 replied to Speedbird_666's topic in General Discussion
Indeed. I've been playing for 15 years now. My first ever overseas Airsoft order was placed only 12 months ago - funnily enough with TaiwanGun. The rest of my guns/gear were bought from UK suppliers anyway. New players will get sucked into the sales pitch from shop staff - not realising that they can buy cheaper from elsewhere. Spend 20min in the Zero One* showroom on a Saturday morning and you'll see plenty of punters paying over the odds for their first shooter. *Not dissing Z1. They have staff to pay, family to feed, Mercedes to buy etc, so if people are willing to pay their prices, then fair enough. -
Macks airsoft dreamers of the week thread
Speedbird_666 replied to Mack's topic in General Discussion
It's a fair price for what it is. Very niche, but I'm sure there's someone out there who will want it. -
Taiwangun Shipping Disruption (Brexit Related Content)
Speedbird_666 replied to Speedbird_666's topic in General Discussion
Not a lot. UK Airsoft will be fine. I would wager that most new players get their kit from UK vendors, especially those that live close to a bricks and mortar store/showroom. It's the more experienced hands that will be hit hardest with this. -
Gawd, it looks fucking awful. I've been following this thread with interest. Very tempted to pick an AAP-01 up on payday.
-
The 'What have you just bought' Thread
Speedbird_666 replied to Cameron364's topic in Guns, Gear & Loadouts
Yeh - just found it. I'm resisting the urge to order anything from Ali until the Chinese New Year has passed. Any problems with shipping with the new VAT rules? -
The 'What have you just bought' Thread
Speedbird_666 replied to Cameron364's topic in Guns, Gear & Loadouts
That sure does look very nice. SomoGear? https://www.somogear.com/product/somogear-ngal-red-aiming-laser-ir-laser-flashlight/ -
Taiwangun Shipping Disruption (Brexit Related Content)
Speedbird_666 replied to Speedbird_666's topic in General Discussion
So can HMRC through Direct Recovery. The new rules came in a few years back just before I left the department. If you owed more than £1K in tax, and had over £5k stashed across your bank accounts, the money can be taken directly from the bank if you ignore HMRC trying to contact you. -
Taiwangun Shipping Disruption (Brexit Related Content)
Speedbird_666 replied to Speedbird_666's topic in General Discussion
As previously mentioned, it could be currency fluctuation. I've seen the prices go up and down a few quid each way quite a few times on TG. I've no idea how frequently they update their conversion rates - it could be a built into their shops back-end system to pull the spot rate automatically. -
Taiwangun Shipping Disruption (Brexit Related Content)
Speedbird_666 replied to Speedbird_666's topic in General Discussion
TG stock a lot of stuff that’s not readily available from UK suppliers, so for me cost is a lesser issue, it’s about having choice of products. For example, they have the CYMA blue edition MP5K in stock, which I’ve yet to see here in the UK. Handling fees are annoying, but it’s the import duty that will be the kicker, if it’s charged at all. -
Taiwangun Shipping Disruption (Brexit Related Content)
Speedbird_666 replied to Speedbird_666's topic in General Discussion
Taiwangun are not charging Polish VAT on sales to the UK. All the prices have been dropped by 23%. UK VAT is chargeable at import, collected by the carrier. Not sure about the duty side of things as to whether it is chargeable under the free trade agreement or not. So net we gain 3% on the VAT difference, but that will be swallowed in carrier charges. The shipping cost has been dropped a little I notice, just over £9. -
The 'What have you just bought' Thread
Speedbird_666 replied to Cameron364's topic in Guns, Gear & Loadouts
I just bought a Classic Army G36K 'doer-upper'/boneyard. Hopefully it doesn't become a money-pit to fix. -
Were HAO squinting when they modeled that grip? Pretty sure the real H&K v7 grip looks like this (note the angle difference):
-
Double Eagle M904g – Aka the Original Q Honey Badger
Speedbird_666 replied to mightyjebus's topic in AEG/GBBR Reviews
If you are UK-based, good luck with that. Nothing is being shipped from them at the moment. To answer your question, as they don't publish the inner barrel diameter, assume it to be roughly 6.05 to 6.08mm. -
The 'What have you just bought' Thread
Speedbird_666 replied to Cameron364's topic in Guns, Gear & Loadouts
My 'Rustys Rigs' SBS-Style SF Extraction Chest Rig arrived this morning. Very pleased for £40. I forgot how practical these style of rigs are. Very nicely made, the straps could be a touch longer, but it still just about fits my slightly rotund post 'xmas and lockdown' figure. Not my pic - Taken from the Rustys Rigs FB page: -
The 'What have you just bought' Thread
Speedbird_666 replied to Cameron364's topic in Guns, Gear & Loadouts
It would be interesting to see if they've fixed the QC issues with the Edge 1.0 guns. Did I see somewhere that the Core series will start being shipped with X-ASRs as standard? -
Taiwangun Shipping Disruption (Brexit Related Content)
Speedbird_666 replied to Speedbird_666's topic in General Discussion
You shouldn't need to mention the downgrade in the commentary - there's a button on the product page to specify your output before adding to cart. Otherwise, just your UKARA number and downgrade FPS and you should be fine. Be prepared for VAT + Import Duty + Handling fee from the Courier when you are actually able to order. Otherwise, if it's a relatively common gun, consider a UK supplier - the price difference will not be as big anymore. -
Macks airsoft dreamers of the week thread
Speedbird_666 replied to Mack's topic in General Discussion
When it comes to Star Rainbow Company the old saying 'In the land of the blind, the one-eyed man is king' springs to mind with your examples....? I shall counter with - the XM8. -
Macks airsoft dreamers of the week thread
Speedbird_666 replied to Mack's topic in General Discussion
Doesn't really matter what gen the gun is though, because it's an SRC. They are all pretty shit*. I wouldn't pay £2.50 for it. *I'm sure there are a few people that will spout on about how their SRC has been amazeballs. I have yet to see a decent one in the real world. -
The 'What have you just bought' Thread
Speedbird_666 replied to Cameron364's topic in Guns, Gear & Loadouts
Looks pretty much the same as this: https://www.bespokeairsoft.co.uk/airsoft-accessories/suppressors-tracer-units/cccp-qd-silencer-full-metal-with-flash-hider-long-black -
The 'What have you just bought' Thread
Speedbird_666 replied to Cameron364's topic in Guns, Gear & Loadouts
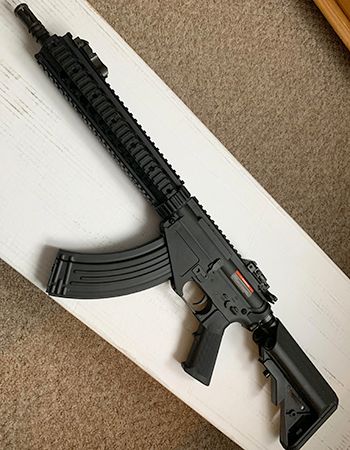
My Cyma CM650A (SR47) for £85 arrived today, courtesy of the Patrolbase sale. I bought it as a cheap loaner. But I like it, I like it a lot. I might end up using it a lot more than I originally intended.
-
The 'What have you just bought' Thread
Speedbird_666 replied to Cameron364's topic in Guns, Gear & Loadouts
There were some cracking deals to be had on Patrol base. £85 for a Cyma CM.650A/SR47? Oh go on then...mine arrives Thursday. I even had consent from the missus. There were a few Specna Edges for £70 - £100, which was worth it just for the external parts. Nearly added one to the order, but the missus would only let me buy the one gun. -
Yeh, I said the same thing on his status update. A cheap T6 single-mode drop-in can be had for £6-7 quid off eBay. Problem is the current shipping situation from China.
-
Taiwangun Shipping Disruption (Brexit Related Content)
Speedbird_666 replied to Speedbird_666's topic in General Discussion
D’oh! I got mixed up, you are correct, it’s Gunfire I got the message from. Still relevant to the thread though. -
Taiwangun Shipping Disruption (Brexit Related Content)
Speedbird_666 replied to Speedbird_666's topic in General Discussion
Just got an email from *edit* Gunfire. They will only fulfil orders over £135 from 1st January onwards. No reason given in the email or updated T&Cs.