Speedbird_666
-
Posts
1719 -
Joined
-
Last visited
-
Days Won
30 -
Feedback
100%
Content Type
Profiles
Forums
Buy a Patch
Classifieds
Everything posted by Speedbird_666
-

Macks airsoft dreamers of the week thread
Speedbird_666 replied to Mack's topic in General Discussion
Thanks - I'll pick up a patch shortly. I honestly cannot think of a meaningful comeback to that. Well played, old chap, well played. -
Macks airsoft dreamers of the week thread
Speedbird_666 replied to Mack's topic in General Discussion
Out of interest, how does one became a supporter? -
Macks airsoft dreamers of the week thread
Speedbird_666 replied to Mack's topic in General Discussion
And the gauntlet is thrown down. This should be interesting. -
Macks airsoft dreamers of the week thread
Speedbird_666 replied to Mack's topic in General Discussion
That's a fair comment. I will point out that he seems to have many satisfied buyers (or you could argue 'customers'), that in itself is a good thing for the forum in my opinion. The better the collective reputation of the sellers on here, the more popular this forum will be. You can see that there has been work done to root out scammers with recent announcements and this very thread serves as checks and balances for those who sell on here. I know you think that he's spamming - but if he's keeping people happy and coming back to the forums looking for more, that's a good thing right? I mean he has more positive feedback and followers than you, me and @Adolf Hamster combined. -
Macks airsoft dreamers of the week thread
Speedbird_666 replied to Mack's topic in General Discussion
But whilst there is another valid explanation, and he is operating within the forum rules, why should he be banned? Your gut feeling? That's not a valid reason either. Don't get me wrong - he could very well be a retailer. But without real evidence, and a change (or clarification) of the Classified rules, it's unfair to keep calling for him to be banned. You've done it a couple of times now in this thread. Perhaps a moderator could contact the guy and establish his motivations, just to put the matter to rest? Again, perfectly valid points too. I was just playing devils advocate. But until either he comes on here to clarify his intent, or the Mods make contact with him, it's no good sharpening the pitchforks and lighting the torches based on opinion and supposition. Just my 2p. -
Macks airsoft dreamers of the week thread
Speedbird_666 replied to Mack's topic in General Discussion
Don't get me wrong, It does look a bit fishy on face value. But I will point out a couple of things - - 1) He is only selling singular Items, many of which have a 'slight' variance on what you would get on a true NIB gun (i.e. some are wired to deans, have got an extra mag(s) included etc.) - 2) There isn't much consistency with the brands he sells, he basically covers every major manufacturer from ICS to TM, with a smorgasbord of others in between. That is relatively unusual for all but the bigger retailers. I think (and I could be wrong) he could buy a fuck-tonne of guns with a large disposable monthly income, and bins off anything he gets bored with/doesn't like fairly quickly. For context: I work for an Investment Bank, where the even the upper-mid-level guys are on six-figure salaries (not me unfortunately). They could drop a grand or two a month on whatever they want, cover their monthly bills and expenses comfortably, and still jet off for two holidays a year. You should see the car park - there must be £50 million quids worth of cars and motorbikes parked in it (again, not me...) Again, I do not know this guy at all, but there could very well be other reasons why someone would sell in this manner. -
Macks airsoft dreamers of the week thread
Speedbird_666 replied to Mack's topic in General Discussion
Playing devils advocate: what exactly has he done wrong? I mean specific rules he has broken? The mods have already said previously that he has, by and large, operated within the forum rules: To be clear, I've never bought from, communicated with, or met the guy. Post it up in the Appraisals section: https://airsoft-forums.uk/forum/151-appraisals/ -
Whoa, that is cool. I mean I know it wouldn't stack up against modern stuff (although it uses a V3 GB?), but when I saw that on DenTrinity what must be 20+ years ago, i thought it was the coolest thing ever. I would never own a P90 now, but back then I would of had one in a heartbeat. Because I was young and liked watching Stargate.
-
@ThisKillaDTThere might be a Tippmann M4 owners group on Facebook, might be joining one and running it past them? You can't be the only one that's had this problem.
-
Am I missing something? Couldn't you just screw the buffer tube back into the receiver, forcing the bolt forward past the receiver split line?
-
Macks airsoft dreamers of the week thread
Speedbird_666 replied to Mack's topic in General Discussion
Well played good sir. ? -
It's a tough one. I've sold guns before to people with elapsed UKARAs or 'other' defenses (dun dun DUN!), but I knew those people from various interactions and other (non RIF) sales, seen pictures/videos of them playing, and have been long-established on the forums. Would I ever do the same to a zero-post new guy (or girl)? No way. (note - I'm aware my post count on here is relatively low - I migrated from the Z1 forums a little while back)
-
Macks airsoft dreamers of the week thread
Speedbird_666 replied to Mack's topic in General Discussion
£400 for half a gun. Nice. I'm sure those are expensive parts...but 400 quid. -
Macks airsoft dreamers of the week thread
Speedbird_666 replied to Mack's topic in General Discussion
They come fitted to the Edge 2.0 series as standard. -
Macks airsoft dreamers of the week thread
Speedbird_666 replied to Mack's topic in General Discussion
Oh dear.... above retail (albeit with a handful of cheapo accessories) on some mediocre guns. -
Macks airsoft dreamers of the week thread
Speedbird_666 replied to Mack's topic in General Discussion
Ah, you mean the picture, not the advert. I think it’s an HPA gun. -
Macks airsoft dreamers of the week thread
Speedbird_666 replied to Mack's topic in General Discussion
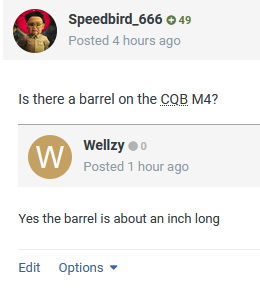
I'm assuming in the buffer tube. -
Macks airsoft dreamers of the week thread
Speedbird_666 replied to Mack's topic in General Discussion
Confirmed - it is the barrel...
-
Macks airsoft dreamers of the week thread
Speedbird_666 replied to Mack's topic in General Discussion
It can be for some - when I played paintball with mechanical guns (Autocockers), I was faster shooting with my middle finger than my index. -
Macks airsoft dreamers of the week thread
Speedbird_666 replied to Mack's topic in General Discussion
This was doing the rounds on social media recently: TBH, i don't know what's worse...the short barrel...or the short shorts...
-
Macks airsoft dreamers of the week thread
Speedbird_666 replied to Mack's topic in General Discussion
I think that the lump of metal that should be a barrel nut IS the outer barrel. Much like: -
Makes for an interesting read - I like the idea, but like you say, difficult to implement.
-
Macks airsoft dreamers of the week thread
Speedbird_666 replied to Mack's topic in General Discussion
Indeed. Whilst I would never spend that kind of money on a gun, those grips do kinda justify the price. I think he will struggle to sell it though - very niche. -
Late '90s/early '00s - staring at the DenTrinity website - they had built a P90 (which was uber cool in popular culture at the time) using TM internals in a model gun way before TM bought theirs to market. I was hooked from there on in.
-
Macks airsoft dreamers of the week thread
Speedbird_666 replied to Mack's topic in General Discussion
Loving the Potato-cam used for the pics. Looks like someone screen-shot some analogue CCTV footage. Nice.