Popular Post SkywardSoul117 Posted September 3, 2024 Popular Post Posted September 3, 2024 (edited) Hello Hello, I remembered I had an account here and asked some questions some time ago related to these projects. I figured I'd do a bit of a project dump on what I've been up to. I'll use this thread for future additions, as I certainly have more planned as funds allow. The BR-55 and M7 SMG are near completion and are fully functional. Both need a few tweaks and some internal parts. I'd stopped both projects until January this year, and started both from scratch with the aid of my new printer, a Prusa XL (single head for now). Due to ill health, I had to stop work on the BR, having completed a lot of but not all of the physical aspects, and instead directed my attention to the design work for the M7. The M7 requires a lot less metal work (only cutting some rods and drilling about 4 holes in a 3x12 stainless bar, and a couple in the alu barrel mounting). Thus both are being worked on in parallel. I'm currently in the process of refining a few things. Needless to say, neither project has been particularly cheap. Credit to Kingdom of Airsoft and Perun for the original idea to use the ETU++ as a "DIY" solution. The BR-55 A bit of a mix of The Halo 2, 3, and H2A designs, I went for a mix of aspects due to preference, and deepened the stock to allow fitment of a V3 gearbox. It weighs around 4.5KG unloaded, and is reinforced with 15mm stainless box section within the upper, and 12x3 stainless bar running down either side of the stock. There are various bits of metal rod where needed. Surprisingly it's pretty well balanced on the (very comfy) grip, and will stand on the grip alone unsupported. It's printed very solidly in eSun's PLA super tough. It feels very sturdy and there are no squeaks or wobbles. (old video where it's basically being held together by me, you can also see my H2A Marine helmet). 1:1 to the "real" size. Guts: It uses a perun ETU++ hooked up to various microswitches for operation, and has a proper 3 position selector with a mechanical safety. This means no bullpup trigger bar and a snappy trigger. The round counter is fully operational, utilising Tachyon's solution with a custom graphics pack and modified sensor layout, removing the need for a "sock" on the end of the barrel. The round counter is reset by pulling back the charging handle. Manually (very, very carefully, I swear) removed the sensor and emitter from the board, applied heatshrink, and superglued to a saddle that straddles the hole I drilled in the barrel. Also contains compass and clock. Quite useful for timed games. The gearbox is a V3 LCT AK, with an airsoft-pro G36 chamber and 450 something-mm ZCI barrel. Sadly the ML bucking I used (60' macaron) has given me some issues, and will not lift a .25 without dropping 70+ FPS. Having attempted the usual fixes and various nubs, I'm at a loss. I have a psionic Tho-R on the way for both the SMG and BR, so touch wood that'll be an improvement. The airsoft pro chamber is nice in that it bolts directly to the gearbox, removing that as a variable for air leakage. The battery compartment is in the foregrip, with an AK dust cover style button for easy access and removal. The space is sizeable, and I can't see much trouble fitting at least a 3000mah 11.1v in there (if only I had one). I intend to include a small toolkit. The magazines are fully custom, with ML superfeed springs (hello midcap syndrome). Not perfect, but I'm working on improvements. Thanks to Igniz for some pointers on dimensions. I intend to try integrating AR mag hi-cap guts at some point for a skirmish mag. The mag release is situated in front of the mag well, and gives a nice satisfying click on seating. The well is intentionally loose for the addition of velcro, giving a secure fit. These feed into a modular feed block that interfaces between the chamber and magazine. I've allowed provision for a built in tracer and a mechanism to prevent BBs from dropping. Takedown: Basic takedown is very simple and tool-less. It involves removing the foregrip, removing a detent pin from in front of the trigger guard, then sliding the upper forward out of the 1/3 rifle length grooves. The braided battery cable should slide free easily. Removing the gearbox requires removing the hop from the gearbox, pulling the squished wires out, unscrewing 5 bolts on the back, and feeding it out through the open hole in the back of the stock, followed by disconnecting the deans and microswitch cable. Somehow both better and worse than the AUG. The pistol grip is held in by 6 M4 bolts and I doubt that'll ever go anywhere. Printed and oriented for maximum strength. The entire upper takes down into sections from around the 15mm tube. Other nifty details and gaffes: -There are 6 QD sling points, 2 rear, front and mid (in front of the receiver). -Rubber (TPU) butt pad and coating for the cheek rest. -The cheek rest is too far forward to comfortably use. Game design moment. -The rail is too far forward for most magnified optic's eye relief to be useful. You can however lift the stock over your shoulder to get close enough. -I neglected to put a ledge on the front of the trigger guard, which the fire select detent mechanism attached to. This meant if you put pressure on the trigger guard (say with your hand), it would move the fire select lever up and down. This has been rectified quite easily, if a little wastefully. -I dropped the whole lower receiver onto a concrete corner from several feet while carrying it to the food dehydrator to cure, after the final coat. I nearly screamed in anguish. Thankfully, PLA-ST is very tough, and it sustained only a minor dent on an edge. This is the first battle damage. Remarkable material for being so cheap and easy to print. -I originally intended the design to keep the hop up chamber with the upper upon disassembly. I found that no matter the spring used, firing would cause the hop up to move forward 5mm with every shot. I suspect this has something to do with the anti double feed mechanism it has. It's now fixed to the gearbox, and is somewhat delicate when unsupported by the upper, hanging by only a grub screw. At some point I'll look at fixing it proper to the lower. -The magazines had to be angled forward to be in an optimal position to feed. -I didn't think my power wiring through very well, and it's a bit of a rat's nest. The excess power wires that give sufficient length for the gearbox to be removed have to be stuffed into a hole to keep them out of the way. Not an easy prospect with thickly insulated 14awg wires. Needs improvement. -The muzzle flash is printed and currently just friction fits on the barrel. I've the means but not the expertise to use a lathe to cut a thread into it. When that happens, I intend to buy Foundry's alu flash hider. -The painting was a bit of a nightmare, and contained a lot of stops, starts and bad farts . Accidentally wiping off paint with unintentionally strong spirits, gray overspray onto black, clear clouding, dropping final piece onto concrete... etc. -The detail lines on the stock were so shallow, sanding and spray putty almost removed them in places. Without thinking I set to with a knife, butchering some grooves into several hundred hours of work. -Much like an old warplane being restored with a few bolts or a nameplate being the "same plane", the foregrip was the only part that made its way over from the original project. Considering the detail lines were so small that they didn't even print, I'm kind of wishing I hadn't. I'd say the (almost) end result is worth it though. M7 SMG Ah, the first proper CAD project I ever worked on, and the first airsoft gun I ever attempted. Frankly, the original I started 5-6 years ago was unsalvageable. Looked pretty, but holy moly, what a mess. It's not wasted though, you learn things. I have to say I'm quite happy with how this one turned out. Far less faff than the BR-55, almost everything worked as intended without much trouble. Printed in much the same fashion and material, but a fair sight simpler. (please excuse the mess, Prusa XL enclosed in the background) The guts: JG Vz.61 AEP innards form the working part of this pew pew. Regrettably, AEP performance isn't always the best, and repairing broken ones can be iffy. You can imagine my disappointment when I finally finished a gun that's been 5-6 years in the making, and it has an effective range of 15 feet. The stock bucking applies no backspin at all. Thankfully everything else works, and I have a Psionic Tho-R on the way to help remedy that. The gearbox unfortunately had an incident where the cut-off switch fell off internally, as evidently no thread lock was applied at manufacture. Awaiting a fine torx set to get at it. The feed route is an interesting one, given it goes around 4 bends and finally ends up vertical. Works just fine though apparently. (Note it's a little more noisy than it would be, as there's no barrel or hop unit, or BB being fired) VID_20240811_210834390.mp4 As a salve for the disappointment that may be gripping some of you upon hearing the acronym "A-E-P", this gun's perfectly sized for a P* F2, and would require minimal design changes to adapt it for such. This gun also uses the Perun ETU++, and this time with some wire management (woo). I've got a very satisfying clicky electronic safety that uses magnets as detents, as I had no room to integrate a mechanical safety in the linear trigger. It's very ergonomic and easy to toggle with the trigger finger within the trigger guard. The ETU was intended for this project originally as a way of getting around the lack of semi cut off present on CMG gearboxes (CQB gun with no semi is as useful as a max joule sniper in CQB), but proved perfect for bullpups. The fire selector isn't in the most ideal of locations (under the magazine well), but it can be easily toggled with the off hand. The battery compartment is in the grip, and a cap comes off with the push of a button at the back. It can hold standard sized lipo batteries, preferably short ~1200mah 7.4v. I'm very pleased with the magazine seating / locking mechanism. It was a problem with the original. This time there's a hook very securely mounted to the back of the receiver. As you slide the magazine forward onto the tray, the hook falls into a groove in the magazine, and as the fore of the magazine seats into the mag well, the hook locks the magazine in the X axis as the mag catch locks it in the Y. You can jerk the gun around by the magazine only without play. Nice click too. Both the stock and foregrip change position. The stock extends by around 95mm, and locks securely with a 5mm stainless pin into a 12x3 stainless bar. The foregrip also locks with a metal pin, but into ABS+. It has no side to side play, but has a little forward and back play when deployed. I've decided it's negligible given it's minor and doesn't make a noise. The ejection port / charging handle also works smoothly, though it's not for thick or gloved fingers. The top iron sights are removable, to be replaced with a pic rail. Side and bottom rails can also be added. Takedown: A little more tool intensive than the BR-55 for basic takedown. 2 bolts allow the removal of the upper "cap", 6 more for the inner "block" which houses the hop up chamber, feed block and outer barrel. This slides forward off the nozzle and up. This allows the gearbox, pressured down by the upper cap, to be removed. Nifty details and gaffes: -The stock detent spring has been a source of frustration and fiddling. I've spent some time trying to get the spring mounted onto the pin block. To be improved. -The stock pad is TPU with ABS encased within to mount the 2 QD fittings (designed for single point slings only, unless the front is wrapped with something). TPU doesn't deal with overhangs well, and the quality leaves something to be desired. I'm hoping a second head for the XL will solve this problem (multi-material integration). -The original Omron SS-5 switch I bought for the trigger sounded *exactly* like a computer mouse. I couldn't stand this and instead bought some of the XSS-5 copies that actually feel more solid and sound better. -Surprisingly ergonomic, though the grip is less comfy than the BR. I didn't want to sacrifice the aesthetic too much. The sights are useful for airsoft even if you can only really look down them when holding the gun out like a pistol. You can still align them while shouldered. Adequate for lobbing small plastic balls at other nerds. -The suppressor seems a little pointless for an electric gun, but I'll likely do it anyway at some point. It's very janky and intended to use an olight key ring torch with a threaded "presser" on the back to turn it on. I'd rather do it when I can thread the barrel. It'd also be more useful for a HPA version. Man I love the aesthetic of this thing. Drawing a blank here, nothing much went wrong. I'd hate you less for wanting me to make you one of these. That's about it for now. You may have noticed a new helmet in one of the pics, with built in forehead / glasses fan. Future projects will be the HPA SMG when I'm not poor (gee I wonder where the money went), Mk23 M6C Socom, and a HPA MA5B. We don't talk about the WE tech Glock I turned into a magnum. Needless to say I don't like WEtech anymore. I'd love to daytona a Halo replica, but alas, money. Ask away, just be aware I'm a little closed on specific details as I do plan to make a little money on these. Cheers for reading. Edited September 4, 2024 by SkywardSoul117 format errors, credit edit JPG Airsoft, Herrgh, Rogerborg and 7 others 4 6
Popular Post SkywardSoul117 Posted September 5, 2024 Author Popular Post Posted September 5, 2024 (edited) Quick update, I fixed the AEP gearbox and cleaned the factory earwax grease out. I don't hold much appreciation for the engineer that designed the gearbox, as it was quite a nightmare to reassemble. With a fully charged 7.4v and barrel installed, I think it sounds rather nice for an AEP. A quick shooting test gave me an indication that it should give surprisingly decent range with 0.25 or 0.28 BBs. I suspect the soft foam "nub" is causing inconsistent hop to be applied, so I'll be modifying the arm to accept an omega or H-nub tomorrow. Hoping it's not an air-seal problem. VID_20240905_203238823.mp4 Edited September 5, 2024 by SkywardSoul117 Herrgh, pyromancer6, Cocha and 5 others 4 4
Wooly57 Posted October 20, 2024 Posted October 20, 2024 This is epic ??? looking forward to seeing how this develops ?? SkywardSoul117 1
Popular Post SkywardSoul117 Posted November 22, 2024 Author Popular Post Posted November 22, 2024 Just a quick update on a few things. The BR-55 had its first game at the start of this month. It worked well for the whole game, though I found afterwards that the V1 Maple Leaf magazine springs I used are useless and lost most of their shape. The V2 ML springs have apparently improved on this, so I'll have to pick some up before the next game. The "squashed" springs should work fine for the SMG magazines however, so no great waste. After a long day it made me realise I need to work on my arm strength more. I've sorted the small problems and sticking points, redesigned the bolt slightly, so it has a nice HK esque lock and slap now (allows a Halo 3 accurate BR reload). Still have one or two little cosmetic details to touch up, but I'd basically call the thing done short of threading the barrel. I had to find a decent cylinder head, nozzle and tappet combo that had good tolerances to stop the midcap syndrome. I still had to shim the tappet and nozzle a bit. I've heard of some people gluing them together, but I didn't particularly want to do that. I also significantly improved the airseal / consistency. Ironically though, having tested it to +/- 2 FPS at home, the moment I got to the site, it varied wildly on the chrono. I suspect it may have just been the first few round in the magazine giving me trouble. Sadly the magwell was too narrow to fit an M4's hi-cap / flash mag internals. I think for future long rifles I'll look at integrating existing magazines into a shell. Small video after optimising the pre-cocking, 7.4v 35C, stock LCT motor and gears. VID_20241029_174825558.mp4 Here's the basic 2 point sling with fast adjustment that I put together. Credit for the design goes to Thrifty Operator on youtube. I'm also working on a new helmet, based on the Halo 3 Marine, specifically the action figure version as it has a sleeker UA plate on the front. I made it detachable as I'd never seen this done before. The helmet looks very much like some of the concept art helmets without it. I've also included a built in 5015 fan in the peak that will hopefully blow air into my glasses. Worst case scenario it becomes a head cooler if I can't duct it efficiently. Unfortunately I was tempted into attempting to print it in plain ABS. I had a spool sitting around that needed using for something. I've never printed anything in plain ABS, only improved, and was not prepared for it. Sadly there was much splitting and warping, and this caused the print of the back to fail near the end. I had to graft on a freshly printed part using ABS sheet mixed into a gloop with acetone. I'm looking at the D30 stealth helmet padding when I can affort it in combination with EVA foam placed where needed to bulk up. It's a little pricy, but worth it for the protection, durability and comfort. See, experience of printing ABS (left), experience of printing PLA super tough (right). Note the many patches of smeared ABS gloop to fill the cracks and bond the two disparate halves together. It'll be a (not so fun) experience sanding into to a smooth finish. That is at least one strength of ABS, the ability to repair and patch it together with its liquid counterpart. Very advanced and certainly not janky method of holding the back of the helmet on while the ABS gloop dried. Trust me I'm an engineer. The ABS as it starts to melt (took a while). PWM circuitboard and battery (yellow) Fan intake at the front of the peak, TPU rubber fan duct (interchangeable. I'm still scrounging up money for a HPA unit, but I'm hoping to have a Scalar Seraph in hand by early next year for building the HPA SMG and MA5. In the meantime, working on this helmet and stuff to sell like my Halo medkits, biofoam etc to fund more projects. The Halo Reach M73 concept art LMG is something I'd also like to pursue. Take care, thanks for reading. ? Herrgh, John_W, Rogerborg and 3 others 5 1
SkywardSoul117 Posted May 4 Author Posted May 4 (edited) Hello again, It's been a slow few months. The moths inhabit the empty wallet, and the paint is slow to dry in the cold of late winter / early spring. I have since acquired the HPA engine (Scalar Seraph, though I've yet to acquire the tank and regulator. I've started working on the HPA adaptation of the M7 SMG, and will be looking to do do some preliminary thinking and design work for the MA5B (Assault Rifle). Cute lil thing. I reprinted the entire helmet as the prior one was too small for me. I also printed it as one piece instead of 2, out of PLA-ST instead of ABS. I got a significantly cleaner and stronger print. While experimenting with the electronics, it turned out that DC fans usually don't like PWM unless they're designed for it. This means that unfortunately I had to ditch the controllable fan speed for a simple on / off switch. Preliminary sanding done using orbital sander, proxxon pen sander for details, and hand sanding. My fingers and tendons thanked me for buying the pen sander. Layer of Motip spray putty that needs to be sanded right back to the base material. Leaving too much on makes the paint easy to chip / flake off. Unfortunately I spent a lot of time sanding the helmet smooth, painting it with a rather heavy top coat of Maston olive green, before figuring out an alternative finish that I'd rather use. It sealed the deal when I foolishly thought the paint was fully set and I turned it over to paint the bottom. Somehow I hadn't thought of making a helmet stand, and the paint on the top marked from the bubble wrap I'd set it on. I sanded it back a bit before applying the textured finish. The technique I discovered was simply painting over a textured spray paint, which provides a nice textured finish that's extra matt and scratch resistant. Unfortunately this meant I wasted rather a lot of somewhat expensive paint. Comparison between the same paint, both smooth and textured. Rustoleum textured paint. Created a helmet stand for painting without the paint ever touching anything. Overcoated with Maston olive green. Unfortunately the black also didn't fully set, and the masking tape marked it lightly. The lacquer evened it out well enough thankfully. I've never had this many issues with paints not setting even after days, even in the cold months. I had the same paint mark from sitting on fabric weeks after painting. I ended up using a food dehydrator inside a large cardboard box, set to 50'C for 12 hours to "bake" the paint. It seems to work well. Voila. I think it came out rather well. The chin strap was a bit of an experiment, to see whether a fully elastic strap would work. It didn't, it's *too* elastic. You want a little bit of flex to allow your jaw to wag, but too much and it allows the helmet to shift and pull right off your head if you fall. So as you can see there are multiple layers of elastic with some inelastic strap to remove the elasticity rather than ripping all the stitches. I'll certainly change it at some point. I've used a magnetic buckle as I did with my previous helmet that makes it easy to secure with gloves on. Due to the buckle, you can't get a cheek weld on the side it's on. It can be reversed easily, but not something you'll be doing mid game. Getting a cheek weld in general is awkward, but it's the price you pay to use a "sci fi" helmet. It is possible, and better than my prior helmet in most ways. I've also added TPU (rubber) pads to the inside and bottom of the mandibles to stop any scraping against guns to protect the finish of both and reduce noise. The padding is a rather crucial part of this helmet. Not only is it about comfort, but it's about safety too. I see a lot of dodgy custom helmets, and I wanted this one to not be a death trap while running around playing in the woods. I've bought a set of quality D30 pads from a body armour shop, which are amazing at absorbing impacts. Some may know D30 from motorbike armour / padding. These form the primary padding around the skull, while my own DIY padding protects the neck from rotation of the helmet. It consists of 20-30mm of hard / dense EVA foam, with a soft open cell fronting and sewn mesh covering. The fan and battery is integrated in such a way that it doesn't protrude or create any pressure points. The fan is a little louder than desired, but it does actually work to clear / prevent fog if you tilt your glasses slightly so there's a gap at the top for the air to pass into. I imagine it works well for goggles as the top vents would be closer to the duct outlet. The side panels can also be replaced with low profile ones that should allow wide goggles to fit. Key thing for me is it's low fuss, no tubes to mess with, and it's there when I need it. It's a little noisy for running all day, but there's enough capacity in the 18650 battery to do so. Something I may look into eventually is fitting a full face shield, a little like the NMPD police helmets in ODST. The Bolle sphere would be the main candidate as it has a 16J impact rating. One more project I'll be working on is a backpack for my kit and the HPA rig. I wanted to do the hardcase trooper backpack from Halo Reach. This'll be a tall print, using up 359mm of the XL's 360mm build height. I want to add some MOLLE modularity to it. I'll be sewing the straps and padding system, and likely padding out the inside so it's not a rattle can. On another post I'll detail the DIY chestrig I made once I have the chestplate and pouldrons finished up. Thank you for reading, more updates to follow Edited May 5 by SkywardSoul117 Rogerborg and ButcherBill 1 1
Supporters Rogerborg Posted May 6 Supporters Posted May 6 Damn, you're taking this seriously. Good call on the D30, and the 5150 fan. Mine's round the back, and I'm forever trying to find a ducting solution that works reliably. Having it on the front and blowing straight down is a great idea. SkywardSoul117 1
SkywardSoul117 Posted August 18 Author Posted August 18 (edited) Hello again, I've made a fair bit of progress, so I felt I should drop an update on what I've been up to. The biggest project has been the SMG. To be seen completed (to be painted still) below, complete with functional suppressor and fairly game accurate red dot sight. The red dot is a Vector optics 1x22 V3. A very good value optic. It has an auto-off, which is great as I have a habit of killing batteries by leaving optics on... It's seen some improvements to the selector switch (new higher quality toggle switch), stock detent system, grip battery panel, and now includes a threaded barrel. The magazine was also improved (now a few mm wider to allow for extra M2 bolts which ensure no flexing apart of the two halves when using strong springs). These improvements will translate to the AEP version if I ever make another. It's also printed in a new ASA (123-3Ds brand), that I've found to be exceptionally printable in a mildly warm chamber. It's a little bit more flexible than the PLA-ST I used previously, but it's more temp resistant (fine to be left in a summer car in direct sun) and long term environmental stability (10y+). I've since acquired an Airtac tank, reg and line, along with a filter and pump. It's gruelling work (doubly so when I found the reg outlet had a leak, and I didn't turn the reg off, letting out most of the air), but tolerable. Parts were acquired for the M7, such as an FPS airsoft 185mm barrel, Lonex AUG hop chamber, XT barrel extensions, and an alu toob. Various little bits and pieces. First testing of the engine went well, though when I got it into the actual gun, ran into some consistency issues. As it turns out, stock tappet springs aren't nearly strong enough, and a stronger one had to be stolen from another replica. Unfortunately the extra strength tappet springs are ludicrously expensive for what they are. (sound warning) VID_20250703_212547966.mp4 See the basic working setup of the gun. The Seraph is a particularly unusual engine in that it requires a carriage with a tappet plate to be made. Thankfully I nailed the dimensions on the first go. See, comically large "ultra super sneaky suppressor". And torch mount with completed suppressor. The suppressor has a series of plastic rings holding some rods that keep the foam out of the path of the BB, while allowing the air to expand into the foam. I lined the inside wall of the suppressor with TPU rubber, and included some TPU cones. I'd do some testing to find what's most effective, but I'm plenty happy with it as is. I believe the extra moving parts (tappet plate) adds some unsuppressable noise. The loud crack is successfully deadened however. VID_20250726_215728216.mp4 Another improvement over the original is metal detent sockets for the foregrip. I went to the effort to add a metal plate in the stock, so I figured, why don't I have metal inserts for the foregrip also? I didn't like having metal on plastic, when I value longevity. I've also successfully managed to print polycarbonate (eSun) for the first time, so any clear parts you see are now in polycarb. This includes any high wear pieces or pieces that benefit from being stiffer, such as the feed nozzle, magazine release and hook etc, and the magazine base (which is very thin at the base, so benefits from the far better impact resistance over PETG). It's clear to allow you to see how many rounds are in the magazine (though unfortunately not while it's in the gun). The backpack is near completion, though due to life, it has sat with only spray putty, ready for more work for a time now. Padding, lid and straps are done. Hopefully soon to be completed, so I can use it to carry the HPA tank for the SMG. Buckles are 3D printed and magnetic. It's also a rather unintended design point that alice pack straps can be used if wished. I've also finished sewing the chest rig, completed some more BR-55 pouches (unfortunately run out of ranger green cordura, and now don't have enough for SMG pouches), and completed the arm panels for the pouldrons. Unfortunately ranger green cordura is shocking scarce, and the one place I can buy it, it's £30 per meter, 3 or more times the going rate for similar material. (don't know why this one is flipped, can't fix it). One small last thing, I added a USB charging board for the 3.7V battery on the helmet. Fancy! Thank you for reading. I plan to get some decent pics of me in gear soon. o/ Edited August 18 by SkywardSoul117 ButcherBill, Lozart, HZR13 and 1 other 2 2
Lyndication Posted August 18 Posted August 18 That M7S is a thing of beauty, but man I'm very envious of that Marine helmet. Looking forward to your upcoming SOEIV project HZR13 1
SkywardSoul117 Posted August 18 Author Posted August 18 Thank you lads. The helmet's a bit front heavy with the armour panel, but I've designed and printed one that's about half the weight that I need to paint up. Bit of a shameful self plug, but I do sell the helmet on Etsy under Thunderhead Armoury. SOEIV coming up. Parachute, a big metal bucket, and a cliff. Lyndication 1
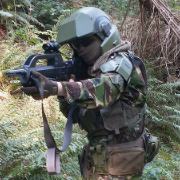
SkywardSoul117 Posted August 25 Author Posted August 25 I'd call these rather poor quality photos, but here you go regardless. Unfortunately most are done with a phone camera with the notable exception of the first one. Paint me like one of your French Marines This was a bit rushed, so I'll probably get another set of photos with a better camera, and hopefully do a shooting video or two. ButcherBill, Lozart, HZR13 and 1 other 4

Recommended Posts
Create an account or sign in to comment
You need to be a member in order to leave a comment
Create an account
Sign up for a new account in our community. It's easy!
Register a new accountSign in
Already have an account? Sign in here.
Sign In Now