-
Posts
351 -
Joined
-
Last visited
-
Days Won
10 -
Feedback
100%
Content Type
Profiles
Forums
Buy a Patch
Classifieds
Everything posted by The Waco Kid
-

Waco’s guide to field sustainment
The Waco Kid replied to The Waco Kid's topic in Guns, Gear & Loadouts
Water sources “Water, water everywhere and not a drop to drink.” Sea water, brine and brackish water are too saline for humans to drink safely. Standard portable purification methods do not usually work. The most effective method for making these sources acceptable is distillation. Basically boiling and collecting the condensed steam. This is resource intensive and time consuming so not feasible for travel. It might be the only option in a survival situation however. -

Waco’s guide to field sustainment
The Waco Kid replied to The Waco Kid's topic in Guns, Gear & Loadouts
Water bottles and bladders • Metal containers. Some metal containers can be used to heat and boil water in, which is useful. Double walled flasks and closed containers (always remove the stopper) should not be used however. They can go bang shower you with boiling water and potentially metal fragments.☹️ • Plastic containers. The plastic bottles you buy soft drinks in are popular with the ultra light backpacking crowd. Cheap and fairly robust. Clear containers make it easy to see content and how clean they they are. Flexible water bottles, bags and bladders (like Camelbak) can be drunk from using an attached hose or straw. I find these a pain to keep clean but a large flexible bottle or bladder can be easier to pack than some other options. Some more robust plastic bottles can hold hot liquids. Some water bags, often those marked as emergency survival kit or lab use, can be used to boil water over an open flame. • Glass bottles. Heavy, in some regions reusing glass bottles still happens but it’s not uncommon for people to store chemicals or fuel in them before returning. Standard cleaning doesn’t remove all traces of this….. Glass is handy if you are buying neat roadside alcohol though. As this liquid will melt other materials unless you drink it quickly. ? • Organic containers. Hollowed out gourds, wooden costels and leather canteens were (and still are) all used to carry liquid. They problem them tend to share is keeping the inside clean compared to modern materials as they offer a nice home for bacteria. Bit if you fancy tabbing along Offa’s dyke in dark age reenactment mode go for it.? Features and uses to consider: • Heat resistant containers can be used as a hot water bottle. • Clear bottles are easier to see how clean or full they are. • Flexible carriers might be more convenient to pack. • Wide mouths bottles can be used for water tight storage. • Empty bottles can be used for buoyancy. • Chemical purification tablets are usually calibrated to 1L or 32oz volumes. So bottles in these sizes are more suitable if you carry this, even as a back up. • Old canteens can be reused as cups. -

Waco’s guide to field sustainment
The Waco Kid replied to The Waco Kid's topic in Guns, Gear & Loadouts
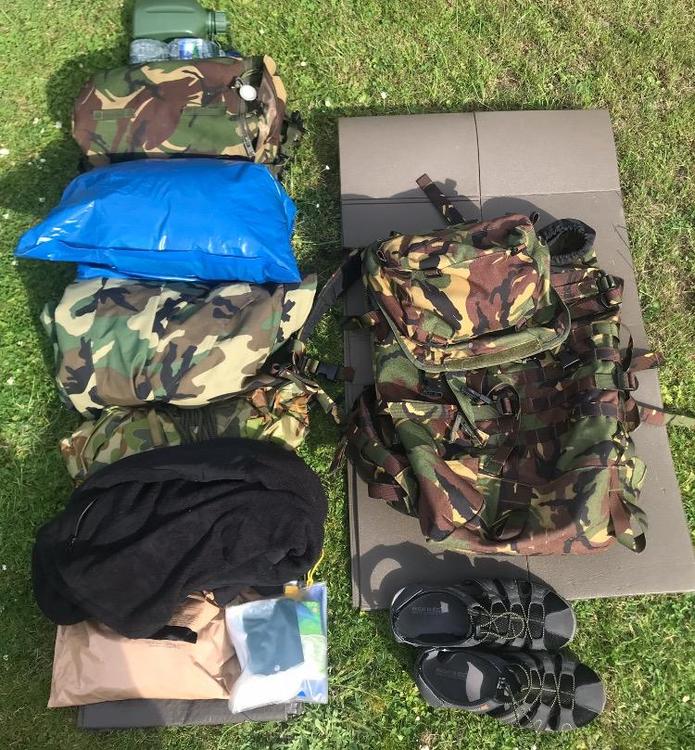
Some ways to load a pack Method 2: The one a lot of people actually use is take method one and ignore it. Stick the biggest thing in the bottom, ie your sleeping bag, then cram the rest on top. ? Seriously it’s a compromise of method 1. Take the core of heavy items close to the spine and higher up but modify it for expected use. This might be to have waterproofs at the top if rain is expected. Or your shelter by the bottom zip (if you have one) so you can quickly pitch it if you will arrive at your intended camp at dusk. Effectively you are packing b a task oriented way. A “bug out bag” might have everything a hiking pack contains but the way you plan to you it differs. Personally I have less kit in the summer, maybe only 30-40L bag so it’s not especially heavy so it’s easier to have what I want to hand. That said this is the same Bergen with side pockets added for a longer trip. LHS is shelter and next meal plus canteen on top. RHS is set up as a day sack and quick zip off. Lid has first aid plus snacks. Top down inside pack: Large water bladder Waterproof jacket Sleeping bag Food Kip mat Wash kit Extra Clothing* * might get bumped up in cold weather. Order of packing has been changed to make it easier to pitch camp in poor weather without having to dig in the main bag. Next up is water. Carrying it, finding it, making it drinkable. -

Waco’s guide to field sustainment
The Waco Kid replied to The Waco Kid's topic in Guns, Gear & Loadouts
“We should inform the high level thinking giving someone a direction, empowering them and trusting them to do so professionally (and that they will push back on us when necessary)” Danger, purple alert! Autonomy detected! -
Flashpoint I such better. Mostly because the Pink Power Ranger is in it. Although she has aged a bit. ?
-

Waco’s guide to field sustainment
The Waco Kid replied to The Waco Kid's topic in Guns, Gear & Loadouts
Well he does have a moscart launcher. I think they called them Very pistols back then. ? Hard to tell if it’s two tone though… ? I try not to have more than 10-12kg of gear for a hike. Knees are now fitted backwards anyway. I might just weigh a little more than the average soldier too. ? ?? -
-

Waco’s guide to field sustainment
The Waco Kid replied to The Waco Kid's topic in Guns, Gear & Loadouts
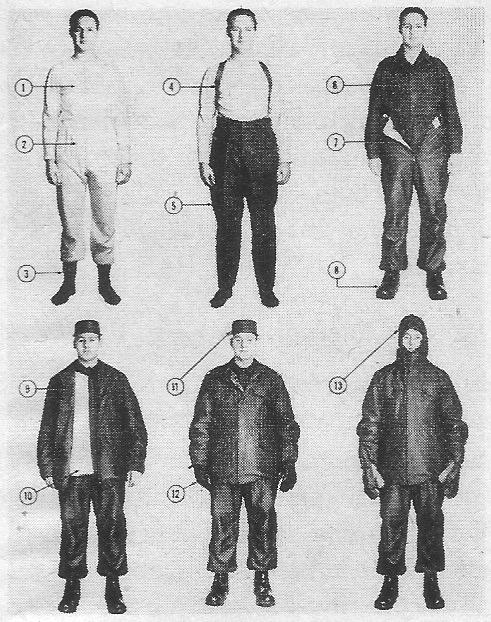
Some ways to load a pack: Method 1 is heavy items at the top and close to your back. This is recommended for effective weight distribution. From top to bottom every thing is stacked heaviest to lightest. • Water • Day sack with stove and sundries under the lid • Sleeping bag in rubble sack • Water proofs, ECWCS is heavy! • Shelter • Clothing • Food • Wash kit • Thin ground sheet • Spare light weight foot wear • kit mat down the inside the bag, away from the body. If the day sack isn’t carried the individual items would be further down the list. -

Waco’s guide to field sustainment
The Waco Kid replied to The Waco Kid's topic in Guns, Gear & Loadouts
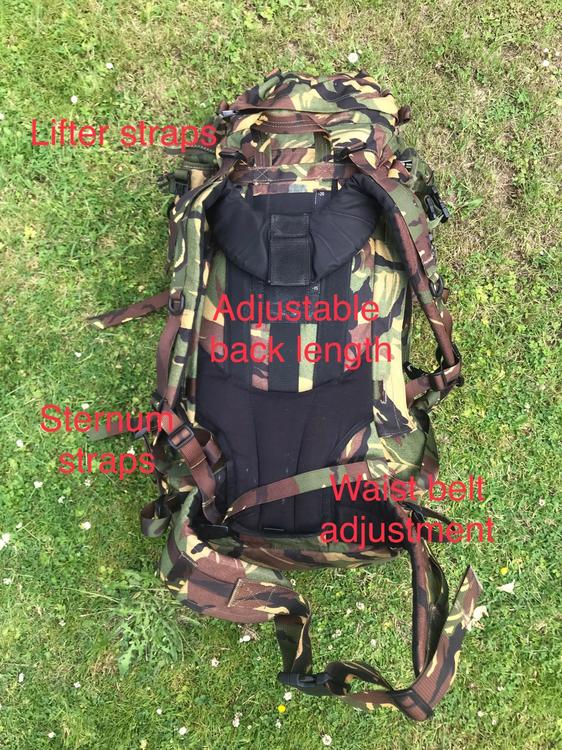
Setting up and loading a pack: I am doing this back to front as adjusting your pack is best done with some weight in it. Pack adjustment: 1) Start with the straps pretty loose. 2) put the pack on and get the belt so it sits on and around your hips. This is where to much padding can be awkward. Fasten and adjust the buckle to it’s snug. Tighten up any side adjusters, might be as many as four, so they are also snug. 3) Pull the shoulders straps until the load comes into you back and is stable. Do up any sternum strap. You do not want it so tight is restrict your breathing. 4) Tension the load lifter straps. You don’t need to pull them as tight as possible as this will shorten the shoulder straps on most designs. Just so the load comes in and a stable, you should still be able to look up. Although however you set up your pack you are not beating the little old lady from the mountain village. Plus she can drink her own weight in diesel and still walk home. -

Waco’s guide to field sustainment
The Waco Kid replied to The Waco Kid's topic in Guns, Gear & Loadouts
Important pack features: or “Things that affect how your ruck takes load. And no I am not talking about your mother”. Buying surplus in general grades such as 1,2 and super are often quoted. Prices roughly reflecting west and tear. • “Super” should be like new. • ”1” Used but complete, probably marked and might have non-critical wear. • “2” Heavily worn. I’d expect to have to do some sewing or replace fittings. Unfortunately these definitions are somewhat loose and I have bought super/a+ grade kit that needed repair and grade 2 was fine. When you get a bigger pack, apart from capacity, the pack itself may be sized or have an adjustable back length. So check it’s the right size. If you can try it with some load in it too. Features that affect carrying the load and comfort are: • Bag shape • Back support/frame • Shoulder straps & adjustment • Shoulder lifter straps • Waist belt padding 1) Bag shape. Short wide packs often put the weight further back from your centre of gravity unless carefully loaded. Example US Alice. Tall narrow packs can be better in the hills but snag overhead and if you go prone can ride up making shooting/watching awkward. Most modern packs have gone this way. Example Berghaus Vulcan. 2) Pack frame. A big bag needs some kind of structure to support the load others it flips about all over the place. I think Internal vs external frame design largely moot, go with what works for you. External frames keep the pack away from your back but the frame can make “hot spots” more common. Example US MOLLE2. Internal frames use a bit of back padding (sweaty back time) or a spacer (airflow back) so the load isn’t poking on your spine. Karrimor SF Predator. 3) Shoulder straps are obvious need some adjustment. I have had a few bags where the adjustment was very limited so once you had layers on getting the packing and off was PITA! Some packs, typically external frame ones, have removable straps. Sometimes after market upgrades are available such as for ALICE & MOLLE packs. On some Bergen’s you can switch where the shoulder straps fit, handy if you have a far neck. Sternum straps allow you to pull the shoulder straps in a bit for stability and to relieve the straps pulling your shoulders back. 4) Load lifter straps are adjusters on the top of shoulder straps that you tension to “lift” the load, really they are pulling the weight closer to your centre of gravity. See how to pack a Bergen below. Useless on packs with no frame and waist support. 5) Waist/hip belts should be the main support for the load. Padding is nice but too much can be a problem as much as too little. Some very well engineered and custom packs use unpadded belts that are sewn to clinch on the wearers hips. I’m looking at you Kifaru! Most belts have an adjustable side release similar buckle. Quite often there are tensioners on either side as well. -

Waco’s guide to field sustainment
The Waco Kid replied to The Waco Kid's topic in Guns, Gear & Loadouts
Largely yes. Some of the biggest influences post WW2, Cold War and upto GWOT was the amount of kit the US punted out in assistance. Alice kit was really wide spread. I think in the 1990’s there was a lot of influence from makers like Lowe Alpine bringing in modern mountaineer style packs. * The Eagle 3 day pack and CFP90 are pretty much copies of civilian items for example. US SF liked this sort of kit but not so popular with regular, pretty conservative, procurement which went with the molle 1 pack for fuck sake. ? Europe had quite a few manufacturers and pretty much went their one way. * Bearing in mind WW2 bergens we’re civilian pack copies and some of the uniform designs were taken from recreational ski and mountain wear. So the cycle continues. -

Waco’s guide to field sustainment
The Waco Kid replied to The Waco Kid's topic in Guns, Gear & Loadouts
He is the “I don’t fucking care bear”. Amazon seem to be out….. -

Waco’s guide to field sustainment
The Waco Kid replied to The Waco Kid's topic in Guns, Gear & Loadouts
-

Waco’s guide to field sustainment
The Waco Kid replied to The Waco Kid's topic in Guns, Gear & Loadouts
-

Waco’s guide to field sustainment
The Waco Kid replied to The Waco Kid's topic in Guns, Gear & Loadouts
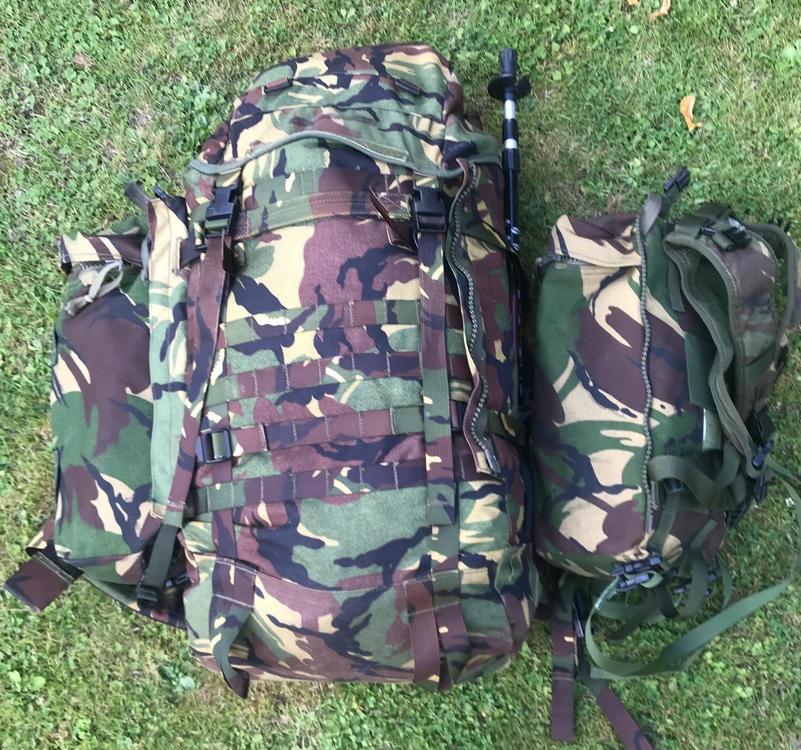
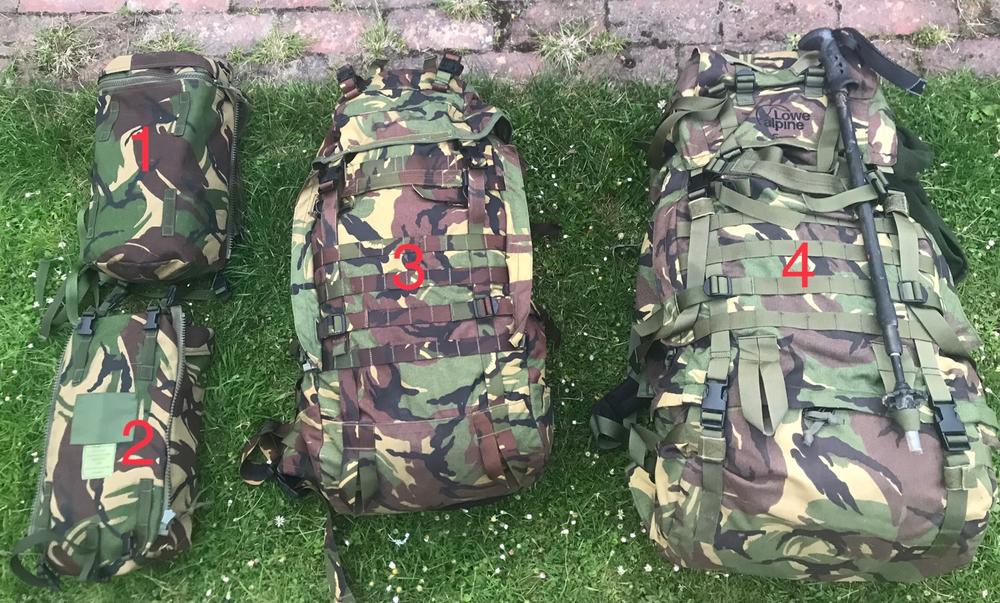
Modular system: 1) Single PLCE side pocket with “survival” / day hike kit 2) Second PLCE side pocket with light weight insulation and bivi. Ground mat on outside. 3) The bug out bag. 60L bergen will hold all the above, wet weather layer, three season bag, 3 days food and 2-3L of water. More than enough for DoE of trip. Side pockets bump it to 80L and is enough capacity to cope with UK winter overnighting in the Cairngorms. 4) Fucking big bag. 120L this will hold two full sets of artic sleeping gear. Or one set and mortar rounds. If you need to carry all your skirmish kit in it plus camping gear. It will probably still have space. The bags above are the 60L Dutch Issue Sting and the 120L Saracen. They were both designed by Lowe Alpine and also made by Fesca. The ones above are the “Gen 2” with molle panels and and MMPS so they will take PLCE rocket pockets the right way up. Both models have adjustable back systems and are very robust. They are some of the best carrying military packs ever made and can be picked very cheaply. The Lowe Apline CFP-90 is also excellent but the shoulder suspension is a bit prone to breaking. It’s also quite pricey this side of the pond. -

Waco’s guide to field sustainment
The Waco Kid replied to The Waco Kid's topic in Guns, Gear & Loadouts
A chaffing tin would do it but they are essentially a heavy(ish) tin. One of the beauties of them and solid fuel burners is that they are very quiet compared to gas. If you need to heat a meal quickly then a simple gas cart stove is not much slower than a jet boil really. I use a mix of military USGI/British 58/Swedish M40 at least once a week. The M40 is for when I cook spagbol for the family meal. ? I have two jetboils which get used for brewing up at work. I half a dozen on my team who cannot function without tea and coffee NOW! Someone after my ration packs… Do you have an under quilt on your hammock? Even a poncho liner strung under the hammock makes a big difference to warmth. Extending the LARP factor So perhaps you want to use your kit for a bit more than just airsofting or you are taking part in cadet training or DoE. What else do you need? -
Which one has a chance of regeneration then?
-

MOLLE the start of the tacticool
The Waco Kid replied to The Waco Kid's topic in Guns, Gear & Loadouts
The Finnish dudes at Varustekeka in from time to time and shipping isn’t too bad. If you want it from the US it’s cheapest to set up a US postal address with a shipping agent who forward it to the UK in bulk. -

Waco’s guide to field sustainment
The Waco Kid replied to The Waco Kid's topic in Guns, Gear & Loadouts
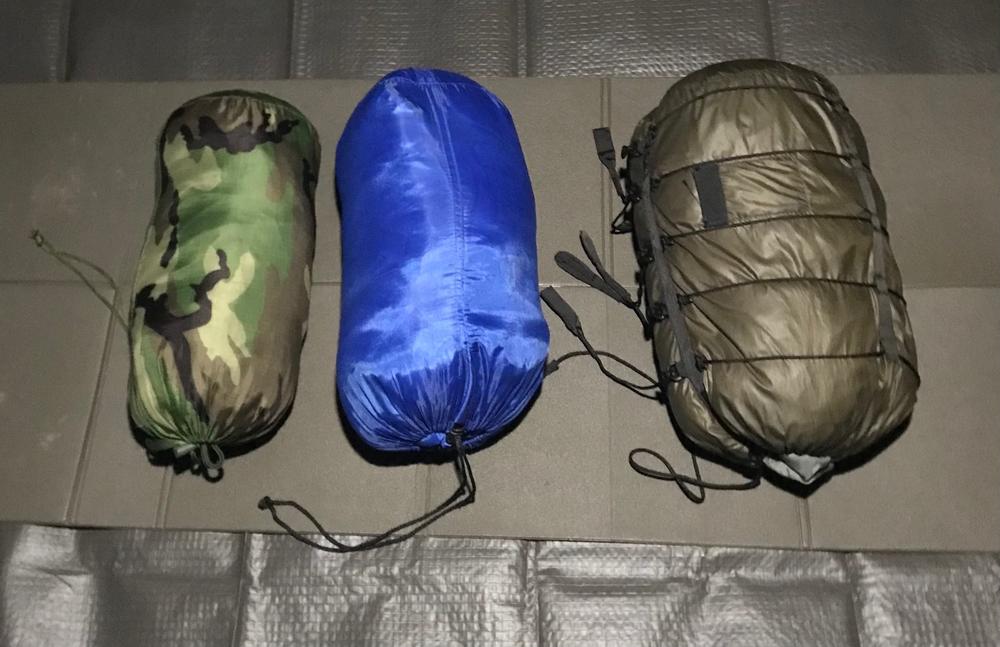
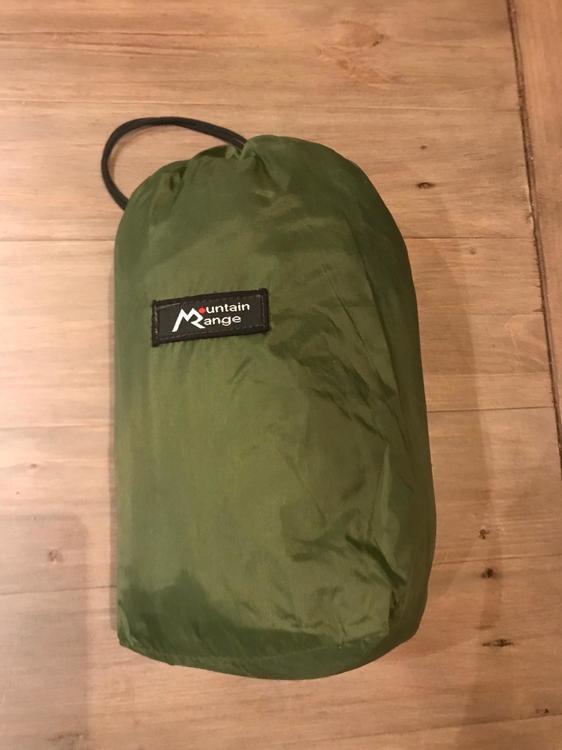
Reasoning of why I’ve suggested certain items: This is intent as a “starter” set of inexpensive kit for summer use. At an event you will likely be “standing too” or stagging on and off through the night so something simple to crawl in and out of is ideal. 1) I’ve suggest items that can be be built up from so remain useful if you decide to camp out in colder months. And/or. 2) Cheap enough that if I need to temporally ditch stuff I am outgoing to worry about it. Pyro landing on a kip mat or sleeping bag is messy. ? Key to get the most out of simple gear it is where you set up. I am assuming somewhere you can put up the basha without poles. Checkist for campsite: • Widowmakers. Check above you for dead trees/branches/roofing slates that might go bump in the night. • Not in on or next too and insect nest or animal midden……. •.Not on boggy ground or a hollow in the ground. We do not need cover from shell splinters so you don’t need a fox hole. Tacticalness/field craft: • Somewhere that offers concealment but ideally it not under the only pair of trees in the field. • Concealment is good but you need a to also have good site lines and a route to exit. I am sure others will chime in! Detailed gear list: A) Pack. In this case a Highlander Proforces 25, this has a reasonably well supported back and waist strap. Retail about £45 but you can often get something similar in a sale for less. A plain black civilian day pack can often be had for less and you can always get it make a cover. Go for something with some back support. Volume of 20-30L should sufficient but 40L would give room for camo net or rain gear. British Army Surplus NI patrol packs are decent or if you have some money to spend the latest Berghaus Munro uses a system to add side pockets (not PLCE ones). B) Garden waste bags/Rubble sack times two. Pack liner, boot covers multi use items. If you fancy some bushcraft stuff the bags FULL with dry leaf litter and put then under your sleeping system with the open ends rolled closed and facing each other. C) Groundsheet. Any cheap fairly tough but like waterproof fabric. Not strictly needed but even in the summer in the UK the ground gets damp over night. Gives you more room to put stuff down but out of the mud. The one shown is a Bundeswher ground sheet and about twice the width of the sleeping mat. A cheap polyester tarp will do. £10. D) Sleeping mat. Foldy up Bundeswher one. Thin but packs well and robust. Apparently these were modelled on Michael Schumacher’s jaw line to get the shape. £20-25 new. You can get the Z folding chinesium ones online for £10, they are okay. I tend to avoid roll up kip mats at they are bulky and usually need to go on the outside of your bag which is a pain when going through undergrowth. E) Sleeping bag. Cheap polyester (I think Highlander brand) zip up envelope type. Supposedly a two season bag but really one season. Cost £10-15. It’s on here as you may already have one, the simple design is easy to whet in and out of and can be used as a blanket if sitting up. I’m sleeping in it with my boots on so cheap is good. For £20-30 you can get a more capable bag, usually with a hood, which I don’t use. Some alternatives are: • A poncho liner (left hand in the above). Not much more compact, no warmer, no zip and £40 for a copy. They are also shiny slide all over the place. • Surplus patrol sleeping bag from the US MSS. A bit warmer and can be compressed to the same size. But more expensive, rapid open zip. Boot covers in this one. ? F) Pillow. This is the sleeping bag stuff sack. Inside is a woolly hat and a cheap puffy jacket the stuffs into it’s own pocket when not in use. These get worn if it’s colder or I want to be head and shoulders out of the bag any way, which is normal for me. Hopefully you are working as part of a team with someone on watch at night. Therefore you can double or share up on some items. Being in the same sleeping bag is optional however. ? -

Waco’s guide to field sustainment
The Waco Kid replied to The Waco Kid's topic in Guns, Gear & Loadouts
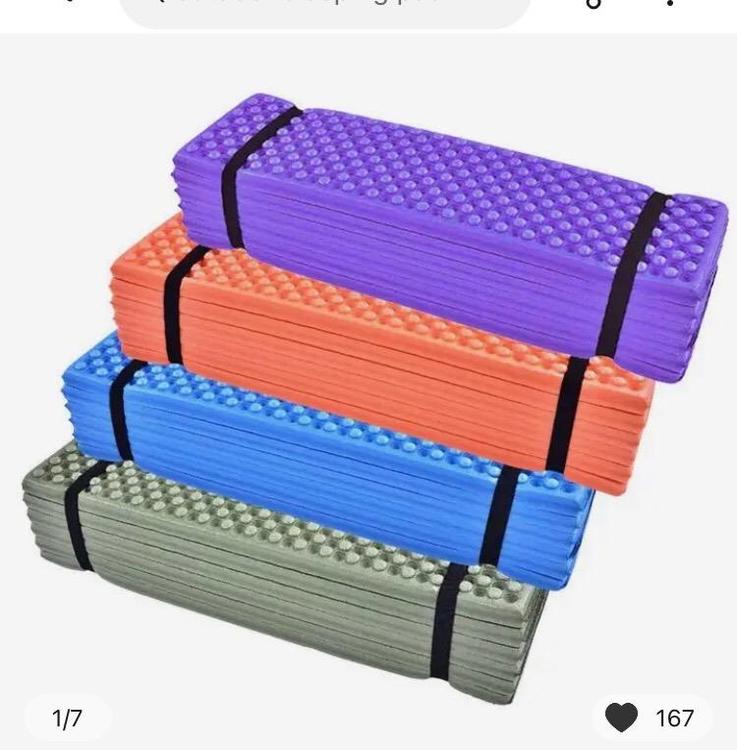
I do like cheap kit mat for a few things. Making pads for belt kit, lining my hammock (double skinned base) and as an underlay for real cold or lumpy ground. ? These Chicom ones can be folded to go inside a bag and work pretty well for the money. Plus purple is the most tactical of colours. £6.05 with tax and postage. -

Waco’s guide to field sustainment
The Waco Kid replied to The Waco Kid's topic in Guns, Gear & Loadouts
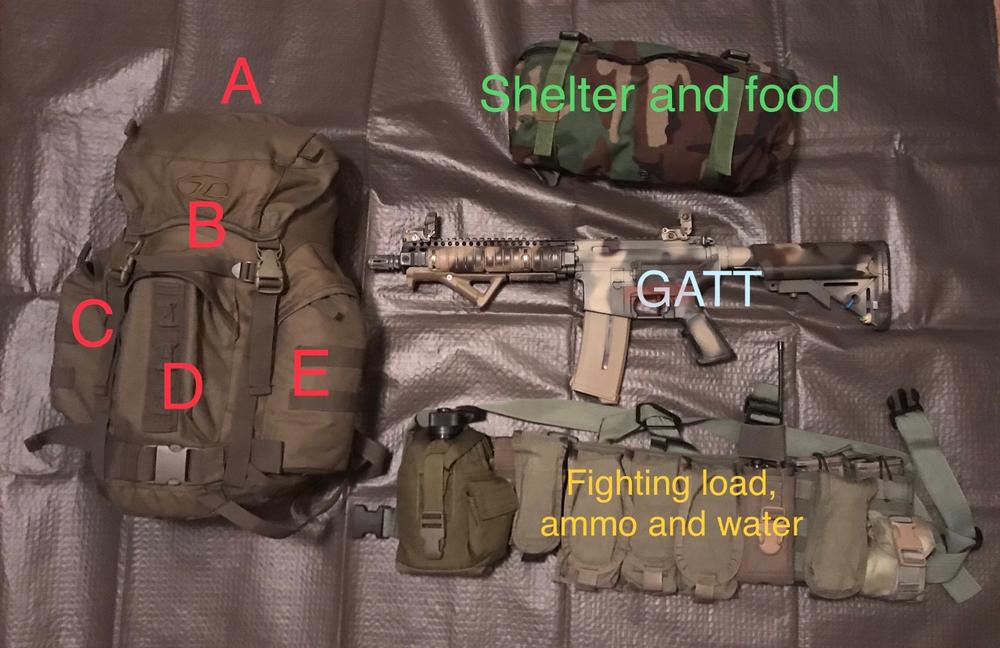
Sample setup for Summer overnight events. Selection criteria are relatively low cost and light weight for warmer weather. This example doesn’t follow the military three line system but does have three elements so items can be dropped off easily if needed. 1) Weapon and chest rig holding fighting load of ammo, smoke, bangs, water & radio. 2) Belt kit (molle waist pack). This holds shelter system, sit pad, precooked food and perhaps a light weight jacket and socks. As previously discussed. Can be worn on it’s own strap or attached to the fight load with some extra clips. 3) 25L pack. To carry sleeping system and some extras. A) Lid pocket with first aid and admin stuff. B) Main compartment with fold up mat, light sleeping bag, ground sheet/bivi bag and insulated jacket. C) Side pocket with cook system. D) Back pocket with tools and spares for gatt. E) Side pocket with another canteen. I’ll break down the specific choices and some options next. -

Waco’s guide to field sustainment
The Waco Kid replied to The Waco Kid's topic in Guns, Gear & Loadouts
Means to keep dry (and out of the wind). If you’ve been reading the previous posts I’ve covered setting up a simple basha or tarp. If set up correctly and relatively close to the ground, they are very weather proof. Further options: 1) Tent or tarp set up as one. Either usually need some sort of support such as an internal pole. Most are more time consuming to pitch an strike. Options to see out and exit are limited so I am going to skip over this option (for now at least). 2) Survival bags. Non-breathable foil blankets and large plastic bags. Pros: Cheap and very compact. Cons: Maybe single use, sometimes fragile, trap moisture so can make you colder in some situations. 3) Bivi bags. Breathable fabric sleeping bag covers. Lots of variations made from Goretex, Pertex and similar materials. There are simple tubes with a closed foot, hooded zip opening, Odesa with built in big netting and designs with integral poles to make a tiny one person tent. Pros: Usually very weather proof, simple to set up (although there are exceptions) and can be used where other systems will not work. Cons: The more features and the lighter the weight the more they tend to cost. Some can be a bit flimsy. Can be awkward to enter and exit. -

Waco’s guide to field sustainment
The Waco Kid replied to The Waco Kid's topic in Guns, Gear & Loadouts
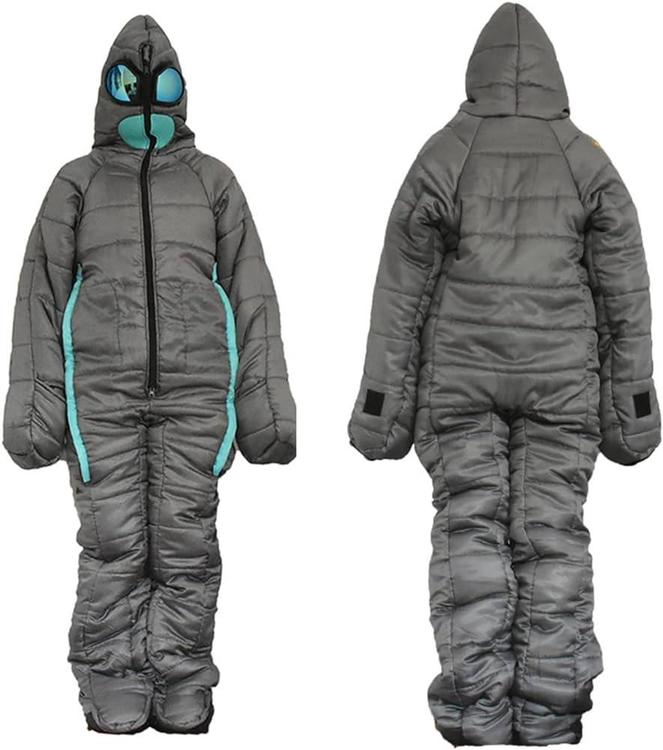
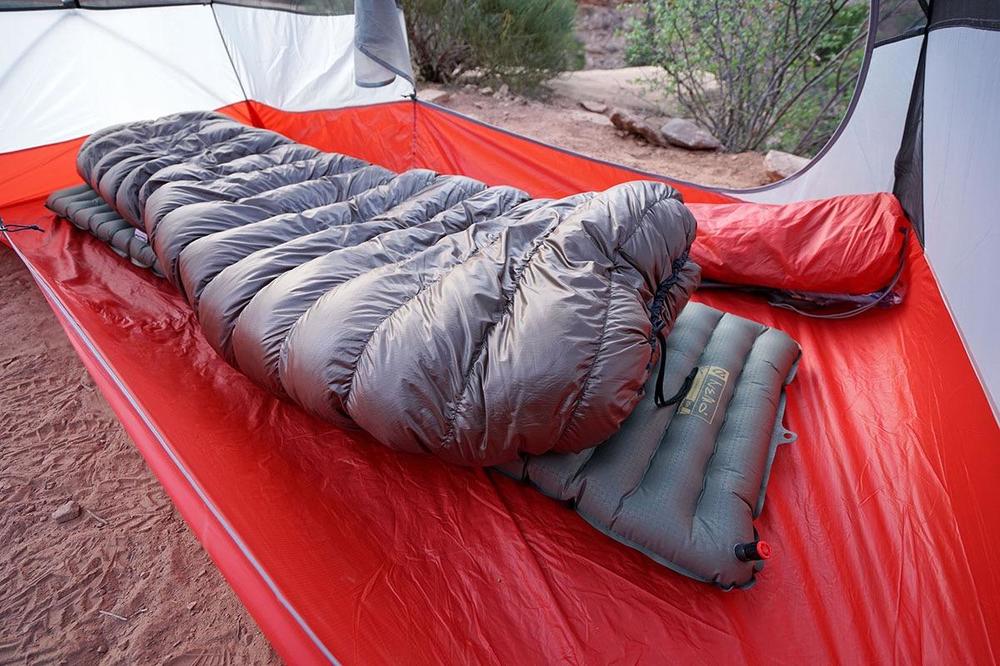
Trapping body heat. There are several options again with advantages and disadvantages. Some outdoor companies sell “sleeping systems” that use the R-rating for insulation although it is far more common to see season ratings for guidance. Generally a three season is sufficient for most used in the UK. A) Insulated clothing. Pros: You probably already have some, as you are wearing it you can just get up and go. Cons: Less efficient, takes time to change in and out of as it will need to be fairly thick to be of much valve and then too warm to run about in. B) Poncho liner or quilt. Pros: Can be inexpensive, quick to get out of. Some ultralight camping quilts can very warm for weight but are often pricey. Cons: Can take some setting up (see ranger roll above).* *My take on the ranger roll in Grunt’s video is that it is not warm enough used like that on it’s own. Secondly the layers should not all open on the same side. “Your mileage may vary”. ? C) Sleeping bags. Huge variability in quality and functionality. I am going to subdivide these a little. Pros: easy to set up and stow, can be cheap. Cons: can be expensive, winter bags can be very bulky, some designs may be difficult to get out of in a hurry. i) Natural Down filling. I suggest avoiding this for skirmishing events. Down comes in fill powers and quality, generally the more expensive the better. Down is possibly the best for warmth but requires proper care and game conditions will probably lead to it getting damaged. ii) Synthetic filling. Higher quality gets close to the level of down. Synthetic bags are more robust than Down so more suitable for wet and muddy conditions. Three season military bags are probably all you need with two season bags being useful in the summer. Sleeping bags verses quilts. If you are lying flat in a sleeping bag the material beneath you is compressed. This provides next to no insulation as a result. Therefore a quilt of the same weight can be warmer when paired with a decent pad or mat. However, a sleeping bag can be used more easily when sitting up or resting in different positions.


