nathan13n
-
Posts
87 -
Joined
-
Last visited
-
Feedback
100%
Recent Profile Visitors


nathan13n's Achievements
")


-
This advert is COMPLETED!
- FOR SALE
- NEW
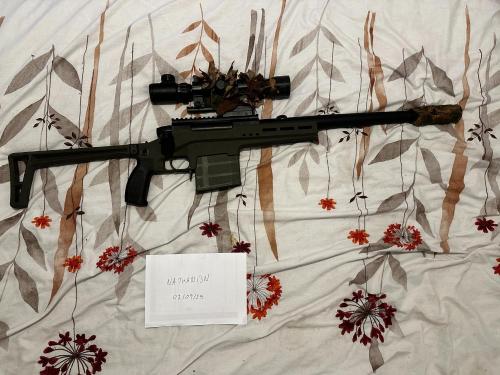
The TAC 41 LS is already one of the best airsoft sniper platforms out there, and this one has been fully upgraded and tuned to deliver maximum performance with heavyweight BBs (0.45g). Internal Upgrades: Prometheus 6.08mm precision barrel Silverback 60° bucking + Longbow Chub Nub V2 (consistent 0.45g lift) Medusa hop-up unit for precise and easy adjustments Silverback silent cylinder head with airbrake – ultra-quiet shot without needing Edge/Scorpion piston upgrades External Upgrades: Silverback carbon suppressor – removes nearly all muzzle pop Paike 3–9x40 scope mounted on a riser for perfect eye alignment and clarity Comes with both 55-round and 100-round magazines Performance: This rifle consistently lifts and accurately delivers 0.45g BBs downrange with whisper-quiet shots, making it a deadly and stealthy tool on the field.280.00 GBP
- GB
-
This advert is COMPLETED!
- FOR SALE
- NEW
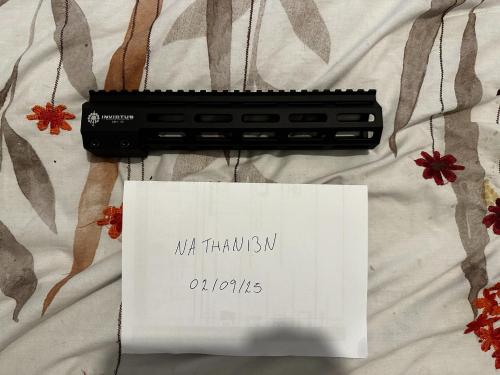
for sale i have a Invictus MK1 10 inch Rail, was build off a new MTW so is in near perfect condition will fit AEG as well so grab a nice study CNC rail ✅ Lightweight yet rugged construction ✅ Sleek 10" length – perfect balance of compact handling & accessory space ✅ M-LOK compatibility for all your favorite attachments ✅ Designed by Wolverine Airsoft for precision and reliability Price include shipping and paypal fees40.00 GBP
-

This advert is COMPLETED!
- FOR SALE
- NEW
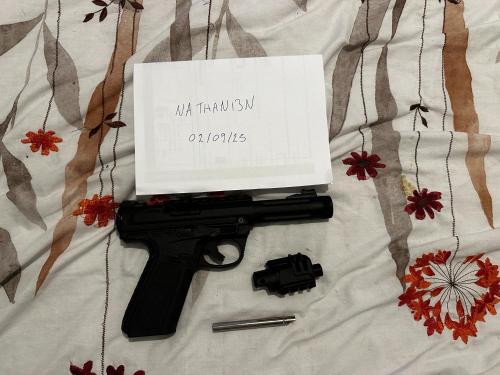
Originally built as a spare, but this upper turned out to be a surprisingly solid performer. Tuned for consistency, power, and heavy BB use. Build Details: AAP-01 upper receiver with 5KU lightweight bolt Stock nozzle + TTI piston head (reliable feeding & strong air seal) 300% nozzle spring & 150% recoil spring (ensures bolt locks and cycles properly) Action Army 132mm 6.03mm precision inner barrel TTI TDC mod for precise hop adjustment Quantum bucking – lifts anything up to 0.45g BBs with ease Performance: Tuned for 1.5–1.7J, keeping it site-legal across the UK (within DMR limits) Optimized for 0.40g BBs (perfect balance of speed & punch), but happily runs 0.45g Consistent cycling with the lightweight bolt setup Extras: Includes Action Army carbine kit for stability and proper shooting stance You’ll need a lower, but tested and confirmed working with both Shinobi and standard AAP lowers This upper is dialed in and ready to go — just drop it on your lower and you’ve got a reliable, hard-hitting AAP build.80.00 GBP
-
This advert is COMPLETED!
- FOR SALE
- USED
AAP 01c Shinobi Original built as an overall do it all side arm, its done it job but just needs a new home. Internal Upgrades: Action Army 132mm 6.03mm precision inner barrel (power increased from 0.8J → 1J) Stalker TDC mod with upper adapter for external hop adjustment Quantum bucking – consistent lift from 0.30g to 0.45g BBs (optimal with 0.32g/0.36g) CowCow V2 piston head for improved air seal 250% nozzle spring & 150% recoil spring – flawless feeding and cycling Stock nozzle retained (great seal & reliability) TTI NPAS ( for you to be able to adjust power from 0.6j to 1.5j) Performance: Lifts heavy BBs (0.3g–0.45g) with ease Consistent, reliable feeding with no misfeeds Balanced for both range and speed Extras: Includes 2 gas-tight magazines (well maintained) Shinobi front end with 14mm adapter TTI 103mm barrel This is a ready-to-go build, tuned for performance and consistency straight out of the box All prices include postage and Paypal fees145.00 GBP
-
This advert is COMPLETED!
- FOR SALE
- USED
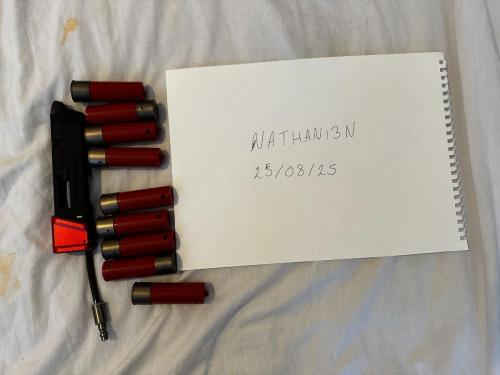
for sale is a Airtac x T1P GLK/AAP-01 Shotgun Shell HPA Adapter with 10 cyme shotgun shells. Works great in the AAP and was able to feed BBs all the way upto .45, has been used in normal CQB all the way through ro DMR and never skipped a beat. looking for £7070.00 GBP
-
This advert is COMPLETED!
- FOR SALE
- USED
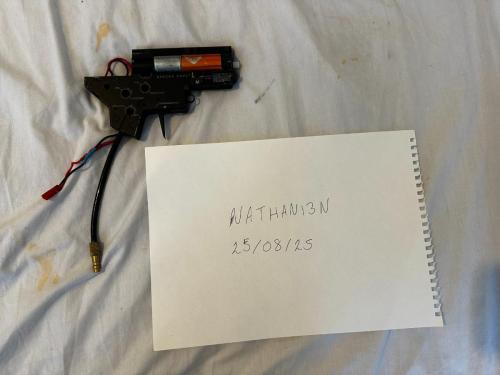
For Sale – Backdraft Innovation HPA Engine Setup Up for sale is my Backdraft Innovation HPA engine, complete and in perfect working order. Included: Backdraft Innovation HPA Engine M4 nozzle M249 featherweight nozzle Upgraded FCU with Gate Aster 2 – programmable via smartphone for quick on-the-fly adjustments Aether gearbox with side-screw alignment system Gate Aster trigger Details: Ideal for AEG-style rifles Can be easily set up for DMR power (may require some fine alignment tuning) Fully functional and well-maintained250.00 GBP
-
This advert is COMPLETED!
- FOR SALE
- USED
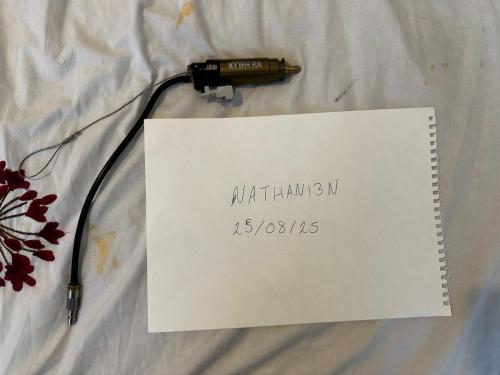
For sale is PolarStar Kythera is the perfect drop-in engine for semi-auto locked builds, DMR setups. ✅ Fully mechanical, no FCU or battery needed ✅ Consistent shot-to-shot performance ✅ Durable, simple, and easy to maintain ✅ Perfect for DMR or semi-auto builds ✅ Drop-in replacement for most V2 gearboxes Item is used and has some marks but doesnt interupt any performance. The engine is only 6 months old and hasnt been heavily used so grab a baragin210.00 GBP
-
This advert is COMPLETED!
- FOR SALE
- USED
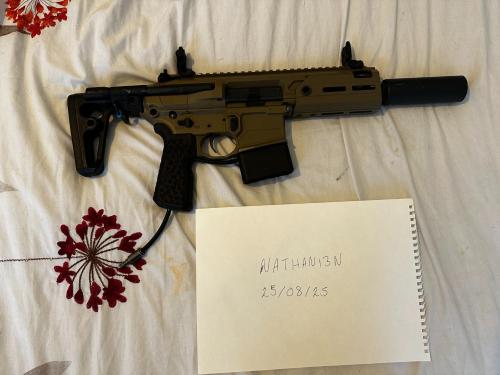
Selling my Salvo Precision MCX Rattler – a solid, reliable build that’s already upgraded so you won’t need to put any extra work into it. It runs beautifully and has seen very little use. Just a few light scratches from normal handling, nothing major. Included: Airtac MWS adaptor with grip (for HPA setup – perfect for consistent year-round performance) Internal Upgrades: 4UAD Quantum bucking Action Army 6.03 200mm inner barrel Jaeger Precision buffer pad Guns Modify Zet Plate Angry Nozzle with NPAS External Upgrades: Delta Action silent suppressor (covers half of the inner barrel) APFG PDW stock Cost to build: ~£730511.00 GBP
-
 Cocha reacted to a post in a topic:
S&T M249 MK2 SAW Sports Line AEG - Complete build
Cocha reacted to a post in a topic:
S&T M249 MK2 SAW Sports Line AEG - Complete build
-
 ButcherBill reacted to a post in a topic:
S&T M249 MK2 SAW Sports Line AEG - Complete build
ButcherBill reacted to a post in a topic:
S&T M249 MK2 SAW Sports Line AEG - Complete build
-
pyromancer6 reacted to a post in a topic:
S&T M249 MK2 SAW Sports Line AEG - Complete build
-
Herrgh reacted to a post in a topic:
S&T M249 MK2 SAW Sports Line AEG - Complete build
-
Galvatron reacted to a post in a topic:
Noveske n4 with air attack HPA conversion kit
-
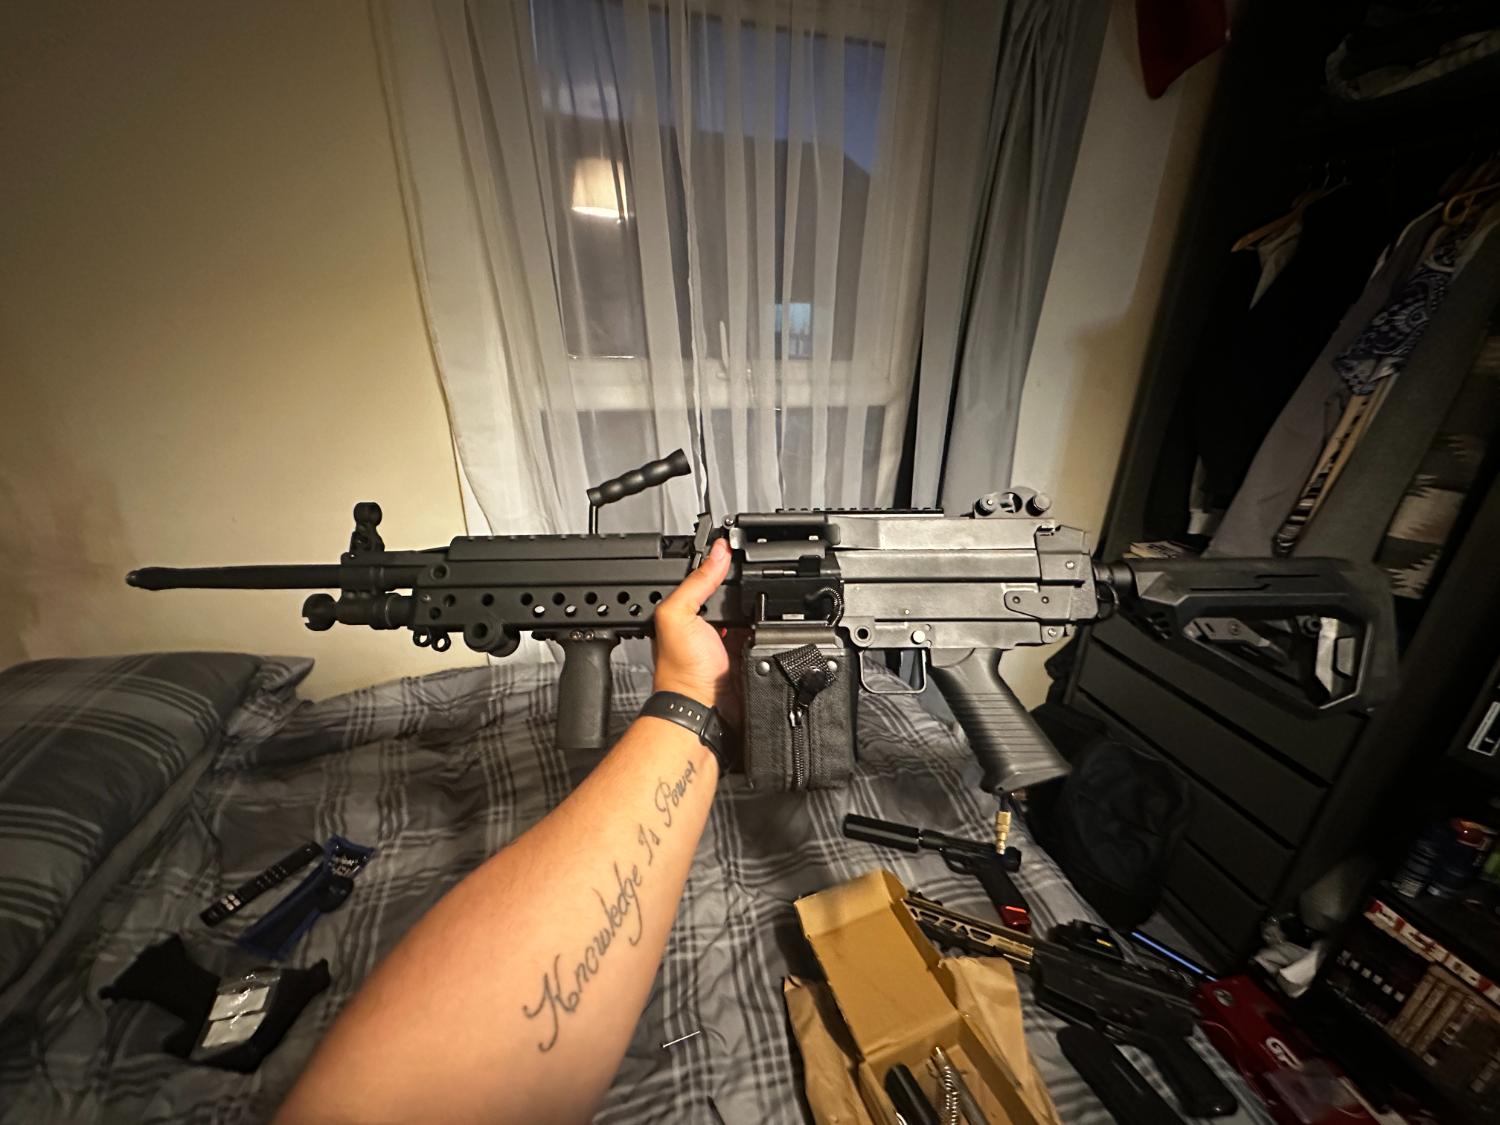
Building the Ultimate Lightweight HPA LMG: My S&T M249 MK2 SAW Project Going through my airsoft collection, I realized I was missing one key piece — an LMG. Naturally, I thought: why not? I didn’t expect it to become one of the most frustrating builds of my airsoft life. From the start, I knew I was going to HPA it, especially since I had a Backdraft Phoenix engine lying around — a solid engine, though a bit inconsistent in DMR roles. Why I Picked the S&T M249 MK2 SAW Let’s be real — the S&T M249 is just a rebranded A&K Featherweight (also sold under Cybergun), but with a few advantages: V2 gearbox (sounds great at first… more on that later) Lightweight — only 4kg, compared to 5.5–6kg for most other M249s Cheap — cost me just £200 At first, the V2 gearbox and light weight seemed like a win. But that big proprietary nozzle and body flex quickly turned into a massive headache. Out-of-the-Box Performance Running a 7.4V battery, it gave me: 12 RPS 1.1J 30m accuracy with a torso-sized spread Not bad for £200. Decent compression, a metal rack piston, basic MOSFET locked to full auto. It worked — but it wasn’t good. Goals for the Build Fix the weak plastic stock Tighten up the shot spread Increase rate of fire Get consistent mag feeding The Build Process Body Flex & Rail Replacement Because the gun is so light, body flex was a huge issue — even minor misalignment can cause major problems with HPA. I replaced the plastic top and bottom rails with metal ones and added bracing plates. This significantly stiffened the gun and improved alignment. Engine & Electronics Installed the Backdraft Phoenix HPA engine and wired it to a Gate Aster II for better control. Problems started immediately: Sporadic shots Inconsistent feeding Laser shot followed by a 2-meter fart Hop-Up & Feed Ramp Hell The stock hop-up is garbage — cheap, flimsy plastic with lots of flex. Swapped to: Bullgear Featherweight M249 Hop-Up — improved consistency, but feeding issues remained Tried: Drilling stock feed ramp — BBs jammed Anttech feed ramp — flimsy 3-part design, reintroduced flex and made things worse Final Solution: Found a 3D model of the original feed ramp by Gazadonf77 Printed in PA12 nylon (MJF) via 3D People Game changer — fixed all feeding issues Bucking & Barrel Testing Bucking Results: Prometheus Purple: Good but had flyers every 5 shots Quantum: Best range (50–60m), but overhopped everything and grouping was meh Maple Leaf 60°: Winner — torso-size grouping at 50–60m with 0.30g BBs, great price-to-performance Tip: With Bullgear hop-up, use high elasticity buckings. Stiffer ones perform worse. Barrel Results: XT 6.00mm: Tight bore, low PSI, bad consistency ZCI 6.02mm: Better, but still not quite there Stalker Morpheus 6.03mm: Extended crown = more range (70m), but groupings were wild PDI 6.05mm: Winner — 55–65m range, best consistency, 2–3 inch spread. Uses more air but totally worth it. Magazines: A Comedy of Errors The stock S&T mag (9V battery) fed only 12 RPS — upgraded to 7.4V LiPo, gained speed, then shredded the gears (poor plastic internals). Tried: Lonex 200rd & EPM1: Fed great, but too low capacity for an LMG Classic Army M249 mag: Worst of all — inconsistent, weak, loud motor Novritsch M249 mag: Winner — actually a rebranded A&K 2000rd box mag, fed up to 30 RPS on both 7.4V and 9V. Responsive mic, auto shutoff, and only £75. Stock Upgrade The original SAW stock is huge and ideal for batteries, but looks awkward and feels cheap. Didn’t want to pay £50 for a CNC adapter, so: Found an STL file by CitrusPers - Stock adapter Got it printed by 3D People Now using M4 buffer tube + compact stock = lighter and more ergonomic Final Build & Cost Breakdown Part Price S&T M249 MK2 £200 PDI 6.05mm Barrel £60 Backdraft Phoenix HPA Engine £250 (already owned) Gate Aster 2 £65 (already owned) A&K 2000rd Box Mag £75 Bullgear Hop-Up Unit £60 Custom Feed Ramp & Stock Adapter (PA12) £50 Total: ~£760 Final Verdict What I have now is a lightweight LMG, feeding 0.30g–0.32g BBs reliably, with: 55–65m effective range Consistent grouping (~2–3 inch spread) 30 RPS at 1.1J 3,500–4,000 rounds per 48ci tank @ 70 PSI Great for suppressive fire, fun skirmishing, and surprising people who think it can’t reach them. Would I do it again? Probably not. Am I happy with it? Hell yes. Little video of the bad boy shooting

- 1 reply
-
- 4
-
-
-
Funnily enough this popped up in the whatsapp chat recently. Airtac doesnt listed it but they recommend running the N4 between 100 - 150psi ( i wish they would put it on the website it would save so many problems). As Gaintkiwi said run it at 100pis and use the NPAS. The best ones to recommend are Feda concept or Jager precision. On the stock nozzle some people complain the npas doesnt hit well but they fit great into the Guns modify nozzle.
-
Invadaza reacted to a post in a topic:
Puslar H - Review
-
Angelvill3 reacted to a post in a topic:
DE Noveske N4 - One stop shop
-
nathan13n reacted to a post in a topic:
DE Noveske N4 - One stop shop
-
The_Lord_Poncho reacted to a post in a topic:
Puslar H - Review
-
Pulsar H I have seen a lot of hate towards the gate HPA systems and yes they can perform horribly if they are not setup properly so thought I would make a little post to try and help some people. I started off with a Pulsar S which I could get to work but not work well mainly with BBs curving left, right or up everything but straight as much as a raged and blamed the engine, gearbox, hop up hop rubber it ended up being the alignment. Gate seem to have a issues with the nozzles on the Gate pulsar series (not so much the D or H ) but the S has them in abundance. During the setup no matter what hop up your using make sure you are using the nozzle sleeve this just helps it keep centred a little bit better. Alignment This is the big thing with the pulsar Series the alignment has to be good there are many ways to do this, but I would recommend grabbing a cheap gearbox like a specna arms orion and tap some bolts on the left and the right hand side just below were the tappet plate runs this will help you centre the left and right of the gearbox. If you want to pull the gearbox up tighten the buffer tube, then the pistol grip. If you want to lower the gearbox tighten the pistol grip, then the buffer tube. THESE is the most important step. The pulsar H nozzle is vastly better then the standard S and gives you more room for error. When you are checking your alignment, you want to grab a small endoscope camera 6mm so you can push it down the barrel and see how the nozzle is sitting in the hop up. You want a black ring around the nozzle even on all sides. Also make sure you’re doing this with the magazine in as this could slightly change your alignment. Once you have got this figured out you are in great hands and the fine tunning on the settings for FPS is a lot easier. Settings As odd as it sounds if you’re using a gate titan or aster make sure you reset it and put the mosfet into HPA mode. For some unknown reason everyone I know has had a better tunning when they select the engine as a single solenoid engine instead of a pulsar S or H. Don’t ask me why I have no clue. Once you have set your PSI for about 1.1j on a 330mm barrel on the S I needed about 70psi on the Pulsar H due to how the nozzle and increased chamber size I needed 90psi. Fine tuning the consumption is easy and the same as all other HPA engine set the dwell time on the Pulsar H I found around the 4m/s with a refresh of around 10m/s got me a great consistency with a deviation of +/- 4fps. People have found if you are having issues with fluctuation changing the RPS to 24/25 helps to solve this. The Pulsar H is recommended to not push past 35rps, but I have been fine with either 1 with not too many issues. Hop Up and Bucking When it comes to hop up and bucking, I ran through a decent amount the main thing you want is a bucking that has a good lip as this will cause a lot of issues. The common consensus is 4auntum and MP super macron bucking are the best. Due to the extra force from the nozzle if you have a hop then has something that help stiffen the bucking lips like the silent industries this helps with consistency. Shooting anything under a 0.3g BB isn’t going to work they are too light with the force generate by the nozzle you’re more likely to get fliers. I run 0.32g or 0.36g and don’t get many if any fliers once the bucking was broken in. The hop I tried were the Gate Eon, Maxx M4e, retro arms and Silent industry alpha. They all work well if you have the alignment correct but for my gear and m4 body I found the silent industry gave me the best consistency, hop and deviation then any other setup up whilst using the MP super macaron bucking. From a 3000 48ci tank I’m easily able to get 3000 shots if not more and they will be spamming the trigger in binary and auto. So, a full day of shooting it going to be easy depending on your playstyle. So, it’s efficient and once you have the alignment setup properly you have a good engine that does have its quicks as it does play up a little bit in the winter. Verdict From a stand point of setup this is by fair the worst wolverine, polarstar f2 and jack or even the backdraft are all easy to setup and align mainly down to they just having better nozzles but the stand out feature is the mosfet being able to update all features on the fly and having more options then the stand hpa fet does set it apart ( can still suffer from the same issues ). I would learn towards another brand but if you are upgrading from a Pulsar S the H is a lot better to install and deal with then the pulsar s. If Gate spent some time fixing the issue with the nozzle that allowed for easier alignment and slowed down the beta release of software and had more stable releases the pulsar system would be fantastic but until then would really recommend if your already in the ecosystem with a S then the H is worth the upgrade if you just getting into HPA go for the wolverine, N7, Polarstar and deal with less issues.
-
- 2
-
-
nathan13n reacted to a post in a topic:
DE Noveske N4 - One stop shop
-
nathan13n reacted to a post in a topic:
DE Noveske N4 - One stop shop
-
Nick G reacted to a post in a topic:
DE Noveske N4 - One stop shop
-
Hahhah i did see his it was the reason i got the MWS instead of the CGS. CGS is a great system but i just prefer the ease of access to parts and upgrade bits.
-
To use the Precison nub you need to slightly sand down the hop arm. Jaeger precision has a video on it. if you don’t remove it you end up with it applying pressure with 0 hop which send even 0.40g to the moon. i have found with my Mr Hop and omega bucking I can hop 0.4+ with no issue but with price I still with the 0.32/36g The CYMA CGS is a good system but it’s a MWS style gbbr meaning Cyma has updated bit that the my thought were needed so some of the internals are different, threads and mags are also slightly different. Where the DE is pretty much a straight clone of the TM MWS system to the point we’re being nosey I was about to switch the bolt+ trigger box from my maters TM and the DE still worked flawlessly also would argue the DE has a better trigger feel. So for parts and spares you have to hope other brands support the CGS system otherwise you just waiting in CYMA
-
Galvatron reacted to a post in a topic:
DE Noveske N4 - One stop shop
-
Yeah honesty. Was speaking to a few people at my local airsoft plantation, would be intresting to see how it holds up to use. Got a friend who spent 1200 in total ( includiong the gun ) on the TM MWS. Use mine and say it performs the same and all in im about £550 with no accessories. Will post a update once i have the Airtac adapter and longevity as it will get used heavily.
-
Hi, I had the Pulsar S that i converted over to The Pulsar H. It does help with the alignment but doesnt completely fix it. You will need to make sure its is aligned to the centre as much as possible or you will still get some curving usually to the end of the BB travel. I have recently got a 3d printed gearbox which aligns the gearbox and hop up which fixed this issue but would argue over HPA engine dont need it to work flawlessly inferno and Polarstar f2 for example. The big factor it has going for it is effecincy is farily good. in a good day of airsoft when im letting rip on my Pulsar H with a 48ci. 3000 psi tank i can run through 2000bs and still have 1000psi left in the tank. This is on a 85psi, 300mm barrel. getting me 1.15j lifting 0.32g. in all honesty. you can get it to run well but requires more fiddling then other engines of a similar price.