
NH Shooter
Members
- Apr 4, 2014
- 323
- 169
So… Basically… Hi Capa’s do fit in a Serpa holster. I didnt know where best to post this, so mods discression on... well... whatever...
Anyways...
If you wanna know how I did it…. Here we go. It’s a full instructional, so be warned, its picture and word heavy. In case you just skip over it, let me point out in advance… CLEAN UP AFTER YOURSELF…
You’re going to be making all sorts of plastic shavings. Make sure none of those end up in your gun.
Also… Be careful and make sure you understand what youre cutting BEFORE you cut it… Its far easier to take material off, than it is to put it on…
SO….
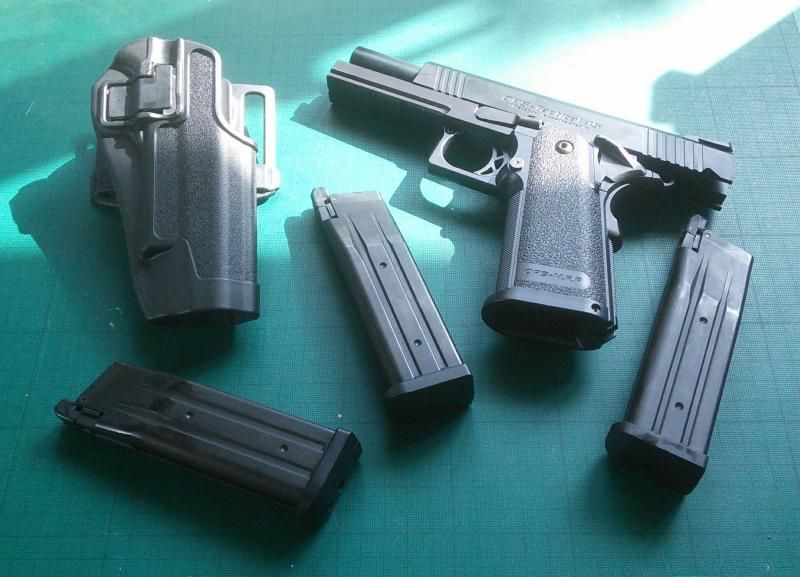
Base units. TM, Hi Capa 4.3 and some cheap Serpa rip-off from eBay.
and the issues you have in the first place are based around the rail and the trigger guard. The rail interferes with part of the holster... So first things first, cut it off!
http://img.photobucket.com/albums/v66/Glaive/Serpa%20mods/IMG_20140709_165929_zps1e55f46b.jpg
....That fixes that....
You will be left with a bottom end that looks like this, so remove the excess (in red)
http://img.photobucket.com/albums/v66/Glaive/Serpa%20mods/IMG_20140709_165944_zpsae971e24.jpg
you will notice already that you can manhandle your pistol into place but it now jams on the trigger guard.... You can see below that the red lines show roughly where the trigger sits, and of course... How the serpa isnt moulded to fit it. Your square trigger needs to occupy the space in the yellow area.
http://img.photobucket.com/albums/v66/Glaive/Serpa%20mods/IMG_20140709_171034_zps0037de9d.jpg
But if you turn the holster to its back...
http://img.photobucket.com/albums/v66/Glaive/Serpa%20mods/IMG_20140709_171059_zps17d1bdc3.jpg
you'll notice that the trigger guard is far thinner than the space moulded for it. You can also see that the trigger is in line (red line0 with the bottom of the holster, but not the side... this means that you can remove material at the bottom without touching the sides, and this will fix your issue.
The REASON its not sitting central is down to another fouling condition, this can be seen here...
http://img.photobucket.com/albums/v66/Glaive/Serpa%20mods/IMG_20140709_170747_zps960de43e.jpg
points in the red and yellow circle are causing a pinch. If you can somehow stop the pinch, you could make the trigger more central and allow some room to breathe... But first... Round trigger guard vs square...
A bit of masking tape shows the area thats causing you problems...
http://img.photobucket.com/albums/v66/Glaive/Serpa%20mods/IMG_20140709_171338_zps9232cc8c.jpg
which along with some pilot holes and drilling gives you this...
http://img.photobucket.com/albums/v66/Glaive/Serpa%20mods/IMG_20140709_171850_zpsd47fc1cd.jpg
which you can open out to this...
http://img.photobucket.com/albums/v66/Glaive/Serpa%20mods/IMG_20140709_172639_zps08e2ddd7.jpg
this allows your square guard to enter the rounded holster.
OK... Take a breath... Lets reflect on what weve just done... and by now, 30 minutes has elapsed and if you were to jam that pistol in, it would actually work! But theres a little more...
the above gives you a working unit, but remember that pinch? Thats caused by the moulding. Thankfully, also fixed in 30 seconds... Cut along the red line and blend...
http://img.photobucket.com/albums/v66/Glaive/Serpa%20mods/IMG_20140709_172901_zps0f42a351.jpg
So next you... Uhhhh... actually...
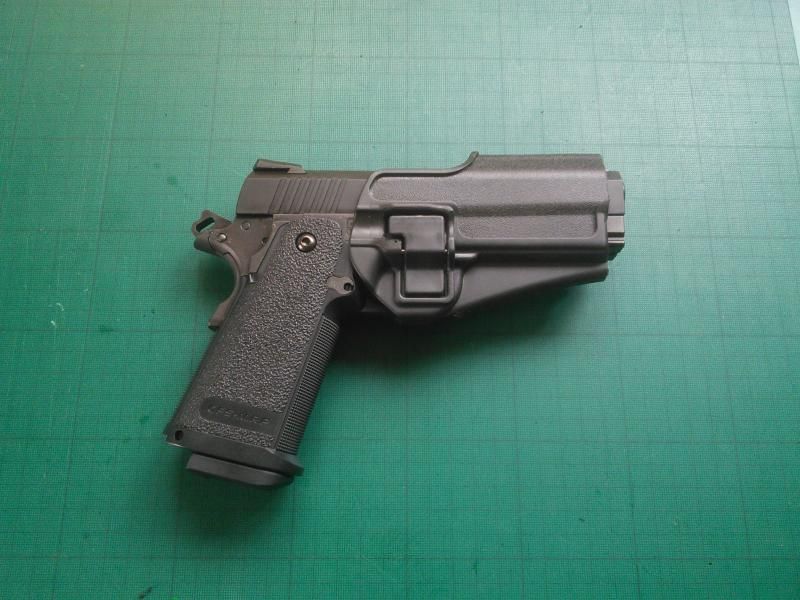
Remember to clean up and crack on... Total time, 60 minutes. Plus maybe another 60 in fine tuning and finishing... But does it actually WORK? Let the video speak for itself...
http://vidmg.photobucket.com/albums/v66/Glaive/Serpa%20mods/VID_20140709_173737_zps4c19378e.mp4
Anyways...
If you wanna know how I did it…. Here we go. It’s a full instructional, so be warned, its picture and word heavy. In case you just skip over it, let me point out in advance… CLEAN UP AFTER YOURSELF…
You’re going to be making all sorts of plastic shavings. Make sure none of those end up in your gun.
Also… Be careful and make sure you understand what youre cutting BEFORE you cut it… Its far easier to take material off, than it is to put it on…
SO….
Base units. TM, Hi Capa 4.3 and some cheap Serpa rip-off from eBay.
and the issues you have in the first place are based around the rail and the trigger guard. The rail interferes with part of the holster... So first things first, cut it off!
http://img.photobucket.com/albums/v66/Glaive/Serpa%20mods/IMG_20140709_165929_zps1e55f46b.jpg
....That fixes that....
You will be left with a bottom end that looks like this, so remove the excess (in red)
http://img.photobucket.com/albums/v66/Glaive/Serpa%20mods/IMG_20140709_165944_zpsae971e24.jpg
you will notice already that you can manhandle your pistol into place but it now jams on the trigger guard.... You can see below that the red lines show roughly where the trigger sits, and of course... How the serpa isnt moulded to fit it. Your square trigger needs to occupy the space in the yellow area.
http://img.photobucket.com/albums/v66/Glaive/Serpa%20mods/IMG_20140709_171034_zps0037de9d.jpg
But if you turn the holster to its back...
http://img.photobucket.com/albums/v66/Glaive/Serpa%20mods/IMG_20140709_171059_zps17d1bdc3.jpg
you'll notice that the trigger guard is far thinner than the space moulded for it. You can also see that the trigger is in line (red line0 with the bottom of the holster, but not the side... this means that you can remove material at the bottom without touching the sides, and this will fix your issue.
The REASON its not sitting central is down to another fouling condition, this can be seen here...
http://img.photobucket.com/albums/v66/Glaive/Serpa%20mods/IMG_20140709_170747_zps960de43e.jpg
points in the red and yellow circle are causing a pinch. If you can somehow stop the pinch, you could make the trigger more central and allow some room to breathe... But first... Round trigger guard vs square...
A bit of masking tape shows the area thats causing you problems...
http://img.photobucket.com/albums/v66/Glaive/Serpa%20mods/IMG_20140709_171338_zps9232cc8c.jpg
which along with some pilot holes and drilling gives you this...
http://img.photobucket.com/albums/v66/Glaive/Serpa%20mods/IMG_20140709_171850_zpsd47fc1cd.jpg
which you can open out to this...
http://img.photobucket.com/albums/v66/Glaive/Serpa%20mods/IMG_20140709_172639_zps08e2ddd7.jpg
this allows your square guard to enter the rounded holster.
OK... Take a breath... Lets reflect on what weve just done... and by now, 30 minutes has elapsed and if you were to jam that pistol in, it would actually work! But theres a little more...
the above gives you a working unit, but remember that pinch? Thats caused by the moulding. Thankfully, also fixed in 30 seconds... Cut along the red line and blend...
http://img.photobucket.com/albums/v66/Glaive/Serpa%20mods/IMG_20140709_172901_zps0f42a351.jpg
So next you... Uhhhh... actually...

Remember to clean up and crack on... Total time, 60 minutes. Plus maybe another 60 in fine tuning and finishing... But does it actually WORK? Let the video speak for itself...
http://vidmg.photobucket.com/albums/v66/Glaive/Serpa%20mods/VID_20140709_173737_zps4c19378e.mp4
Last edited by a moderator:
")
