

jeremythegenius
-
Posts
5 -
Joined
-
Last visited
-
Days Won
1 -
Feedback
0%
Recent Profile Visitors
1,151 profile views

jeremythegenius's Achievements
")


-
 AirsoftTed reacted to a post in a topic:
Mil-Tec Ghillie suit review
AirsoftTed reacted to a post in a topic:
Mil-Tec Ghillie suit review
-
AirsoftTed reacted to a post in a topic:
Mil-Tec Ghillie suit review
-
Mil-Tec Ghillie suit review
jeremythegenius replied to jeremythegenius's topic in Guns, Gear & Loadouts
Amazing how much the prices have dropped, last year ghillie suits were selling for £89, Military 1st offer them for £59.99 and as Teddybhoy says they cost £32 from Amazon, pays if you shop around. Thanks guys for the great comments, much appreciated. -
Dan88 reacted to a post in a topic:
Mil-Tec Ghillie suit review
-
Airsoft_Mr B reacted to a post in a topic:
Mil-Tec Ghillie suit review
-
team flex reacted to a post in a topic:
Mil-Tec Ghillie suit review
-
Caliber reacted to a post in a topic:
Mil-Tec Ghillie suit review
-
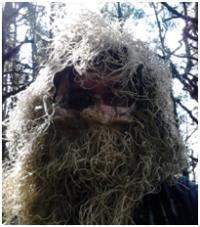
Mil-Tec Ghillie suit review First off the bat, I love sniping. To me it is a way of life and not just a skill. OK, so you know me by now. I am very tight fisted to say the least. I hate buying anything that I can’t make myself for a fraction of the price. For heaven’s sake when I was eight I tried to make a bike from old scaffolding pipes. So far 95% of projects that I have attempted have been successful, the bike was not one of them and neither was my homemade ghillie suit. I have attempted to make a homemade ghillie suit five times and each time the effort was poor to say the least. The concoctions I tried to make looked a mess and fell apart in the field during nightmare game after game. I am a very counter sniper player and enjoy hunting and taking out other snipers on the opposite team. This said, it is a bit embracing as a sniper to be taken out by a girl with a bright pink two tone AK47. The last straw was when my suit fell apart and I was spotted and taken out by two guys who looked like Robert Smith of ‘The Cure’ and Gerard Way of My Chemical Romance (random). So I made a bit of money recently writing for different web sites and from a few magazine articles. This money has been burning a hole in my back pocket. So I decided that in order to hone my sniper warfare skills then I would need to procure a professionally made ghillie suit using this money. In this review I will cover the Mil-Tec variant ghillie suit. The suit cost me £32.99 complete with £2.99 shipping. Altogether this is an excellent price to pay for such a suit. I went for the digital desert camouflage option, this will blend in well during the coming autumn season. The woodland camouflage suit that Mil-Tec manufactures also looks very nice as well, being greener and darker in colour. So I ordered it on a Wednesday evening and by the following Friday it arrived, nicely packaged in a sturdy cardboard box. Mil-Tec is a German company so the quality is definitely towards the higher end of products. I was so excited that I just had to try it on straight away when I got home. The first day I had great fun hiding in the garden, then for my girlfriend to come home at seven o’clock before I stepped out of the shrubbery to accidentally/on purpose scare the hell out of her. The ghillie suit is a four piece system. The trousers are elasticated and feature holes so you can access you pockets underneath. The jacket is airy and light weight. Made of 100% Polyester so it remains cool. The head shroud is perfect and features netting over the eyes and nose allowing for easy breathing. The fabric is very durable featuring plastic press buttons, elasticated waist and adjustable drawstrings which feel strong. The suit features elasticated ankles and buttons at the bottom of the legs which is useful for covering your feet. It is worth adding the whole set can be easily compress into small and light kit bag. The compact and packed up suit and then unfolded. The rifle scrim is the only part of the suit which is a bit too small for a sniper rifle. I use an L96 warrior and sometimes M42A1. Both are long rifles and really need extensive ghillie wrap made of burlap sacks instead. Now at first the suit camo looks as though it is too thin in places. But this is what every ghillie suit looks like at first. The fibres that the suit is made from will need to be flayed and will need to pick up debris and dirt making it look more natural over time. The US Army for instance basically get snipers to run through the woods over a whole day to break up a new ghillie suit. If it is good enough for the US Army then this is good enough for me. So I did the exact same thing but for only three hours. The more vegetation you can pick during this first outing then the more camouflage you have. Meanwhile in the UK, the most random selfie of 2014. But the hood really is that good and stays put when you are wearing it. The suit will easily tangle-up in nettles and small branches. But ghillie warfare is not about yomping for miles, it is about cover and concealment often working from a small number of hide locations. Putting the suit through its paces I headed out to my local woodland to practice. Now this is where I would need to be really stealthy as ‘normal’ people use these woods as well. I crossed a public footpath in close proximity to some walkers and they didn’t even see me. I even carefully crawled within three feet of a busy road on the other side of the woods and still I was undetected having passed within ten feet of about ten different people. For quality I would give this suit a 9/10 – The suit feels durable yet amazingly light and airy Easy of putting it on 10/10 – It is really easy due to the lightweight and flexibility of the material. Build quality 9/10 – Really good and put together really well. Overall the Mil-Tec variant of ghillie suit is excellent, if you are looking and getting a four piece suit next or as a first ghillie suit then this is one that you will not regret procuring. I got my mate ‘superpaperboy1989’ to take some pictures of me in the ghillie suit in concealment. Rather than ‘Where’s Wally’, it is can you ‘Spot the Wally’? Clockwise from top left (1) next to a fence post in prone position (2) in kneeling position next to a mound of earth (3) laying down beneath a fallen tree and (4) in a bush in prone position. Cheers for reading and please feel free to post your comments. Be kind to pigeons Jez

-
Oh brother, everyone's a critic.
-
I have an L96 Warrior MB-01, it looks great, straight out of the box (although I bought mine second-hand from a pawn shop), but it needs a little something extra – I know lets ghillie it up. In this article I will tell you how I cheaply, but effectively camouflaged my rifle using a range of items that are found on the high street, and for low price from the internet. Firstly, don’t spray paint your rifle or use a fancy stencil, it will probably work the once, but adding layer after layer of paint will over time have a negative effect on your rifle – it is ABS plastic after all. You have probably seen the film Shooter with Mark Wahlberg – and he does some pretty neat stencilling to camo his rifle, but that is just a film and not real life. Few if any snipers take shots at great distance, most shots are quite close, which is why camouflage and cover is so important. OK this is my review on how to source and then use low price materials to effectively camouflage a rifle, cheaply, sustainably and most importantly, so that it is effective in the field. There are a few tutorials (I use this term loosely) on youtube that cover this, the best one I have seen is by this German chap who pretty much knew everything about sniping and concealment, he was so good at it that I wouldn’t be surprised if he was hiding in my back garden! The current problem is that any place that sells hunting supplies has a vast variety of camouflage paraphernalia, which they will charge you premium for – usually there is a 500-1000% markup! So you will usually end up paying £45 for something that someone else has made for £4. I haven’t got this sort of money lying around, at the end of the day to quote Mark Twain ‘times is hard’, and money is in short supply, and I am also very tight-fisted. I have seen ghillie rifle wraps on the internet that cost around £30. A friend of mine procured one of these, but you have to do an awful lot of work to it in order to make it look as good as the one in the picture. Netting costs money and camo fabrics cost money, and before you know it, this all ends up costing £75-£80, which is almost as much as the rifle itself! Essentially what I have learned is that there are an abundance of freely available materials that can be used as camouflage but only cost 10% of the price. Most people don't understand that the meaning of sniping, is to be quiet and hidden. Back in WW2 snipers would simply take an old burlap bag and wrapped it around the rifle and scope. The 'idea' then as it is now is purely to break up the straight lines of the scope and rifle and mix in with local colours. Using burlap strands with random knots tied successfully did both these jobs and added a 3D effect to the camouflage. My method uses simple burlap, camo tape and rubber bands that are used for attaching natural materials – this is also eco-friendly and I want something that blends in well. In battle theater around the world, real snipers will pretty much make their own camouflage and even ghillie suits with the materials found around a patrol base or operating region. Again, why buy off the shelf? When you can make it yourself, save money and learn some traditional skills. Anyway, I had a budget for this small venture and I decided to splash out the princely sum of £8.50 – as the tight-fisted git that I am. First, I bought some light brown fabric-based (scappa-brand), camo tape 50m worth, off ebay, from a seller up north. This cost me £4.20, it was the cheapest price for quality tape, and it only took two days to arrive right to my door! This camo tape is great in that it sticks to the rifle really well but when peeled off it doesn’t leave any sticky residue, unlike duct tape. See the image of my rifle before and after the taping process. I tried wrapping my suppressor with the stuff first of all and it looked so great that this reinforced my notion to do the whole rifle. I first disassembled the rifle and then started with the stock, then the barrel, chin rest, followed by the scope and then finally the bipod. Some parts of the rifle can be tricky, especially around the butt end where there are many complex geometries. That is why it is a good idea to first disassemble the rifle, cover it with tape and then reassemble it again as you can hide any messy ends under the different parts. What I also do is add a bit of kiwi boot polish which soaks into the fabric of the camo tape and darkens it – Special Forces use this trick. Apply the tape firmly to the surface of the rifle and it will bond well to the plastic, to itself and also to metal, also ensure that any surface is clean and free from any grease. Some advice on using camo tape, just remember: · Be patient – it takes time to do it right – the L96 took me a good four hours to do a proper good job; · Put extra tape over the areas where you grip – this will be more wear resistant; · Avoid covering moving parts; · Keep the edges as clean and with a neat straight cut; · Try to be neat and avoid folds when putting the tape on. Then one rainy, dark and cold Friday afternoon in December I headed off to the town in search of some materials that can be used for camouflage. There are a surprising number of shops on the high street that sell materials that can be used to camouflage a rifle. My local Wilkinson store sells a range innocent materials, which to the trained eye can be used for camouflage i.e. a sad old green cushion that grandma sits on – yep I will have that as a camo wrap, and some black rubber bands from the stationary section – well they will be perfect for attaching foliage etc. Then I picked up an old British Army camouflage jacket (to make the first part of a ghillie suit) from my local British Red Cross charity store. I got this for the kingly sum of one pound; they originally wanted five pounds for it – like hell! Essentially, I told the old biddy behind the counter that the jacket was in poor condition and I needed it for a school project, and I had a single pound of pocket money (sic) left in my back pocket. Out of the corner of my eye, in the backroom I noticed some old-school burlap sacks (bingo), I just demanded that she give me these, and she did. With a burlap scrim added over the scope, this reduces glare, this is very important as this is the most likely way to get seen. OK, so I merrily exited the store with a lot of camo-based materials that I needed, but for only a pound – gives the term pound shop a whole new meaning. At the end of the day sometimes you have to be a son of a bitch. OK these charity places can be full of sad Jeffs and they smell funny, but at the end of the day, a bargain is a bargain – use them. OK, with the first and most difficult stage of camo taping the rifle and collecting the materials from civvy-street complete then I headed to the forestry to use some natural materials to ghillie the rifle and make my ghillie suit. It is not like old PC plod are going to arrest me for taking a few bits and bobs, and even if they try then I can always hide from them. In my next posting I will carry on, starting with making burlap strips and then proceed to taking it out into the field and adding the all important natural camouflage.


