Leaderboard


Popular Content
Showing content with the highest reputation on 29/11/19 in all areas
-
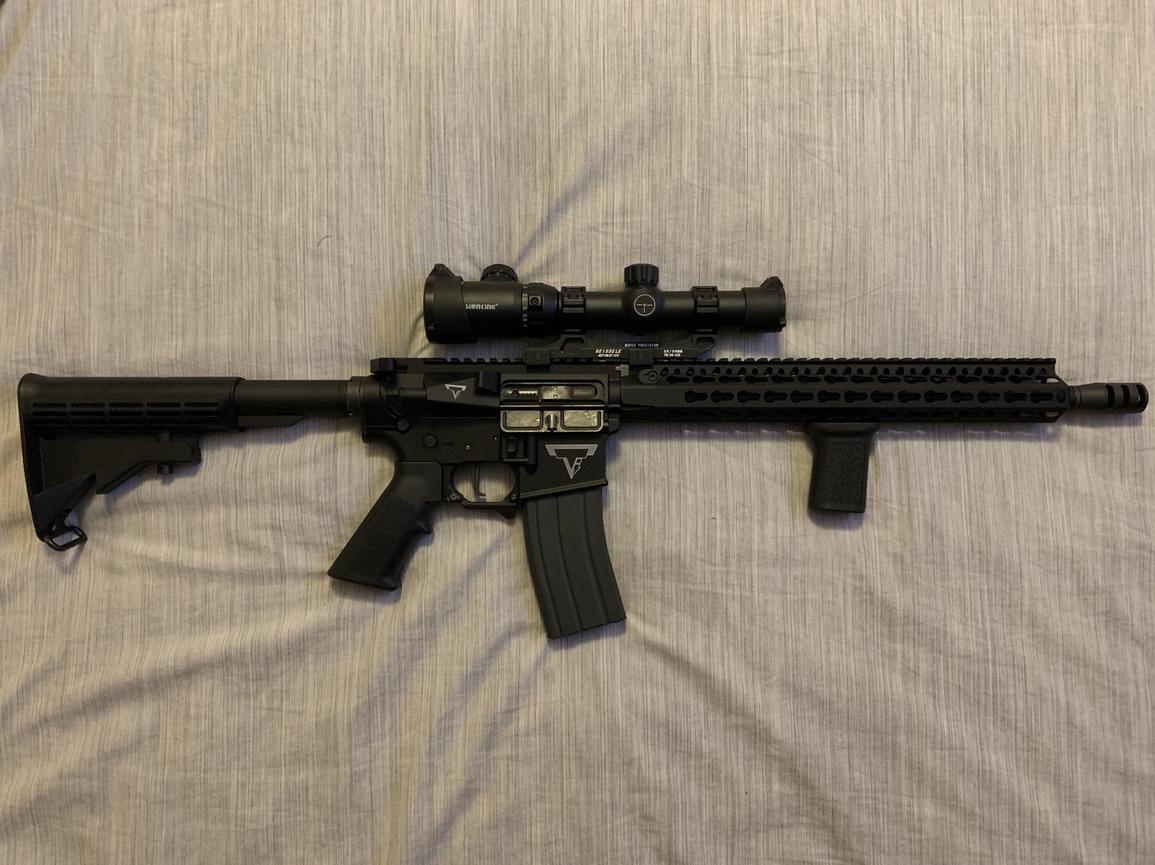
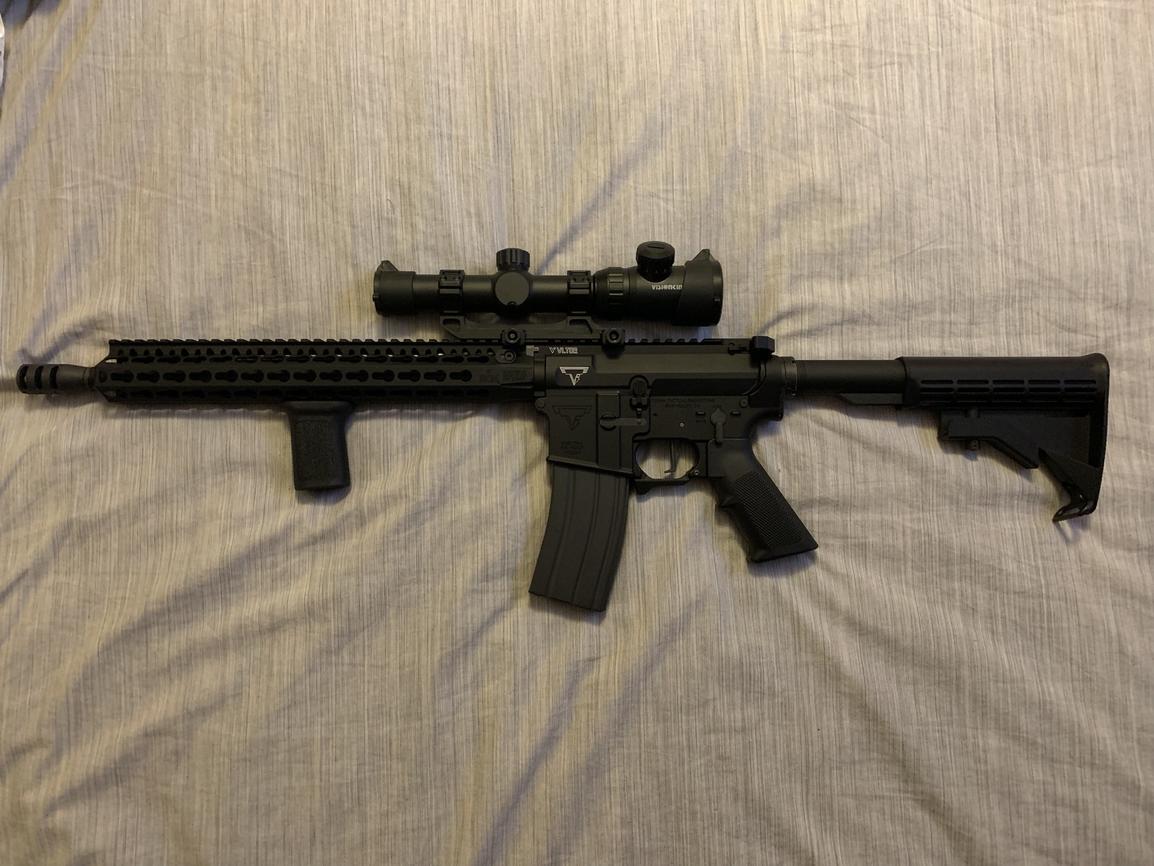
And she is complete! My MWS Taran Tactical TR1 / John Wick DMR Build. Not an exact copy as the real steel stuff as supplied on the original TR-1 is sooooo expensive. The scope mount itself is about £300 (from memory) so I have found the closest I can. Internally it has a Prometheus 6.03 370mm inner barrel, Modify Tan Bucking and the essential SixG Nub (props to Dave). A trip to Dave’s Custom Airsoft on the way home tonight where I picked up the scope as well as a Chrono so I will be testing the output tomorrow. My initial first shots were very impressive with .3 gram BB’s. Must have flown 60m straight without me touching the hop up. What do we think guys?
 4 points
 -
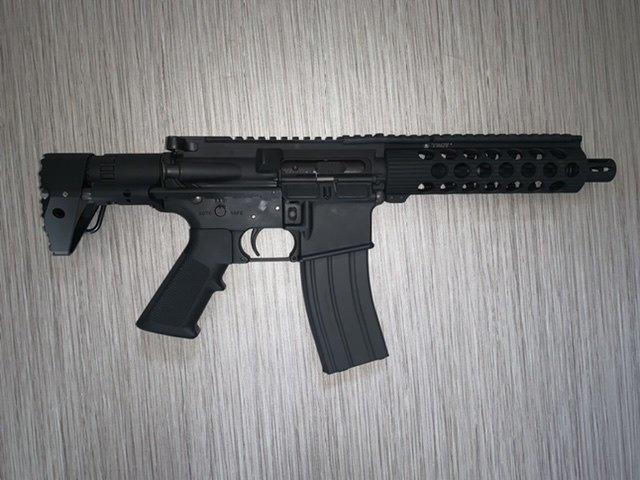
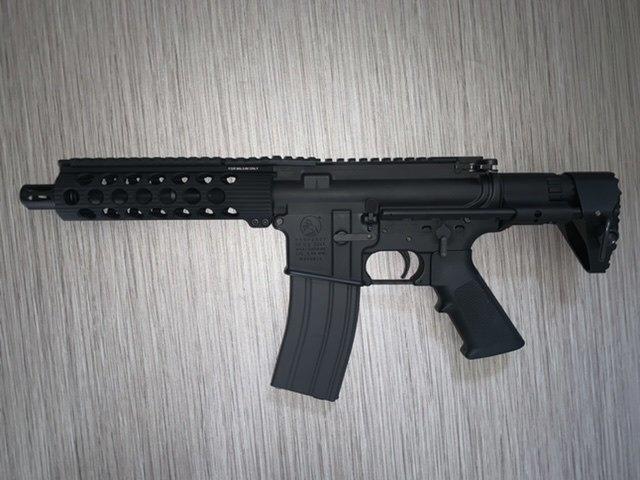
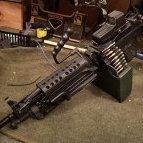
Troy M7A1 PDW mostly complete. G&P Troy PDW stock Madbull Troy TRX 7” rail 5KU 7” outer barrel Laylax Nineball 162.5mm inner barrel 6.03 Everything else stock apart from the biro mod. Will lift a .45 Bb to 70m Just got to get a red dot and different flash hider, and keep my eyes peeled for a Dytac 7.5” silver barrel
3 points
-

How do Mech Box, or Hamster Rambling About Generic Tech Tips
paradoxum reacted to Adolf Hamster for a topic
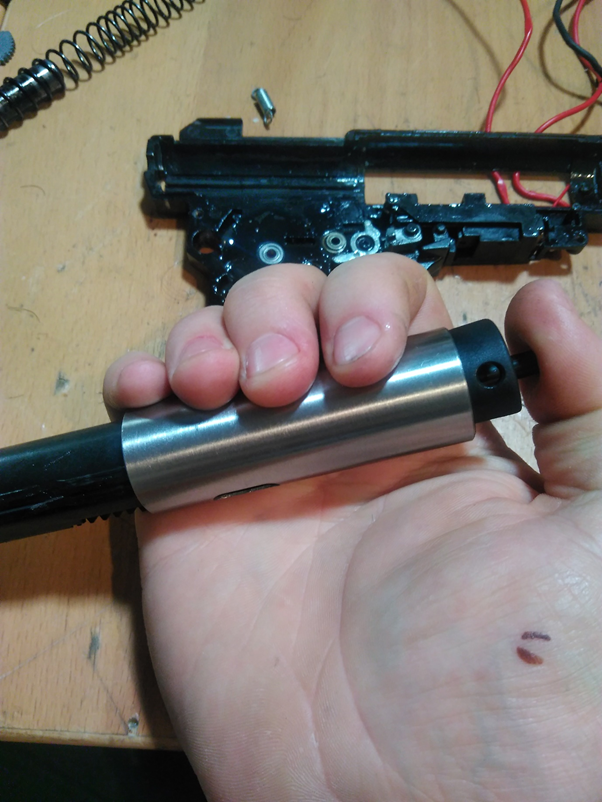
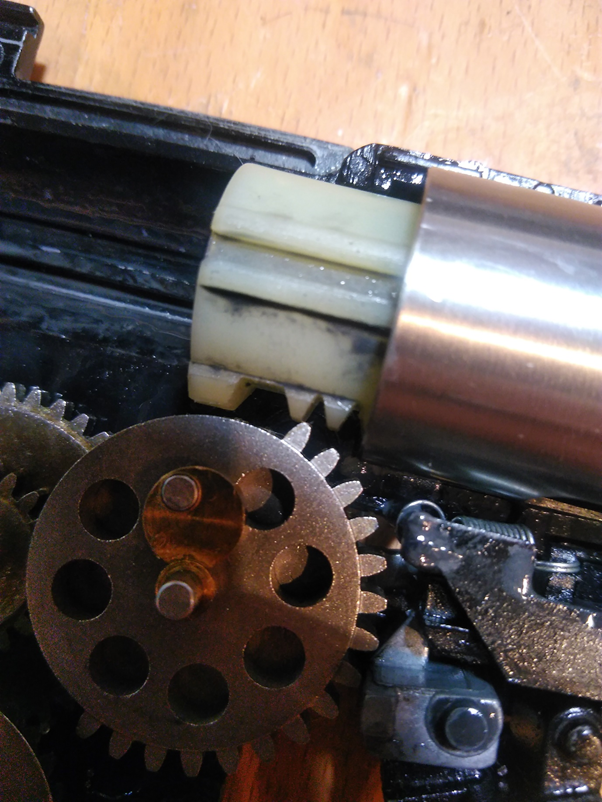
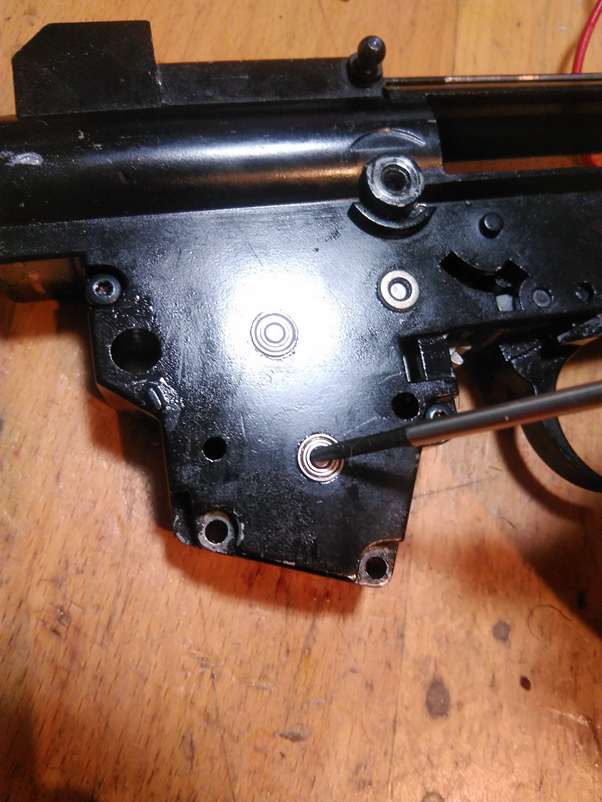
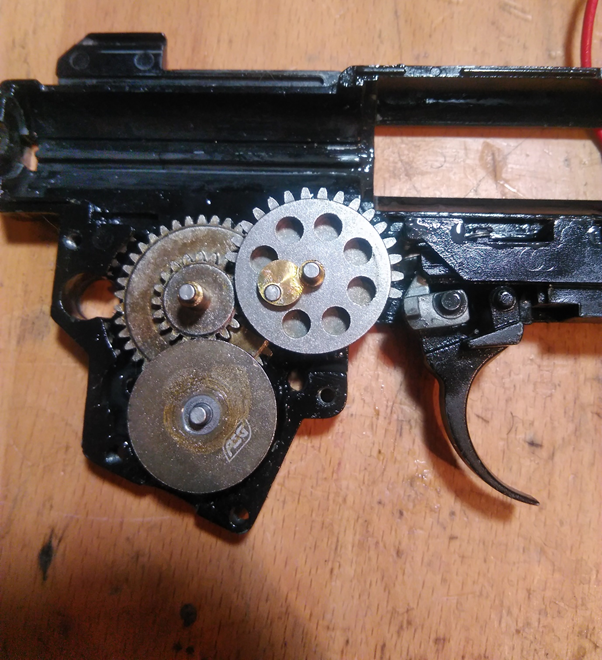
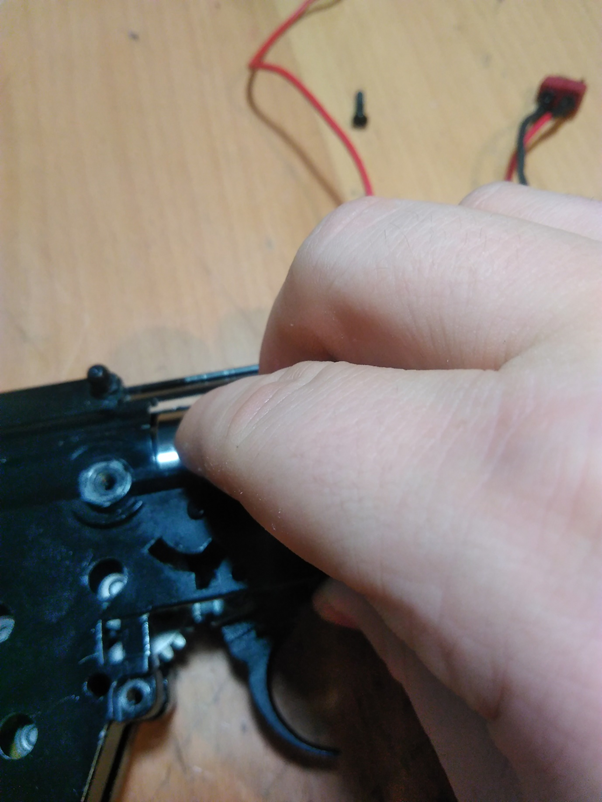
So inspired by this thread i figured i'd have a ramble. Foreword (or why you should/should not continue reading) I figured I might chuck together a guide as to the generic checks, tests and things to do when assembling an aeg box. I’m not going to cover specific parts or specific builds, because mostly it’s not a case of “always use X part” as much as “well x part is excellent in this gun, but for that gun y part is better suited”. This is more a case of I have an aeg what should I do when rebuilding it or I have this issue what might be the cause. . Now the premise to this is before continuing you should ask yourself this: · Is my gearbox actually broken? · Do I have a reliable backup? If you answered no to both of those questions then I would seriously re-evaluate wether or not opening up the box is a good idea, it’s an old and tired adage but “if it ain’t broke don’t fix it” very much applies here. It’s also important to remember that there’s a difference between upgrading a gun and throwing a bunch of expensive parts into it and expecting it to work better. The second question is more for the experimentalists but remember the walk of shame 30 minutes into a game day when your latest tinkering has failed is not a fun experience the tenth time you’ve done it- ask me how I know. *if you want to have a crack at it my record is killing 2 guns in 5 minutes. However, if you answered yes to the first question I’d put forward my philosophy- you have a broken thing, if you try to fix it then the worse case scenario is it’s still broken and you’ll have to take it to get repaired/replaced. Even if you can’t fix it you’ll learn something and have a better idea of what needs done if you choose to seek help getting it sorted. So whilst I don’t encourage opening up a box needlessly if you do have the need of it then give it a go, it’s not as hard as you’d think and you get used to it pretty quickly. General tips So the first thing to point out is that for the most part the various aeg pattern gearboxes tend to follow a pretty common pattern, yes you’ll have different motor mounts, gear locations etc but the majority of boxes will use the standard marui pattern design, and certainly your common v2/v3/v6/v7 boxes will. Guess we have marui to thank for getting ripped off so badly- at least it set a standard. So this is why I’m not going to talk about the specific versions because they’re all doing basically the same thing. Next thing to consider, especially if you are new to the sport and want to get into doing your own work is to have good quality tools and the right tool for the job. Yes you can use a flat head or alan hex to remove a torx bolt, but do it too many times and you’ll chew up the head of the screw and that could leave you in a sticky situation. Having the right tools will make the job much easier and smoother, also proper hex drivers are so much nicer than alan keys. This also applies to your working area, there are so many things that can go sproing and you’d be amazed where they can end up, so a relatively tidy environment will help locating things. It’s also handy to have a bunch of dishes to set things in, butter dishes work well but you can use whatever you want to drop things like screws in to stop them rolling their way to a new life under the nearest bit of furniture. This is definitely the only reason I eat GU cheesecakes to get the little glass dishes and absolutely nothing to do with how delicious they are. So, I suspect folk are probably getting bored of the exposition now so onto the techy stuff. Safety *HSE mandated disclaimer: I am not responsible for your safety, the guts of an airsoft gun are a clockwork nightmare of sharp things and springy things which will do their utmost to slice or blind you, use common sense and appropriate ppe such as gloves and safety glasses and yes I know you’re going to ignore this and do it bare fingered with no glasses but I’ve said it so you have been warned and now you can’t sue me* Terminology So for the benefit of folk who aren’t maybe all that familiar when they see the various terminology used for the parts I figured I’d go over it just so we’re all working on the same page. This is a v2 gearbox image but you’ll find parts that do the same job with roughly the same shape in other boxes: Figure 1: view of v2 gearbox Number Name 1 Nozzle 2 Cylinder head 3 Cylinder 4 Piston head 5 Piston 6 Mainspring 7 Mainspring guide 8 Tappet plate 9 Sector gear 10 Idler gear 11 Bevel gear Step 1: removing the gearbox from the gun So this is going to be a short section- youtube it, there’ll be a video somewhere probably with portrait aspect ratio mobile footage of someone else pulling a gun apart. There’s no shame in checking before you do it just in case that pin didn’t need smacked out with a hammer. There’s not much more I can add because there’s so many gun designs out there and they can have their different tricks even for similar guns like m4’s. Step 2: opening the gearbox So most of this should be obvious, just start unscrewing things until bits start coming off, some boxes (v3,6 and 7) have slide on rails that can be a bit tricksy. As a general mode of order I’d go with: Quick detach spring if it has one (and if it doesn’t have fun because qd springs are the best, they should be mandatory) Any external trigger bits Motor cage (unless that already came off with the grip in the case of m4 style guns) Once you’ve got that apart then it’s time to separate the 2 halves, if you’re unlucky and don’t have a removable mainspring then the next tip is for gearboxes with a threaded hole in the mainspring guide you can shove a screwdriver up there and if you keep it pressed down it’ll stop the mainspring from catapulting itself across the room. Once you have the box open then carefully remove the mainspring assuming it hasn’t spontaneously catapulted itself across the room. The rest of the internals should be easily popped out. *careful when pulling stuff out, things like shims will stick or not stick to their various bearings/gears in a completely random ratio. It’s best to keep track of them if you’re not actively planning to re-do the shimming as it makes life much easier to be able to pop them back in with the shims still in the correct positions* Step 3: cleaning and checking So there’s not much science to this- just clean each part individually using your preferred method, you can use a cloth or if you’re feeling fancy you can use things like ipa or acetone or ultrasonic cleaners. You want to pay special attention to any grit/dirt that may have accumulated or bits of whatever bit just ate itself. Once found a twig inside a v7 box, no I don’t know how that happened either. A good thing to check for when your in there is the trigger contacts- if you aren’t running a mosfet you can get carbon build up on the contacts, just give them a good scraping without bending them. If you’re running higher power setups (ie lipo’s) without a mosfet you can even burn through the contacts, so keep an eye for that. Step 4: compression Compression is one of the key factors for accuracy, you can have an excellent hop/barrel setup and feed your gun the finest premium bb’s but if it’s got bad compression it’ll still shoot terribly. A good indicator if you’ve got compression issues is vertical dispersion- your bb’s going up and down with different shots, this is because the bb’s don’t have the same velocity each time. You can use a chrono to check this. A really well setup system can have as low as ±1fps. There are 4 main areas to check for compression (assuming the hop is good) 3 of which you need to be inside the gearbox to check. 1. Between the nozzle and the hop bucking- if you’ve just changed your hop and have issues odds are this could be your culprit. 2. Between the nozzle and the cylinder head 3. Between the cylinder head and cylinder 4. Between the cylinder and the piston Generally the steps go like this: Put the cylinder head into the cylinder and put your thumb over the end. Next try to push the piston into the cylinder. This is mostly on feel but you want to have a lot of resistance and have the piston spring back out when you let go. If it can be pushed in you have a leak somewhere: Figure 2: method for checking compression, also note the lovely blood blister and how i said to wear gloves, do as i say not as i do..... -Between your thumb and the cylinder head- hold harder -Between the cylinder head and cylinder, a well matched cylinder/cylinder head shouldn’t have this issue. There are various methods of solving this ranging from one-piece cylinder/head combos, double seal cylinder heads, replacing the o rings, wrapping the cylinder head in ptfe tape before assembly or even gluing it. Which method you use is up to you although personally I prefer where possible to use non-permanent methods. Figure 3: how to use ptfe tape to make a mess fix compression also note the o ring glued onto the back for fixing aoe -Between the piston and cylinder, as above if it’s a well matched setup this shouldn’t happen. Solutions include changing the o ring, stretching the o ring, or changing the piston head. Some piston heads (I’ve met this on “silent” piston heads) haven’t got a good sealing surface, this can also happen if there are scratches on the sealing surface. Another potential culprit is if the cylinder itself has bad scratches in it or has a bulge/poor quality internal bore. Figure 4: one method of "stretching" the o ring for better seal on the piston, note this isn't as good as a good replacement o ring The next step is to repeat the above, but add the nozzle, this is a bit easier than before because if you have a good base compression and get a leak with the nozzle then you know you have a leak there. This could be due to a worn o-ring inside the nozzle (or even not having an o ring which some cheaper nozzles wont), worn surface or poor fit on the cylinder head can also cause this. Personally I’m a fan of brass nozzles with a good sealing o ring. Figure 5: checking compression again with the nozzle installed Figure 6: refreshing the sealing o ring on the nozzle for a better seal. The final check is between the nozzle and the hop, which is jumping ahead of ourselves a bit, basically it’s a case of the feed lips on the hop being too short/long, or the nozzle being too short/long/damaged. You can look up the feed tube and check this visually, or hold a strip of paper under the feed tube to see if any air is being blasted out, needless to say the aim is to get every last bit of air going down the barrel and nowhere else. Figure 7: and we're done with this bit. Step 5: piston setup, aoe and pme So the next check is to pop the cylinder back in the box with the piston and the sector gear. Leave the tappet plate out for now. We want to check the angle of engagement. Have the piston all the way forward and rotate the sector gear until the teeth just start to pick up. What we’re looking for is what angle there is between the teeth and the piston. As a general rule I find *most* stock guns have issues here normally with the piston being too far forward. The problem is that in this case when the sector makes contact it’s trying to push up on the piston. Without going into the mathematics of resolving forces the short version is this is not good, in extreme cases it can damage the piston (especially when you’re talking about higher powered setups): Figure 8: early engagement, note how the tooth will push the piston up as well as back. On the other side of things if the piston is too far back the sector gear might try and pick up the wrong tooth: Figure 9: the other extreme, where the sector tries to pick up on the wrong tooth. There are different ways of solving this, a common one is to use sorbo pads. Personally I just shove an o ring infront of the piston (figure 3) which in many cases is about right to bring the aoe to a decent level: Figure 10 there we go, much better, note this is much easier to tell by eye than in a photo and the piston here isn't the one for this build but it does show up better on camera. Another common problem is pme, or premature engagement. This is particularly aimed at high speed builds. These days my advice would err more towards telling people not to bother speed chasing on an aeg, start trying to push beyond 25-30rps is just going to cause a lot of issues and frankly high rate of fire isn’t all that useful beyond punching through hedges, accuracy by volume and pissing people off. If you want a snappy semi auto response for cqb then you’re better off looking at getting a mosfet with precocking like a titan. Leave the stupid rof stuff for those hpa knobs (before someone tries to call me out for that I am one of those hpa knobs ) What’s happening here is the sector gear is spinning so fast that it’s already spun all the way round before the piston has had the chance to close home and caught the piston as it’s moving forward. Needless to say this never happens with good tooth engagement and the increased impact velocity means even a full steel toothed piston is going to get eaten in short order. If you’re experiencing this, or notice the teeth on your piston starting to get chewed up there are a few fixes: 1. Slow it down, and maybe take it a bit easier on the full auto. Of course I know as well as any that nobody likes this option, but it will work. 2. Beefier spring- get that piston to close faster and it’ll miss getting hit by the sector. Of course this runs into the issue of energy limits so this can only go so far. 3. Short stroking- this goes hand in hand with beefing up the spring as this will reduce the energy by giving the piston less distance to travel. The common way of doing this is shaving teeth off the sector gear or in extreme cases going as far as a dual sector gear. Needless to say the problem you have here is that the stronger the spring the greater the load on the box, combine that with hammering it at high speed and you can start breaking things. There’s also the side issue of less volume of air being utilised, which means you’ll be limiting the barrel length you can have which in mild cases isn’t so bad but go to the extremes and you will have to start trading accuracy for rate of fire. 4. Lighter piston/lighter ammo- a lighter piston will accelerate faster, although going to the extremes of swiss cheesing pistons starts to compromise their strength. As a general rule I prefer to keep standard pistons and only have a thrust bearing on the guide rod not in the piston. Lighter ammo can have the same effect although this is pretty negligible. As a side note, it’s generally a good idea to at least run a thrust bearing on the spring guide, otherwise it’s possible over time the constant twisting of the spring as it compresses can cause it to fail, a thrust bearing lets the spring do it’s thing. Step 6: shimming and backlash So the next phase is shimming, there are plenty of youtube videos out here but for the most part it’s a trial and error process, remember when I said keep track of those shims? Well now’s the time to be thankful you did because having to re-shim a gun that wasn’t too bad is annoying. There are a few things to keep an eye on when doing this: Firstly it’s easier to do with the box empty, it’ll give you access to the gears when it’s closed up to feel for play, secondly be careful to check it with the box tightened up, just holding the halves together with hand pressure it might seem perfect then seize up when you tighten everything together. The aims are pretty simple- we want a decent height engagement for the motor, minimal side to side movement on all the gears, and no jamming/binding. Figure 11: the ol' poke test for movement, note in this case the box has been tightened down to account for compression of the shell when bolted up The other check to do is to check for backlash, with everything shimmed and bolted together hold either the sector gear or the bevel gear still and try to turn the other, there shouldn’t be any free play. A common cause for this is a set of gears mis-matched for the box, or one of the gears from a different manufacturer to the rest. Unfortunately I’ve yet to find a solid method beyond just trying different sets until you get one that fits well for that particular box. If you’ve got all stock gears the easiest thing to do is just not change them. Figure 12: it's really hard to photograph checking for backlash, so here's a picture of some asg scorpion gears in a jg shell, despite being a matching set they still have a tiny amount of backlash (although acceptable in this case) Step 7: final assembly So now everything’s in place the final thing is to put everything back together. This is the fun bit especially if you have to deal with the mainsring on top of everything else. First things first- get some grease around. A little bit in the cylinder, a little on the piston guide rails, and a little on the gears. I generally put a dab on the gear contact points then spin them a couple of times by hand to distribute. No need to go overboard and drown the box in grease, just enough to keep things spinning/sliding smoothly. Next fit the gears with their shims in position. I tend to rotate the sector gear to let it clear the tappet plate/piston, leave the bevel gear out for now. Next pop the piston/cylinder combo in with the tappet plate, use a pair of needle nose pliers or a screwdriver to hook the spring in position, it should sit there nicely while you continue. Next pop the anti reversal latch in (unless it’s being left out because you have a titan or such) and the bevel gear, I find rotating the bevel gear back into the anti reversal latch is sufficient in most cases to hold it in position but if it won’t play ball a strong magnet placed on the outside to hold it down works wonders. Figure 13: gearbox setup prior to adding spring and re-assembling the halves, note the orientation of the sector gear to prevent trapping the tappet plate as we reassemble. Now it’s time for the fun bit, if you have a quick release spring then this will be easier for you (as you won’t have to fight it) but I’ll pretend for now that we have to do things the awkward way. Keep pressure down on the cylinder and pop the mainspring in with it’s guide, if you angle it towards the bottom it’ll help it from trying to pop up. Once the spring guide is nested properly it should sit as long as you keep pressure on the cylinder. Figure 14: method of holding cylinder in place during re-assembly, in the actual process my left hand would be holding the spring guide in place with a screwdriver to stop it springing to freedom Then get your other gearbox half, poke your fingers through the hole where the cylinder goes and swap holding the cylinder down to that hand, this should mean you can now press the gearbox half down whilst keeping pressure on the cylinder to stop everything from going sproing. Next is the fiddly bit, the key here is ***don’t force it***, try to get everything lined up as best you can and keep pressure on the system. Often the gears, trigger bar etc won’t play nice and pop into their respective holes, you can get a 2mm alan hex or similarly sized pokey thing and wiggle them into position, you want to be going for the ones that are tight- that’ll be the one that’s currently stopping you from closing the halves. Once you get everything lined up right the halves should slide together nicely- you’ll know it when it happens. Next you want to get a couple of screws in, generally I’ll pick one at the back and one at the front just to get the thing held together, this is where having your screws in nice pots where you can grab them comes in handy. And relax…. The hard part’s over, with a couple of screws in it’ll hold itself together and you can take your time to recover the feeling in your fingers, collect your sanity and get around to bolting everything else together which from this point on is basically the reverse of how you got it apart. Step 7: checking, testing and troubleshooting Ok, so we’re done right? Not quite, still a couple of things left to do. First off you want to check your motor height and general running of the box, it’s easier to do this with the box outside the gun but sadly for v2 users you’re gonna have to bolt everything back in there before you can test fire. I generally prefer to start with the motor mesh set tightly, it’ll sound nasty but it feels preferable to potentially having it too loose and risking stripping something. Give it a fire and listen to how she sounds, gradually backing out the adjustment screw until you get to that sweet spot where she’s as quiet as she’s going to be. A dab of glue/threadlock on the adjustment screw should prevent it backing out on you mid-game but don’t go overboard in case you need to re-adjust. Now sadly that still doesn’t mean it’ll always stop whining. A well set up box can make very little noise besides the obvious pop pop of the firing mechanism, but if it’s whining then you have some things to consider: Firstly the motor height- of course if this is set to minimise noise then that likely wont be the issue Next is meshing, sadly whilst most components are reasonably standardised they’re not all perfect and different manufacturers will have slightly different shapes to the teeth etc that means unless everything matches nicely a perfectly shimmed box can still whine awfully. This is why as a general rule I advise against messing with the stock gearing. If you are changing things out at least try to stick to one manufacturer for everything from the pinion to the sector gear to minimise the risk of this happening. The photos from this thread are me re-fitting one of my ak’s for precisely this reason. Try it out in full auto and keep an ear out for the clicking that’s a sign of PME. If everything sounds good then go ahead and pop it back in the gun. The final check is to see how she shoots, start off with a chrono- check your fps as improving the compression can push you up and maybe over the limit if it was close before with poor compression, the fps consistency will also be a good measure of how much improvement has been made. The final one is the fun bit- go a shootin’ and see if it’s any better than before. Conclusions As a general rule when you’re buying from higher end manufacturers a lot of the points I’ve made about the likes of compression, shimming, aoe aren’t really relevant because they’ll already be pretty good, it’s the kind of attention to detail a better manufacturer puts into their guns above and beyond simply making them look pretty on the outside that makes them cost more and perform better out of the box and over the years. Of course you can level the playing field with some diy as above, and it’s the sort of thing that won’t hurt to at least check on any gun if you have need of opening it up. So my final caveat here is I’m not a professional tech, just someone with an engineering background who loves tinkering and experimenting as much as he loves shooting. Most of what I’ve learned has been from doing it wrong and screwing up and I’ll not lie and say that state of affairs doesn’t continue to this day. So I’m sure some of the methods I’ve covered might not be the optimal ones, or perhaps even controversial, and I’m sure the ensuing debates will make for entertaining and informative reading. However, I can at least assure you that I don’t actively endeavour to give out poor advice or speak about things I haven’t tried myself. *don’s flame suit and runs* also inb4 the pictures don't load properly.
1 point -
THE TM MWS thread
Jacket reacted to PopRocket123 for a topic
I normally don't like PDWs but that is tasty1 point -
@RossF Be careful, it may not identify as a he or she 😱1 point
-
Haven’t tested yet, but range is as good as stock 250mm barrel1 point
-
Sorry I forgot to say! Wolf Armouries1 point
-
Each to their own I guess 😜
1 point
-

Beretta cx4 smg project
Tackle reacted to HuttArmouries for a topic
Unscrews from the other side and comes apart in two pieces. Classic cheap springer or nerf gun style1 point -
So my search for a cheap as chips Tavor has ended. Unfortunately it had to be a Umarex branded one with the plastic fantastic receiver and metal gearbox rather then an S&T Nylon fibre pro jobbie. However this was very cheap at 90 euros shipped from France! https://www.lilifolies-airsoft.com/iwi-tavor-m21-noir-aeg-sportline-umarex-hop-up-1-joule-c2x12512050 Damn cheap! Thats now all of the currently released bullpup rifles I have been looking for! (Until MDR comes out!) 1X Umarex Tavor Sportline.1 point
-
Has anyone buried him in the woods yet or is it all keyboard warrior antics still?1 point
-

THE TM MWS thread
EvilMonkee reacted to Immortal for a topic
Only thing I've changed internally on mine is the bucking and nub. Shoots just fine in the woods. I'm always tempted with some of the parts listed on here but at the same time I always read a flow of issues of why it's not working. Catch 22. Maybe I'll get a second one (model variant to be different) and have a play but really I haven't seen the need to do anything. It makes people shout hit & squeak when I shoot them which is about all it needs to do. lol1 point -

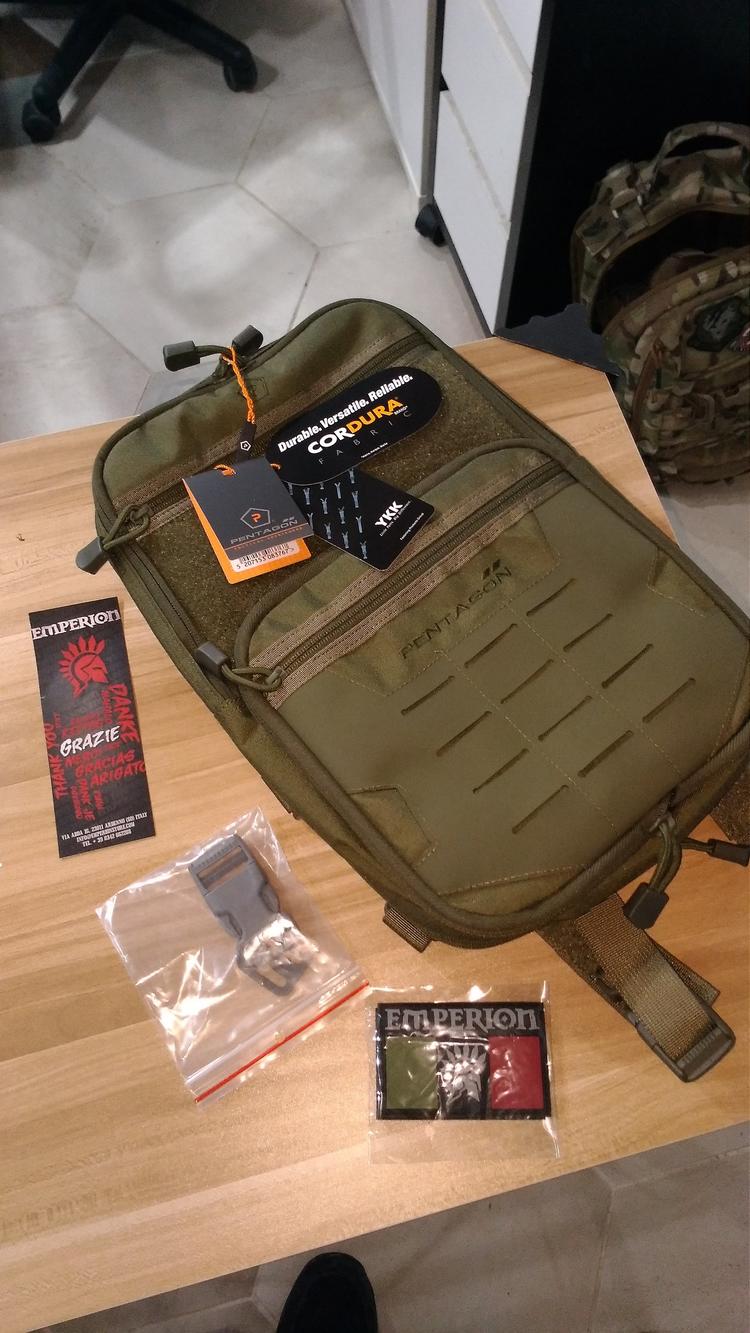
The 'What have you just bought' Thread
GothicGhost reacted to Skara for a topic
Pentagon Quick Bag in OD 1" ITW repair buckle ITW g-hook From Emperion, literally the best Italian retailer. Delivered in less than 24h.
1 point -

Gun picture thread
GothicGhost reacted to XanderShadow for a topic
latest addition to the armory. Cyma Thompson 'Typewriter' with it's included drum mag and some spare TM mid caps for less rattly play.
1 point -

Gun picture thread
GothicGhost reacted to Ujustgotsarged for a topic
Nearly finished, we gbbr m4 base, upgraded nozzle, recoil spring, barrel and bucking. Exterrnaly clone geiselle mk4 rail, mlok for grip, pts pistol grip and trigger guard, slim pdw stock, t1 on high rise, rmr on 45 degree angle and m620v torch. Still got to change the muzzle.1 point -
Hey guys! after speaking to the bank for what felt like 2 hours.. I have finally got my money back told them everything the address his family the box he sent a picture of, the rug he used to take the pictures.. everything. They put the money in in seconds. On another not as well I said paid threw f&f but in fact it came straight out of my account so I think I got a bit lucky 🍀.. they handled it perfectly. The guy Tom who delt with the call couldn’t of been nicer about things really couldn’t. The police phoned me this morning regarding the issue and I still want to take things further.. he still has the other buyers money Stephen Joyce as he paid threw f&f I’m not letting him scam another bloke who is looking for something again. Named and shamed! I’m going to phone all the sites he goes to to get him banned. Until Stephen gets his money back it’s not over yet. Also I just want to say a massive thank you to the people who helped me deal with this.. salt of the earth kind of people. I really do appreciate all the looking up, the searches everything. I felt so alone and didn’t have a clue what to do.. but use guys made it right. I’m really grateful for that. If anyone is around the Edinburgh area in the next couple of weeks for a game of Airsoft at my local I would love that 👌 cheers again Craig1 point
-

Load-Out / Loadout Picture topic
Skullchewer reacted to Helbi for a topic
Hello guys, something from Czech republic ... (Vector 21, LLM-vr .. replica) More photos ... https://www.facebook.com/BW371/ or https://www.instagram.com/371jgbkvh
1 point