Leaderboard


Popular Content
Showing content with the highest reputation on 17/12/18 in Posts
-

Gun picture thread
BibbsOnTour and 3 others reacted to SeniorSpaz87 for a topic
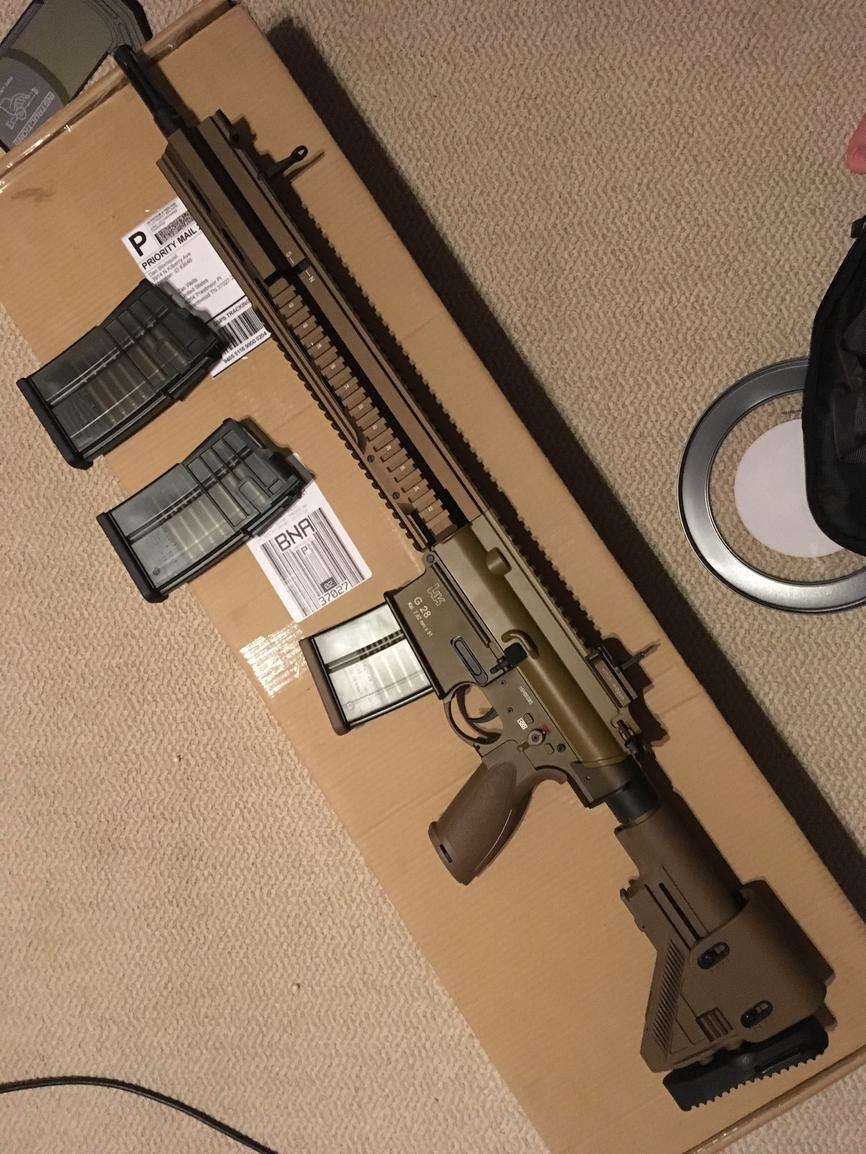
I got a new toy 4 points
 -
As a lot of threads end up with one of us recommending the Tokyo Marui MWS, and i get PM's asking about it, i figured I'd start a thread to keep all of the information in one place. Here i plan on covering a general overview of the gun, as well as upgrade parts, general maintenance and tuning. If anyone else wants to share any information, guides or even gameplay with their MWS, here is the place to do it. With that being said, lets get on with it. I've had my 2 Tm m4 GBBR's for a little over a year now, and they've got through dozens of changes to get them where they are today. Out of the box they are beautifully finished and boast impressive performance. I bought my first one from Zeroone, who price matched it for me. At the time the gun set me back £430 and the magazines £35, but they have risen quite a bit in price in most places. The gun is incredibly well finished and sports a Cerakoted receiver. Before opening the box, i didn't get what the big deal was about Cerakote, but that all changed after using it over time. The finish is VERY resistant to the hard life I've shown it, and is far more scratch resistant than any paint or anodization on any other gun I've owned. The two I have still don't have a scratch on them. At the rear is a standard m4 stock, which does its job with little wobble, but isn't the nicest one I've ever seen. The railed handguard is very solid and nicely finished with all of the correct numbered markings on the rails. From there you have your usual front triangle iron sight which DOES NOT have a sling attachment at the base. The magazines hold 35 BB's and have a Cerakoted shell to keep them from scratching easily. They have very recently started coming with silent fill valves, but are mostly the normal kind that hiss when filling and spray liquid propane when full. Its worth noting that the valve sits at an angle to the baseplate. One modification i would highly recommend to do is the "green gas mod" which involves removing a long zinc tube from inside the magazine. This allows more gas into the magazine and upping your shots per gas fill dramatically, with some people reporting 150+ shots from a single gas charge. As a side note, i have started to just cut the zinc tube about 1 inch from the base instead of removing it entirely. A video showing how to do it: Chronograph Results: using blaster .20 BB's and green gas i got around 298 fps with a deviation of 2FPS. yes, you heard that right, " FPS. This thing is incredibly consistent! Important information: The inner barrel is 250mm on the 10.5 " CQBR and the 14.5" carbine, meaning on the 14.5" outer you can fit a much longer 370mm inner barrel. The Hop up adjustment dial is similar to Tm pistols and can be located inside the upper receiver by locking the bolt back and looking down the magwell. Due to the way the outer barrel is cut, it's not possible to fit an aftermarket rail onto the gun without one of two things. A barrel adapter ring (PTS, ORGA and a couple of others make them and usually cost £10) or A dytac outer barrel, which has a wider lip, as shown below. Dytac on the left First shots: I took it down to the 20m range at the First and only shop and loaded it up with .28 blaster devils. They had multiple targets there, but i focused on the little spinning targets at the back wall. The orange discs must have been no more than 1.5 inches in diameter and i was hitting it virtually every time with the iron sights. So far, very impressed with the accuracy. So much so, I treated it to a new dress! First internal upgrades: After speaking with Dave about the gun, he explained that the gun wouldnt hop really heavy weight BB's with the standard nub. because it was hollow and squished when applying hop pressure. To remedy this he machined me a great little nub out of brass. Isn't it beautiful!? This meant i could now lift much heavier BB's increasing my range and accuracy even further than the already impressive stock performance. Using this new nub and GEOFF .32 bb''s i was able to get the bb's out 60+M with a flat trajectory. They were making a 1.5-2ft grouping on the plastic bales as seen in the video below. I have SOOO much move to cover, including barrel reviews, customs mods and a DMR build, but its 5;30 am and i need to be up in an hour, so we'll continue this tomorrow1 point
-
Think of the UKARA as more of a hurdle to thin out those that are not going to use Airsoft RIFs for their intended purpose. If you're serious about owning an Airsoft RIF then simply gain a UKARA by doing what people do when they have a UKARA - Play. It's no big deal and simple to gain the defence required.1 point
-
Yea, they are. Expensive and dangerous toys, but toys none the less.1 point
-

Does a real firearm license allow me to not be a UKARA registered player?
sonofsammo reacted to Tommikka for a topic
It is not ‘special circumstances’ for the police dog handler requiring a letter, it is catered for within the VCRA: The purposes of functions that a person has in his capacity as a person in the service of Her Majesty. To gain your firearms certificate you were required to justify your need for a firearm or firearms. I’m fairly certain that you didn’t include shooting people in that application1 point -
Verrrrry interesting. If I can never get around to affording an SRS silverback then i'll have to consider this!1 point
-
Quick update, stronger spring fitted and another 300ish shots yesterday and cylinder is still fine1 point
-
No, your firearms licence is not a valid defense for buying Airsoft replicas. It seems dumb to me but that's the law I'm afraid.1 point
-
They are different parts of the law I believe. To buy a RIF you need to acquire a defense. To prove you are an Airsofter you can get a UKARA number which you get playing Airsoft over a certain period of time. Another defense is for use in Cosplay and you can get Cosplay insurance (Though this is far less used by shops). In short, rightly or wrongly Real guns and Airsoft guns are treated very differently. You cannot use your firearms license.1 point
-

Gun picture thread
SeniorSpaz87 reacted to TheFull9 for a topic
If you don't paint that up to look like a nail gun or Nerf blaster I'll be very angry.1 point -
Maintenance: Now before i get into what i do, id like to point out that how i do it and what i use are not the only way of doing things. People use all sorts of different oils, grease and sprays to get the job done. As long as it's suitable for the job, all is well. Items: Wurth High performance dry chain lube (Teflon/ptfe spray) Wurth brake and chain cleaner Airsoft Engenuity cleaning rod Silicone oil paper towels Step 1: Remove the magazine and split the upper and lower by popping out the body pins. From there, remove the charging handle and bolt carrier group. Using the paper towel, wipe them down properly, including the channel on the underside of the charging handle. This is what mine looks like after one game day and a bit of testing. Step 2: With the moving parts cleaned, we need to move onto the upper receiver. There is no point cleaning the moving parts if the walls they're sliding against are still dirty, so wipe down the inner walls of the upper receiver as well as the grove that the charging handle runs in. Step 3: We're going to finish off the cleaning of the upper by cleaning the barrel. I use an Airsoft Engenuity Optirod because it holds cue tips at a slight angle instead of cutting little strips of tissue, but any will work just fine. I go in from the muzzle end and stop before the hop up so i don't disturb it or damage it in any way. Because i use propane, i don't get silicone oil or other crap all over the hop rubber. If you do, take a cue tip and gently push it inside and twist. you don't want to apply any sort of pressure because you're at risk of rotating the rubber ever so slightly or damaging it. Step 4: Moving on to the lower.. I have two processes that i do to the lower. One after every game, and one after every 5. The only difference is on the 5th clean i spray out the lower with brake/chain/carb cleaner. Because of how tight everything is packed in to the MWS trigger box its hard to completely clean it without removing it from the lower. with carb cleaner it will blast out all of the deposits and degrease the trigger mech completely. what will happen is the spray will run into the gaps and drip out of the trigger hole in the bottom of the lower. The spray evaporates in the air, so after about 30 seconds it will be bone dry, leaving behind a clear trigger box. For the daily clean, i just wipe down all visible surfaces with a cloth/ paper towel. In order to keep a reliable bolt lock, push the bolt release and clean the faces of the ZET plate when it lifts up. if you get crap between there, it can slow and not lock back reliably. Especially running green gas, which cycles the gun faster. Step 5: Everything is now clean, so we can start with the lube. There's lots of options out there but one thing that's important is this... SILICONE OIL IS NOT FOR METAL ON METAL PARTS. over time, silicone oil will make metal bind and is the exact opposite of what we want to do. Silicone oil is important, but only for sealing components. I use Wurth dry chain spray for 2 reasons. If it can lubricate and stand up to the temperatures of chain/sprocket contact on a 200mph motorbike, it will do just fine on our bolt moving 8" forward and back. The other reason is it isn't messy. it dries in the air and leaves a light film on the surface so it isn't going to get thrown around the inside of the gun. so give it a good spray and give it a few seconds to dry. Step 6: Back to the lower.. If you're using a spray like me, put your finger over the hop up entrance in the lower receiver and give the inside a quick spray with the lube. YOU DO NOT WANT ANY LUBE OR ANYTHING ELSE ON THE HOP RUBBER. If you're using a grease or oil, this is less of an issue (until you fire the gun and it throws it all in there anyway) Step 7: Spray your BCG and charging handle with lube. Pretty self explanatory so i didn't bother with a picture. What i do is hold the bolt by the nozzle with my thumb covering the underside of the nozzle. this stops any lube going into the nozzle chamber. Step 8: Last thing to do is lubricate the sealing parts with silicone oil. This step is only really needed if you use propane, as green gas should keep the sealing cup on the nozzle adequately lubed and i do this every 5 games. Pull the nozzle out and place a couple of drops of silicone oil between the nozzle and the BCG. On WE guns you can pull the nozzle out far enough to apple lube directly to the o ring, but you cant on an MWS without removing the nozzle, so this is as good as you can get. Like i said though, if you're using green gas, this shouldn't need to be done often. Step 9: Put it all back together because you're done!1 point