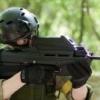
Adam3088 Posted July 17, 2015 Share Posted July 17, 2015 This does require a reasonable number of tools, quite a lot of patience and more accuracy with a drill then I have.. CASV rail can be purchased from numerous places, as far as I can tell all the clone ones are the same, got mine from ebairsoft as it was the cheapest. Be prepared for a wait if ordering from them however as the service can at times be somewhat dubious. Tools required: Dremmel Fine sand paper / wet and dry Hacksaw Drill and countersink bit Thread tap Numerous allen keys Tape measure Two blocks of wood Krylon in your colour of choice -Remove side and bottom rails from the front of your scar, you'll need to use the tool from the gas block at the front to remove two of the screws on the side rails. -At this point if you try to meet the rail with the front of the SCAR you'll notice that nothing lines up as the highlighted section will be too long. -Measure and mark off a short section to be removed, will need a bit of guesstimation but try to line the holes up to get the end of the rail as close as possible to the lower receiver, then chop it off with a hacksaw. -Smooth off the cut section + corners using a dremmel with a sanding bit, followed by some fine sand paper. -At this point I found that the top of the rail curved inwards too much to fit comfortably on my SCAR. Tried numerous ways to bend it outwards, only one which ended up working for me was lining the inside with cloth, jamming two pieces of wood inside the lower section and then forcing pliers between the blocks to wedge it out. Trying to bend it out by hand did not work at all for me, you may have more luck.. -Using the two longer screws from the original SCAR rails you should now be able to attach the main section onto the gun. However due to the front sling mount being further backwards then on the real-steel the small screw on sections will not fit.. -The two options for getting these on are to either cut a section out to allow them to fit around the sling, or to do what I did and make some new holes. Both methods are a pain, but cutting out sections will be the more secure method. Wasn't convinced I could get it accurate enough however, so went for drilling. -Careful measurement and drilling is very important at this point, mine was pretty rubbish so the screws are now at slight angles. -Once drilled you'll need to tap a thread into the new holes, make sure to smooth off both sides using a dremmel / file -Do not screw on these bits yet, the supplied screws are slightly too long which will cause them to bite into your gun, resulting in bad times. Using a dremmel or a file and lots of patience, reduce the length of the screws -The two holes in the underneath will need to be countersunk, not sure if my bit was just rubbish or if the metal isn't great for it but it got chewed fairly badly on mine, took some smoothing -Spray with Krylon/other popular brand of paint! -Before screwing the rail on you'll need two washers of reasonable thickness to go between it and the underneath of the barrel, without these the screws will clamp down on the inner barrel, stopping the hopup from pushing back correctly and causing all kinds of weird feeding issues (took me a while to work that one out..) -Affix tape to the edge of the small screw on rails which will be next to your gun, helps prevent scratching. Then attach rails with a lot of threadlock. Think that's about it, will most likely add on the bits I've forgotten at a later date.. Link to comment Share on other sites More sharing options...
straffham Posted July 17, 2015 Share Posted July 17, 2015 Looks pretty mean, nice job! Link to comment Share on other sites More sharing options...
Marc.RG1 Posted July 20, 2017 Share Posted July 20, 2017 Awesome, great write up, thank you.. does look pretty cool as well and i like that mag.. ATB, Marc.. Link to comment Share on other sites More sharing options...

Recommended Posts
Archived
This topic is now archived and is closed to further replies.